
Adobe After Effects 123
「『 Motion Tools 2』と『 Motion Tools Pro』は一体なにが違うんだろ…(゚∀゚;)」
似てるようで全然ちがーうっ( Д ) =͟͟͞͞ ⊙ ⊙
「調べるの面倒だから誰か簡単にまとめてくれないかなー」
「『 Motion Tools Pro』の使い方、簡単でいいから誰か教えてくれ…_(┐「ε:)_」
と思ってる人も多いのではないでしょうか!?
そんなズボラなお悩みを解決すべく
今回は 2023年1月13日に『 Motion Tools 2』のアップグレード版としてリリースされた『 Motion Tools Pro』の機能や使い方を徹底解説していきたいと思います。
UIも一新されて新機能の追加やツールパネルのカスタマイズ性もかなり向上してるので
旧バージョンである『 Motion Tools 2』との違いも含めて解説していきます。
なが〜い記事ですが…ぜひ最後まで読んでいただけると嬉しいです。
*『Motion Tools Pro』のインストール方法やアクティベート(アカウント認証)方法については以下の記事をご参照ください⬇︎⬇︎
*【最新!!完全版!!】『Motion Tools Pro』のカスタマイズ方法や20種類のツールの紹介、zxpインストール、アクティベート方法などを徹底解説した動画はこちら⬇︎⬇︎
目次
- 旧バージョン『Motion Tools 2』と新バージョン『Motion Tools Pro』の違いとは!?
- 『Motion Tools Pro』の機能や使い方
- 『Motion Tool Pro』ツールパネルのカスタマイズ方法
- 『Motion Tools Pro』アップデート
- 最後に
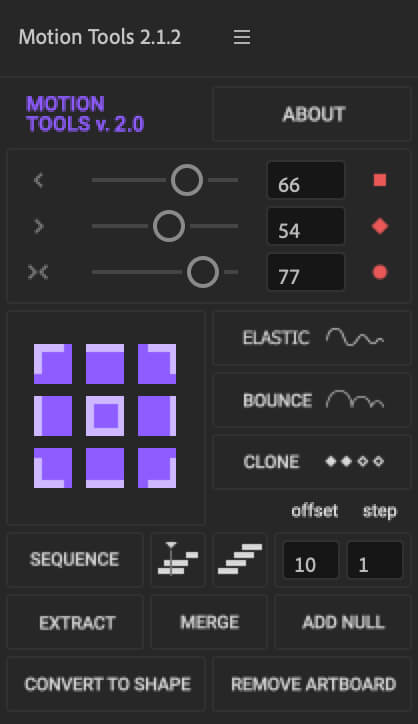
旧バージョン『Motion Tools 2』と新バージョン『Motion Tools Pro』の違いとは!?
まずは旧バージョン『 Motion Tools 2』と新バージョン『 Motion Tools Pro』の違いを要約してまとめて紹介していきます。
新バージョン『Motion Tools Pro』の機能一覧はこちら⬇︎⬇︎
- Elastic ▶︎ 選択したプロパティーにエラスティック(弾むような効果)のエクスプレッションを追加
- Add Parent Null ▶︎ 選択したレイヤーに親ヌルを追加
- Bounce ▶︎ 選択したプロパティーにバウンス(跳ね返るような効果)のエクスプレッションを追加
- Clone ▶︎ 選択したキーフレームをシークバーの位置に複製、反転複製
- Extract Shapes ▶︎ シェイプレイヤーから選択したシェイプを抽出(Extract)
- Merge Shapes ▶︎ 選択したシェイプレイヤーを1つのレイヤーにまとめる(Merge)
- Nulls To Point ▶︎ パスが null オブジェクト、または null を指すようにする
- Slider To Path ▶︎ パスに沿ってスライダーでコントロールできるヌルを作成
- Fix Keys Time ▶︎ 選択したキーフレームをフレームに揃える
- ◉ Collect Colors ▶︎ レイヤー内の存在する全ての色を抽出
- ◉ Add Limb ▶︎ 手足を作るリムを作成
- ◉ Unprecomp ▶︎ 選択したコンポジションを分解
- ◉ Duplicate Comp ▶︎ 選択したコンポジションやその中に存在するプリコンポジションまで全て複製
- ◉ Crop Comp ▶︎ 選択したコンポジションを中身のフッテージサイズに合わせてクロップ
- ◉ Loop In/Out ▶︎ 選択したプロパティーにループ(繰り返す効果)のエクスプレッションを追加
- Ease Keyframes ▶︎ キーフレームのイージング(カーブ)制御
- Selector ▶︎ レイヤー内に存在するパス、塗り、ストロークをそれぞれ一括選択
- Move Anchor Point ▶︎ アンカーポイントの移動
- Sequencer ▶︎ レイヤーの再配置
- ◉ Ease Copy ▶︎ イージング(カーブ)情報のコピー&ペースト
◉がついている項目が新機能です(=゚ω゚)ノ
2023年5月23日に『Motion Tools Pro』がアップデートされ『v1.1.3』がリリースされ、さらに5つのツールが追加されました。
*『v1.1.3』の追加機能をまとめた記事はこちら⬇︎⬇︎
今回のアップグレードで旧バージョン『Motion Tools 2』ではあった以下の機能が廃止されてます⬇︎⬇︎
- イージングスライダーの数値入力設定
- キーフレーム補間の切り替えボタン
- レイヤーの整列、配列基準の設定機能
- 『CONVERT TO SHAPE』▶︎ .ai データのシェイプ化
- 『REMOVE ARTBOARD』▶︎ .ai データのアートボードの削除
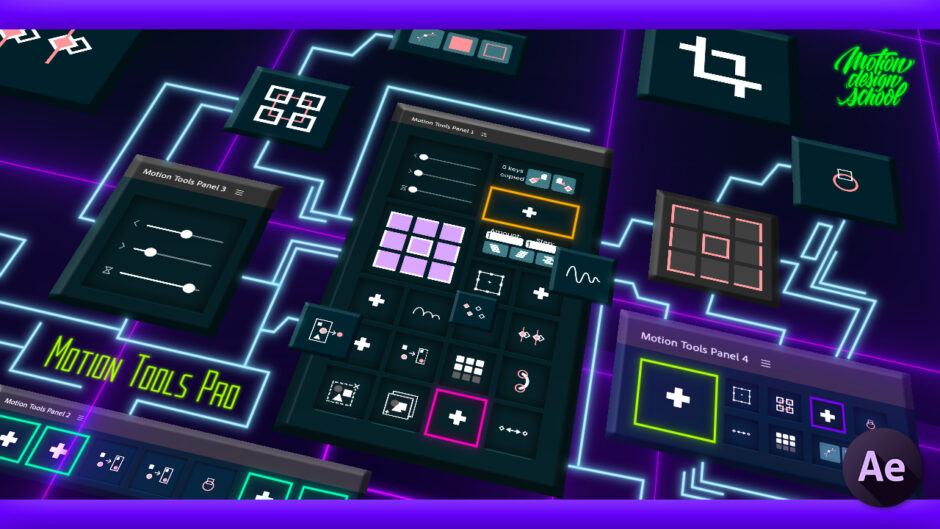
注目したいのがツールパネルのカスタマイズ性はかなり向上している点です。
新たにツールパネルでカスタマイズ可能になった項目は以下の通りです⬇︎⬇︎
- ◉ ツールパネルを4つまで作ることができる
- ◉ 各パネルごとパネルカラー、ボタンカラー・サイズ・間隔などを設定できる
- ◉ ボタンの配置、アイコン、アイコンカラーを設定できる
- ◉『Function』の全ツールはボタンアイコンをオリジナルに設定できる
- ◉『Scripts』の全ツールはボタンアイコンのカラーを細かく調整できる
他のユーティリティーツールで賛否両論あった『ツールパネルのタブ問題』を見事に解消できる仕様に変更してきましたね( ´ ▽ ` )

ワンクリックでも少なくして作業効率化するためのツールなのに
タブのクリックが増えたら意味がないってお話ですね( ;∀;)
各パーツのカラーやサイズを細かく調整できたり、ボタンアイコンやツールパネルの背景としてオリジナル画像やgifを設定することもできます。
4つのパネルに自由にカスタマイズできるので、これはハマると沼ですね…

『Motion Tools Pro』の機能や使い方
『Motion Tools Pro』の機能や使い方を『After Effects』初心者の方にもわかるように詳しく解説していきます。
内容が多いので見たいところまで飛ばしてみてください⬇︎⬇︎
- Elastic(旧 ELASTIC)
- Bounce(旧 BOUNCE)
- 【NEW】Loop In/Out
- Clone(旧 CLONE)
- 【NEW】Fix Keys Time
- Add Parent Null(旧 ADD NULL)
- 【NEW】Nulls To Point
- 【NEW】Slider To Path(不具合あり)
- Extract Shapes(旧 EXTRACT)
- Merge Shapes(旧 MAEGE)
- 【NEW】Unprecomp
- 【NEW】Duplicate Comp
- 【NEW】Crop Comp
- 【NEW】Collect Colors
- 【NEW】Add Limb
- Ease Key Frames
✔︎ イージーイーズアウトスライダー
✔︎ イージーイーズインスライダー
✔︎ イージーイーズスライダー - 【NEW】Selector(不具合あり)
- Move Anchor Point
- Sequencer
- 【NEW】Ease Copy

カーソルを合わせると表示される英語の和訳はこちらにまとめてます⬇︎⬇︎
【Elastic】
Click - Places elastic expression and one common Controller for all selected properties +Shift - Places controllers for every selected properties. +Alt - Creates Control Layer and places controllers on it.
Click ▶︎ 選択したすべてのプロパティにエラスティック エクスプレッションと 1 つの共通コントローラを配置します。
Shift + Click ▶︎ 選択したすべてのプロパティにコントローラを配置します。
Alt + Click ▶︎ コントロール レイヤーを作成し、その上にコントローラーを配置します。
【Bounce】
Click - Places bounce expression and one common Controller for all selected properties +Shift - Places controllers for every selected properties. +Alt - Creates Control Layer and places controllers on it.
Click ▶︎ 選択したすべてのプロパティにバウンス エクスプレッションと 1 つの共通コントローラを配置します
Shift + Click ▶︎ 選択したすべてのプロパティにコントローラを配置します。
Alt + Click ▶︎ コントロール レイヤーを作成し、その上にコントローラーを配置します。
【Loop In/Out】
Click - Add Cycle Loop expression to selected properties
Click+Alt - Add Ping-Pong Loop expression to selected properties Click+Shift - Add Offset Loop expression to selected properties Click+Ctrl - Add Continue Loop expression to selected properties
Click ▶︎ 選択したプロパティにサイクル ループ式を追加
Alt + Click ▶︎ 選択したプロパティに Ping-Pong Loop 式を追加 Click+Shift – 選択したプロパティに Offset Loop 式を追加
Ctrl + Click ▶︎ 選択したプロパティに Continue Loop 式を追加
【Clone】
Click - Clone selected keys from Playhead Alt+Click - Clone keys from Playhead and select them Shift+Click - Reversal clone
Click ▶︎ 再生ヘッドから選択したキーを複製
Alt + Click ▶︎ 再生ヘッドからキーを複製し、それらを選択
Shift + Click ▶︎ 逆複製
【Fix Keys Time】
Fixes keys time depending on selection: 1) Selected keys 2) All
keys on selected layers 3) All keys in composition if no layers are selected 4) All keys on selected compositions 5) All keys on project if no layer or item is selected
選択したキーフレームの時間を修正します。
1) 選択されたキー
2) すべて選択したレイヤーのキー
3) レイヤーが選択されていない場合、コンポジションのすべてのキー
4) 選択したコンポジションのすべてのキー
5) レイヤーまたはアイテムが選択されていない場合、プロジェクトのすべてのキー
【Add Parent Null】
Add Parent Null to selected Layers
Click ▶︎ 選択したレイヤーに親ヌルを追加
【Add Parent Null】
Click - Will be created nulls and then linked to points on selected path. They will follow points on path. Alt+Click - Will be created nulls and then points on selected path will be linked to them. Points will follow nulls position.
Click ▶︎ ヌルが作成され、選択したパス上のポイントにリンクされます。 これらはパス上のポイントに従います。
Alt + Click ▶︎ ヌルが作成され、選択したパス上のポイントがそれらにリンクされます。 ポイントはヌル位置に従います。
【Slider To Path】
Click - Position of newely created null will follow path and will be driven by slider. Alt+Click - Creates predefined number of nulls. They will be distributed evenly on path. Their position will follow path and will be driven by slider.
Click ▶︎ 新しく作成されたヌルの位置はパスに従い、スライダーによって駆動されます。
Alt + Click ▶︎ 定義済みの数のヌルを作成します。 それらはパス上で均等に分散されます。それらの位置はパスに従い、スライダーによって駆動されます。
【Extract Shapes】
Click - Merge and delete SourceLayers or Properties if it needs
Alt+Click - Merge ShapeLayers
Click ▶︎ シェイプレイヤーまたは選択したシェイプを分解して削除
Alt + Click ▶︎ ソースレイヤーを分解または選択したシェイプを抽出
【Merge Shapes】
Click - Merge and delete Source Layers or Properties if it needs Alt+Click - Merge Shape Layers
Click ▶︎ 必要に応じてソース レイヤーまたはプロパティを結合して削除する
Alt + Click ▶︎ シェイプ レイヤーを結合する
【Collect Colors】
Parses all the colors in the selected layers. All unique colors are added to a new layer controller, and all repeating colors are parented to the unique ones in the controller. Then, it deletes the unused colors in Fill and Stroke (optional). Also collects colors from Layer Styles such as Stroke and Color Overlay.
選択したレイヤーのすべての色を解析します。 すべての固有の色は新しいレイヤ コントローラに追加され、すべての繰り返しの色はコントローラ内の固有の色の親になります。 次に、塗りと線の未使用の色を削除します (オプション)。 また、ストロークやカラー オーバーレイなどのレイヤー スタイルから色を収集します。
【Unprecomp】
Unprecomp all layers from the selected composition
選択したコンポジションからすべてのレイヤーをプリコンプ解除
【Duplicate Comp】
Duplicate selected comp and update expressions
選択したコンポーネントを複製してエクスプレッションを更新する
【Crop Comp】
Precompose selected layers to cropped composition
選択したレイヤーをプリコンポジションしてクロップしたコンポジションにする
【Add Limb】
Add Limb to selected comp
選択したコンプにリムを追加
Elastic
『Elastic』はボヨヨーンと一旦広がって縮む弾むようなエクスプレッションをワンボタンでつけることができるツールになります。
例えば…
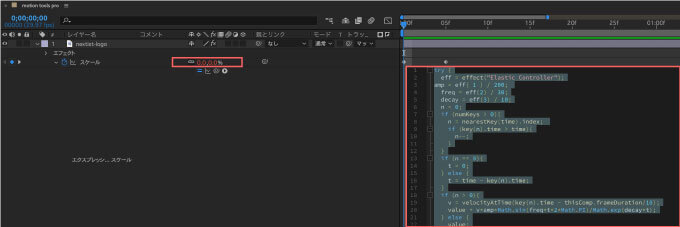
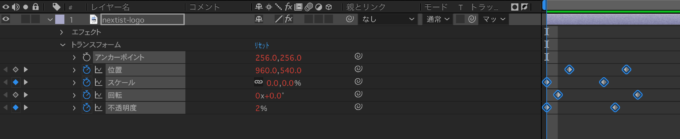
サイズのプロパティーに0% ▶︎100%に拡大するアニメーションをつけます。

両方のキーフレームを選択した状態で『Elastic』ボタンを押すと
スケールプロパティーにエクスプレッションが追加され弾むようなアニメーションがつきます。
『Elastic』適用前後を比較すると以下のような感じです⬇︎⬇︎


ボヨヨ〜〜ンと弾むようなエラスティック効果を簡単につけることができます٩( ᐛ )و
選択した全てのプロパティーに同時に適用することもできます。
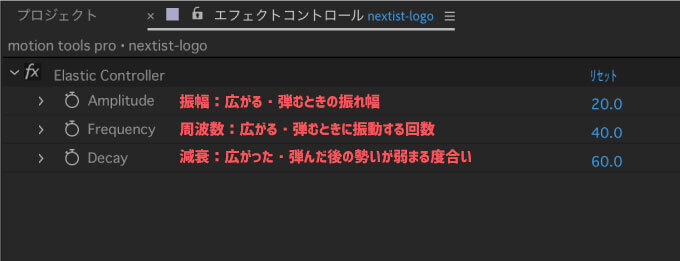
『Elastic』を適用するとエフェクトコントロールパネルにエラスティックコントロールエフェクト『Elastic Controller』が追加されて
3つのエフェクトプロパティーでボヨヨ〜〜ンと弾むようなエラスティック効果の度合いを調整することができます。
ちなみに『Elastic』ボタンをWindowsの方は alt、Macの方は optionを押しながらクリックすると
エラスティック効果を調整できるコントローラー『Elastic Controller』のついたレイヤーが新たに作成されます。
複数レイヤーのコントロールプロパティーを同時に1つのコントローラー『Elastic Controller』で制御したい場合に便利ですd(゚∀゚)
Bounce

『Bounce』は指定したプロパティーに跳ね返り(バウンド)効果のエクスプレッションをワンボタンでつけることができるツールになります。
例えば、位置のプロパティーにキーフレームを打ってアニメーションをつけて
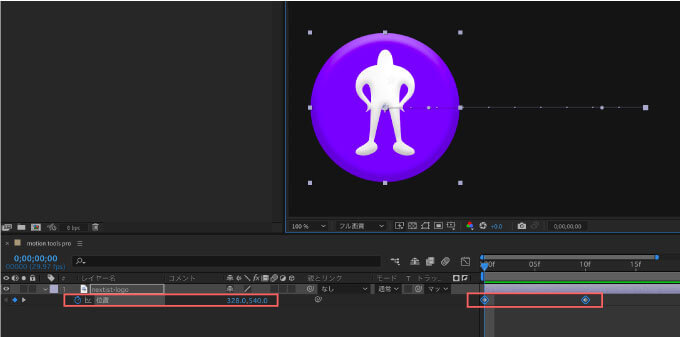
キーフレームを選択した状態で『Bounce』ボタンを押すと、位置のプロパティーにエクスプレッションが追加されて、跳ね返るようなアニメーションがつきます。

『Bounce』適用前後を比較すると以下のような感じです⬇︎⬇︎

エンドポイント=位置キーフレームの終了点で跳ね返るようなアニメーションをつけることができます。
選択した全てのプロパティーに同時に適用することもできます。
『Bounce』を適用するとエフェクトコントロールパネルにバウンスコントロールエフェクト『Bounce Controller』が追加されて、4つのエフェクトプロパティーで跳ね返るようなバウンス効果の度合いを調整することができます。
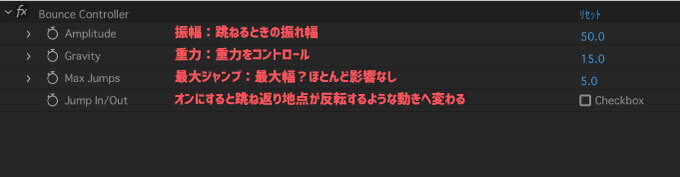
『Jump In/Out』に『Checkbox』チェックを入れると跳ね返りが反転するようなアニメーションになります。

『Bounce』の『Jump In/Out』をONにしてスーパークリボーのアニメーションを作ってみました٩( ᐛ )و w クリボーの着地に使ってるイメージですd(゚∀゚)
ちなみに『Bounce』ボタンをWindowsの方は alt、Macの方は optionを押しながらクリックすると
バウンス効果を調整できるコントローラー『Bounce Controller』のついたレイヤーが新たに作成されます。
複数レイヤーのコントロールプロパティーを同時に1つのコントローラー『Bounce Controller』制御したい場合に便利ですd(゚∀゚)
Loop In/Out
『Loop In/Out』は選択したプロパティーに繰り返す効果(ループ)のエクスプレッションを追加することができるツールになります。
例えば、位置プロパティーにキーフレームを打って、左右に移動する動きをつけます。
キーフレームを選択した状態で『Loop In/Out』ボタンを押すと、位置のプロパティーに繰り返し効果(ループ)のエクスプレッションが追加されます。

『Loop In/Out』適用前後を比較すると以下のような感じです⬇︎⬇︎

『Loop In/Out』ボタンを alt or optionを押しながらクリックすると『ピンポンループ』

『Loop In/Out』ボタンをShiftを押しながらクリックで『コンティニューループ』

コンティニューループは直前のスピードを保ったまま動き続けますd( ̄  ̄)
『Loop In/Out』ボタンを Ctrl or commandを押しながらクリックで『オフセットループ』??
オフセットループは基本の動きがエスカレートしていくエクスプレッションですが、これはうまく機能しませんでした… 本家のチュートリアルでも解説がない…_(┐「ε:)_
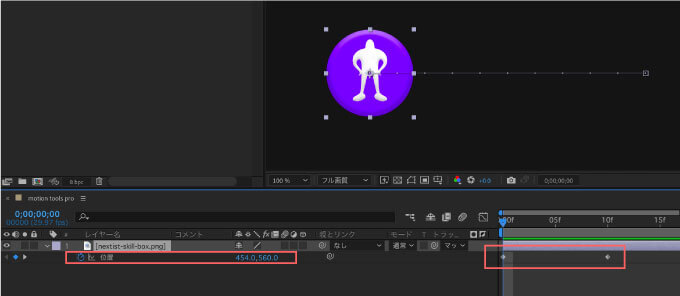
Clone
『Clone』はキーフレームを複製したり、反転複製できるツールになります。
複製したいキーフレームを選択した状態で『CLONE』ボタンを押すとシークバー(時間インジケーター)の位置にキーフレームが複製されます。
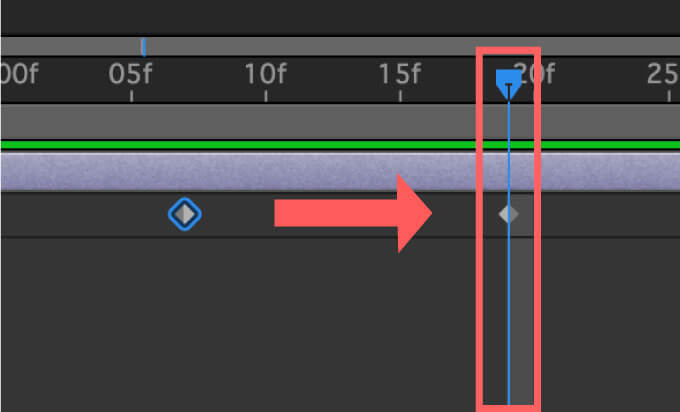
複数のレイヤーを跨いで複数のキーフレームを複製することもできます。
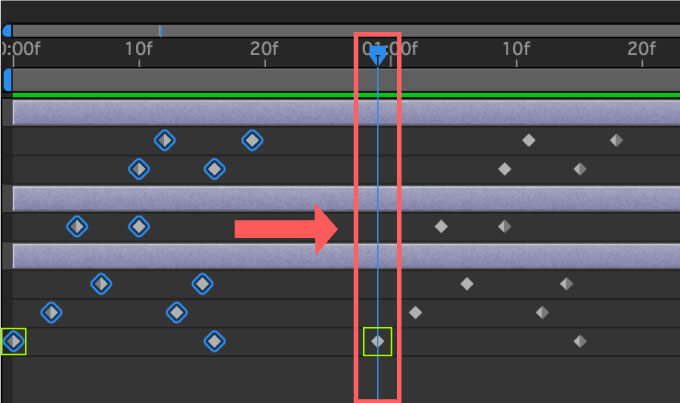
先頭のキーフレームからシークバーの位置に複製されます٩( ᐛ )و
ちなみにキーフレームを選択した状態で Shifを押しながら『Clone』ボタンをクリックすると
シークバー(時間インジケーター)を軸に反転複製できます。
反転複製を使えば、出てから消えるみたいなトランジションやアニメーションなどは、開始点のキーフレームを作って反転複製するば完成するので便利です。
購入したアニメーションプリセットが開始点のキーフレームしか打ってない場合にも便利ですねd(゚∀゚)
【NEW】Fix Keys Time
『Fix Key Time』は選択したキーフレームを近くのフレームレートに合わせて揃えるツールになります。
選択したキーフレームやコンポジション内のキーフレームなど、近くのフレームレートに合わせて一括で揃えることができます。
【キーフレームを選択して適用】
選択したキーフレームが近くのフレームレートに合わせて揃う。
【レイヤーを選択した状態適用】
レイヤー内のすべてのキーフレームが近くにフレームレートに合わせて揃う。
【レイヤーやキーフレームが選択されていない状態で適用】
コンポジション内のすべてのキーフレームが近くのフレームレートに合わせて揃う。
【レイヤーまたはアイテムが選択されていない状態で適用 】
プロジェクト内のすべてのキーフレームが近くのフレームレートに合わせて揃う。
Add Parent Null
『Add Parent Null』は選択したレイヤーに親ヌルを作ってくれるツールになります。
ヌルに紐付けしたいレイヤーを選択した状態で『Add Parent Null』ボタンを押すと、選択したレイヤーをリンクした親ヌルを作成してくれます。
【NEW】Nulls To Point
『Nulls To Point』は選択したシャイプパスの各ポイントの位置プロパティーにリンクしたヌルを自動で作成してくれるツールになります。
シェイプパスを選択した状態で『Nulls To Point』ボタンを押すとパスの各ポイントの位置プロパティーにリンクしたヌルが作成されます。
『Nulls To Point』ボタンが使えるのはシェイプパスのみでマスクパスには適用できませんd( ̄∀ ̄;)
ちなみにシェイプパスを選択した状態で altor optionを押しながら『Nulls To Point』ボタンをクリックすると
シェイプパスの各ポイントに位置プロパティーにリンクしていないヌルが作成されます。
【NEW】Slider To Path(不具合あり)
『Slider To Path』はパスに沿って動くヌルを作成し、スライダーで動かすことができるツールになります。
『Slider To Path』を適用するとエフェクトプロパティー『Progress』でパスに沿ってヌルを動かすことができます。
私のMac▶︎After Effectsでは機能しませんでした…_(┐「ε:)_
Extract Shapes
『Extract Shapes』は1つにまとめられたシェイプレイヤーの中から選択したシェイプレイヤーを抽出して、新たに個別のレイヤーとして分けてくれるツールになります。
1つのレイヤーにまとめられたレイヤーの中から取り出したいシェイプレイヤーを選択した状態で『Extract Shapes』ボタンを押すと、選択したシェイプレイヤーを抽出して1つずつ個別のレイヤーに分けてくれます。
まとめられたシェイプレイヤー自体を選択した状態で『Extract Shapes』ボタンを押すと、レイヤー内のシェイプレイヤーをそれぞれ個別のレイヤーに分解してくれます。
ちなみに抽出したいシェイプレイヤーを選択した状態で altor optionを押しながら『Extract Shapes』ボタンをクリックすると
選択したシェイプレイヤーを複製した状態で、選択したシェイプレイヤーをそれぞれ個別のレイヤーに分けてくれます。
まとめられたシェイプレイヤー自体を選択した状態で altor optionを押しながら『Extract Shapes』ボタンを押すと
まとめられたシェイプレイヤーを複製した状態で、選択したレイヤーに含まれるそれぞれシェイプレイヤーをそれぞれ個別のレイヤーに分けてくれます。
Merge Shapes

『Marge Shapes』は選択したシェイプレイヤーを1つのレイヤーにまとめてくれるツールになります。
1つのレイヤーにまとめたいシェイプレイヤーを選択した状態で『Marge Shapes』ボタンを押すと、選択したシェイプレイヤーを1つのレイヤーにまとめてくれます。
ちなみに1つにまとめたいシェイプレイヤーを選択した状態で altor optionを押しながら『Merge Shapes』ボタンをクリックすると
選択したシェイプレイヤーを残した状態で、新たに選択したシェイプレイヤーをまとめたレイヤーが作成されます。
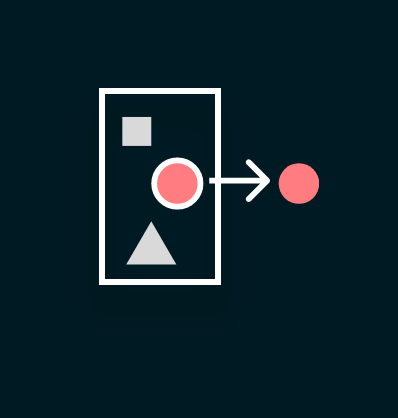
【NEW】Unprecomp
『Unprecomp』は選択したプリコンポジションを分解してくれるツールになります。
プリコンポジションを選択した状態で『Unprecomp』ボタンをクリックすると、選択したプリコンポジション内に含まれる全てのレイヤーがヌルにリンクした状態で分解されます。
分解するプリコンポジションにキーフレームを打っている場合は、そのまま新規作成されたヌルレイヤーに引き継がれます。
引き継がれるのはデフォルトのプロパティーに設定されたパラメーターのみで、エフェクトなど他の設定は引き継がれませんd( ̄  ̄)
ちなみに分解したいプリコンプを選択した状態で altor optionを押しながら『Unprecomp』ボタンをクリックすると
プリコンプは残したまま、プリコンプ内のレイヤーがヌルにリンクした状態で複製されます。
【NEW】Duplicate Comp
『Duplicate Comp』は選択したコンポジションやその中に存在するプリコンポジションまで全て複製してくれるツールになります。
コンポジションを選択した状態で『Duplicate Comp』ボタンをクリックすると、選択したコンポジションが複製されます。
「ん!?通常の複製と何が違うの!?」と思いますよね。
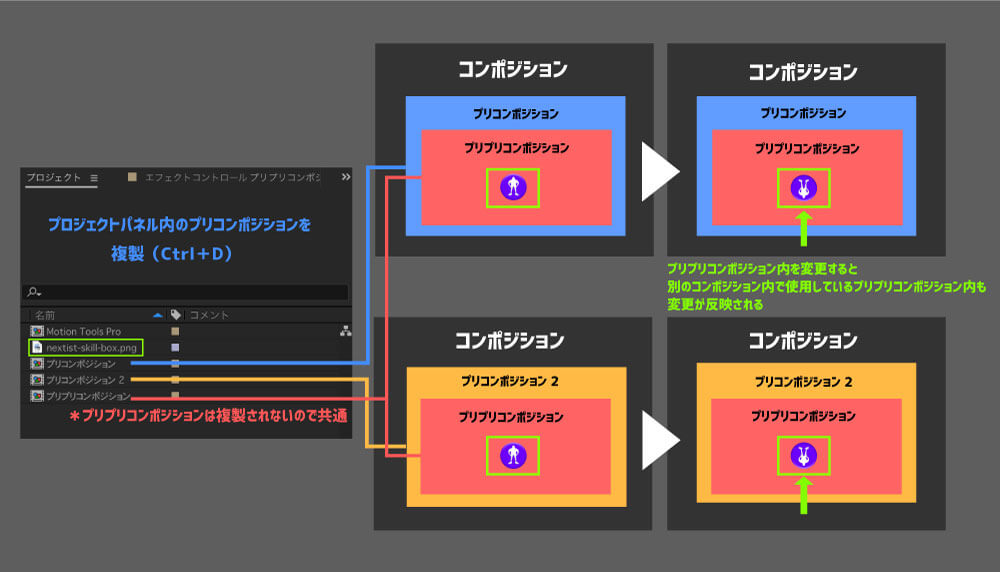
例えば、プリコンポジションの中にさらにプリコンポジションを作って、そのコンポジションをプリプリコンポジションという名前だとします。
通常の複製の場合は、プロジェクトパネル内でコンポジションを複製すると、コンポジション内にあるコンポジション(プリコンポジションやプリコンポジション)は複製されません。
この場合、プリコンポジションやプリプリコンポジションを複数の別のコンポジションでも利用しているとしたら…
どれか1つのプリコンポジションやプリプリコンポジションの中にあるレイヤーを変更すると、他に共通のプリコンポジションやプリプリコンポジションを使用しているレイヤーも全て変更が反映されてしまいます。
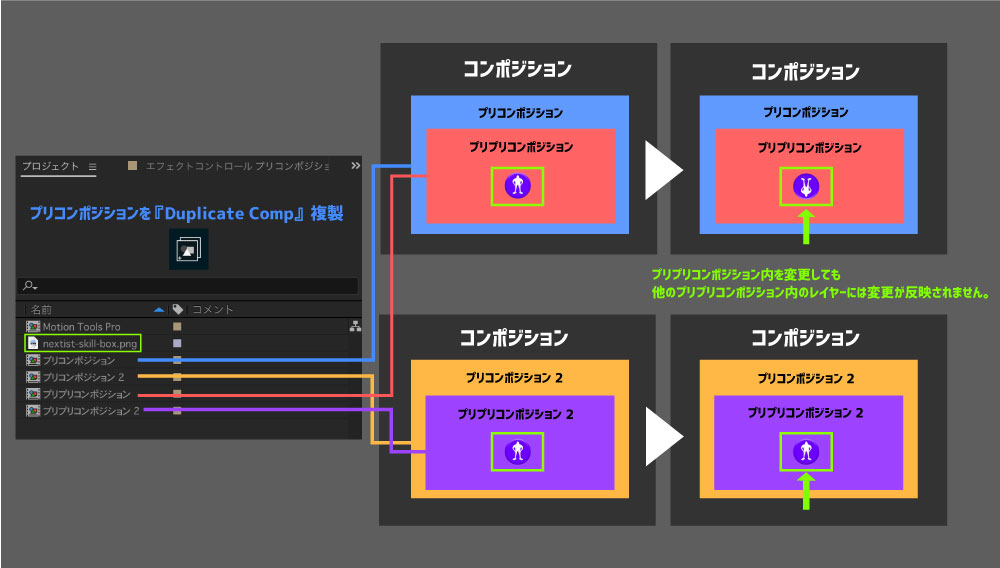
そこで『Duplicate Comp』ボタンを使ってコンポジションを複製すると、コンポジションの中にあるプリコンポジションやプリコンポジション内にあるコンポジション(プリプリコンポジション)も複製されるので

プリコンポジションやプリプリコンポジション内にあるレイヤーを変更しても、他のプリコンポジションやプリプリコンポジション内のレイヤーには変更が反映されません。
ちなみに複製したいコンポジションを選択した状態で altor optionを押しながら『Duplicate Comp』ボタンをクリックすると
複製されたコンポジションを全てフォルダに入れて分けてくれるのでわかりやすいです。

【NEW】Crop Comp
『Crop Comp』は選択したコンポジションのサイズをそのコンポジション内にあるフッテージのサイズにクロップしてくれるツールになります。
例えば、クロップしたいコンポジションを選択した状態で『Crop Comp』ボタンをクリックするとアンカーポイントのような解析センサー?が動き出します。
しばらく待つとコンポジション内のフッテージのサイズに合わせてコンポジションサイズがクロップされます。
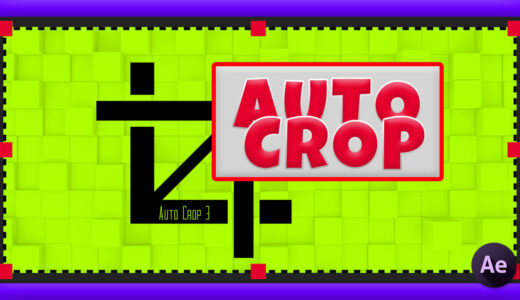
この『Crop Comp』機能を備えて、他にもアニメーションのついたコンポジションも自動認識してクロップしてくれたりする便利なスクリプト『Auto Crop』があります。
有料プラグインですが価格は1000~1500円くらいと安価で費用対効果も高いので、気になる方はぜひ以下の記事を参考にしてみてください⬇︎⬇︎
【NEW】Collect Colors
『Collect Colors』は選択したレイヤー内に存在するすべての色を抽出してくれるツールになります。
例えば、カラーの情報を抽出したいレイヤーを選択した状態で『Collect Colors』ボタンをクリックすると、選択したレイヤー内に存在する塗りや線のカラーを全て抽出した『Style Layer』を作成してくれます。
これは地味に便利٩( ᐛ )و
【NEW】Add Limb
『Add Limb』は手足を作るリムを追加することができるツールになります。
リムを使えば躍動感のある手足のアニメーションを作ることができます。
Ease Keyframes
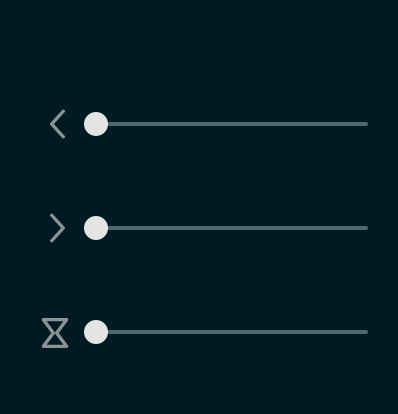
『Ease Keyframes』はキーフレームのイージング(カーブ)をスライダーでコントロールできるツールになります。
上から順にイージーイーズアウトスライダー、イージーイーズインスライダー、イーズイーズスライダーとなっています。
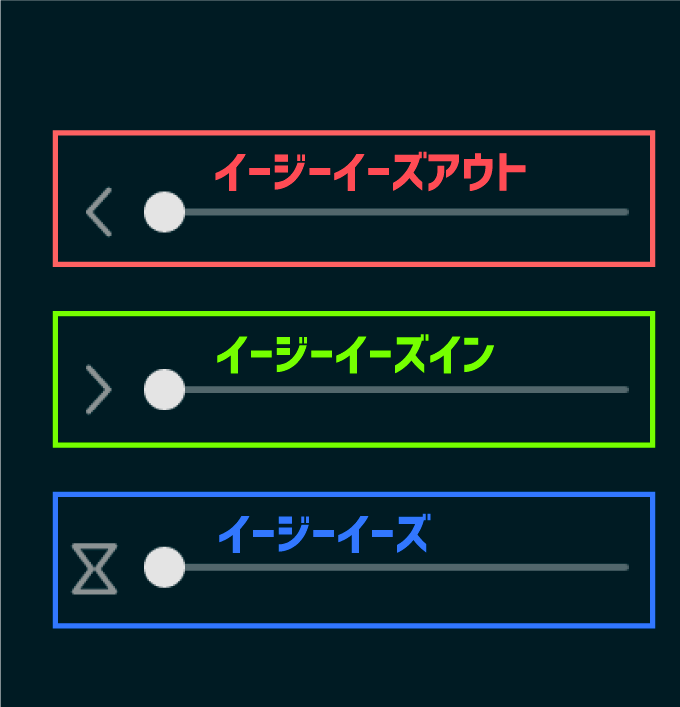
イージーイーズアウトは動き出しが緩やかになればなるほどアウト点に向かって加速するグラフ形状となります。

キーフレームを選択した状態で一番上のスライダーを右側に動かすだけで、素早くイージーイーズアウトを適用することができます。
イージーイーズアウトは動き出しが緩やかになればなるほどアウト点に向かって加速するグラフ形状になるので
スライダーの数値を上げれば上げるほどイン点からのカーブは緩やかになり、アウト点のカーブは急になります。
通常はイージーイーズアウトを適用した後に手動でカーブを調整する必要があるので、スライダーを調整するだけでカーブをコントロールできるのはかなりに便利です٩( ᐛ )و
イージーイーズインは終了点に向かっての動きが緩やかになればなるほど、開始点の動きが加速するグラフ形状となります。
キーフレームを選択した状態で2番目(真ん中)のスライダーを右側に動かすだけで、素早くイージーイーズインを適用することができます。
イージーイーズインは終了点に向かっての動きが緩やかになればなるほど、開始点の動きが加速するグラフ形状となるので、スライダーの数値を上げれば上げるほど終了点近くのカーブは緩やかになり、開始点のカーブは急になります。
イージーイーズはスライダーの数値を上げれば上げるほど開始点と終了点の両方のカーブを同時に緩やかにすることができます。

キーフレームを選択した状態で3番目(一番下)のスライダーを右側に動かすだけで、素早くイージーイーズを適用することができます。
イージーイーズは数値を上げれば上げるほど開始点と終了点の両方のカーブが同時に緩やかになって、中間点のカーブが急になります。
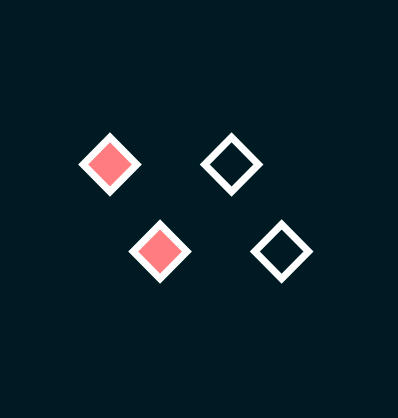
【NEW】Selector(不具合あり)
『Slector』はおそらくですが…
左がパス、真ん中が塗り、右がストロークを複数のシェイプから一括選択できるツールかと思います。
Mac▶︎『After Effects(最新.ver)』では左側のボタンは全選択、真ん中と右のボタンはレイヤーに含まれる全てのシェイプパスを選択表示してくれます。
現在のバグ状態で使い道があるとすれば…
1つのレイヤー内にまとめられたシェイプを一括選択して塗りやストロークの色を一括で変更したり
レイヤー内のシェイプのプロパティーを全て一括でを変更したい場合に
1つずつシェイプを選択しなくても『Selecter』真ん中、もしくは右側のボタンで一括選択できます。
不具合があるようなので使い方があってるのかはわかりませんが、きちんと使えれば便利そうなので早くバグを改善してほしいですね…_(┐「ε:)_
Move Anchor Point

『Move Anchor Point』はアンカーポイントをワンボタンで移動できるツールになります。
アンカーポイントを変更したいフッテージを選択した状態で、アンカーポイントを移動させたい場所をクリックするれば、9箇所へワンクリックで移動させることができます。
これは地味に便利ですd( ̄  ̄)
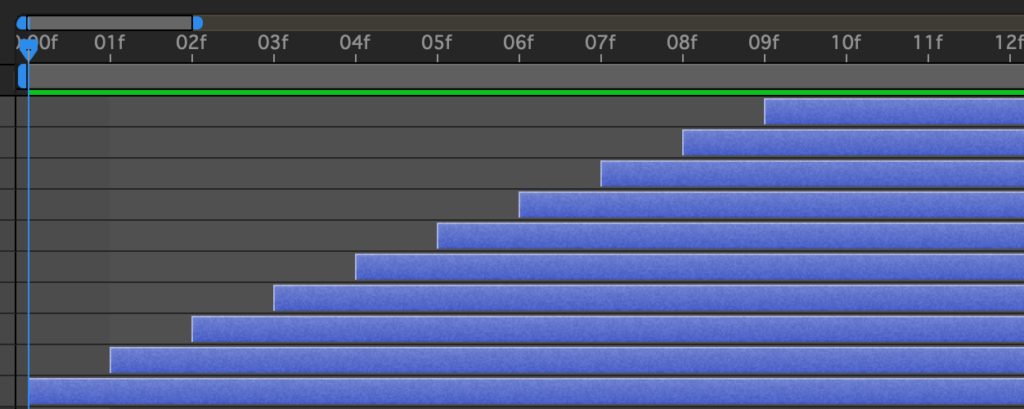
Sequencer
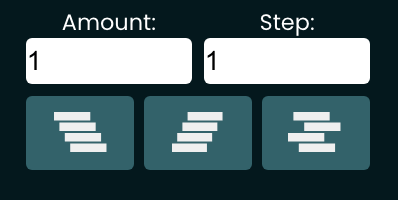
『Sequencer』は選択したレイヤーを再配置できるツールになります。
現在 Mac▶︎『After Effects』最新バージョンでは『Amount』と『Step』の10以下の数値が変更できない不具合が出ています…
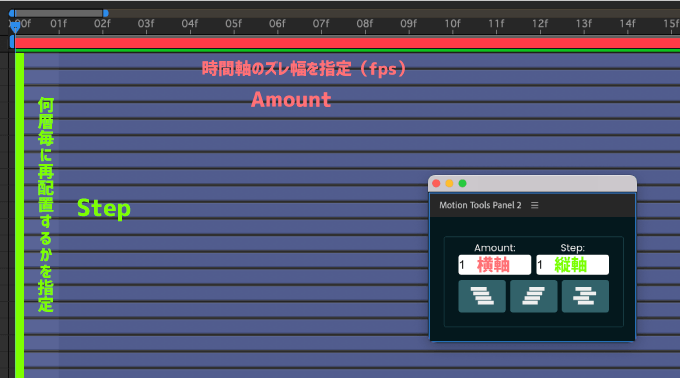
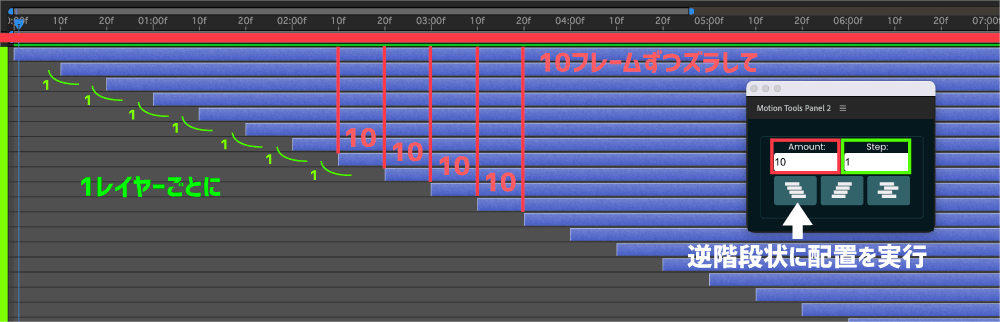
『Amount』▶︎ 選択したレイヤーのフレーム数=横軸である時間軸のズレ幅を指定(単位はフレーム数)
『step』▶︎ 選択したレイヤーを何層【縦軸】毎に再配置するかを指定(単位はレイヤー数)。
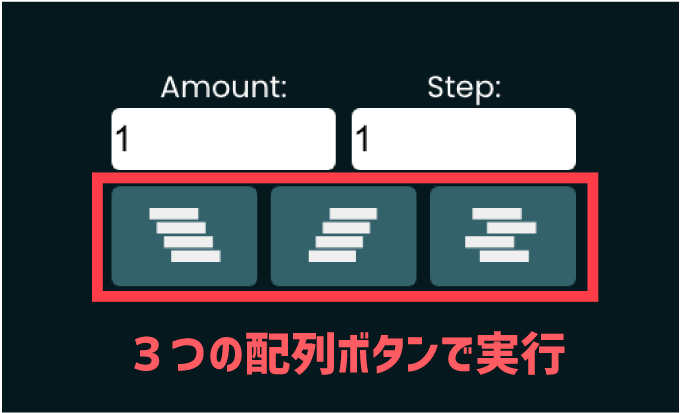
『Amount』と『step』で指定した数値を3つの配列ボタンでレイヤーの再配置を実行します。
キーフレームも同様に再配置することができますよー♪( ´θ`)ノ
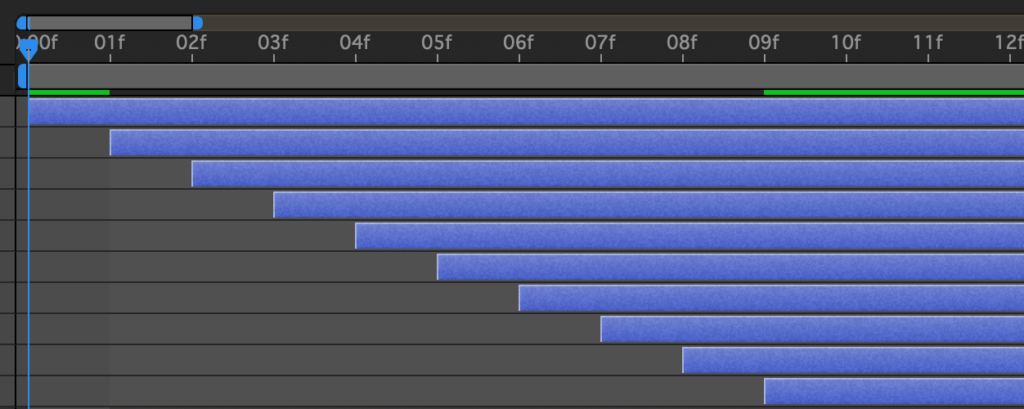
例えば、Amount ▶︎ 10、Step ▶︎ 1、逆階段状に配置を実行した場合は以下のようになります。
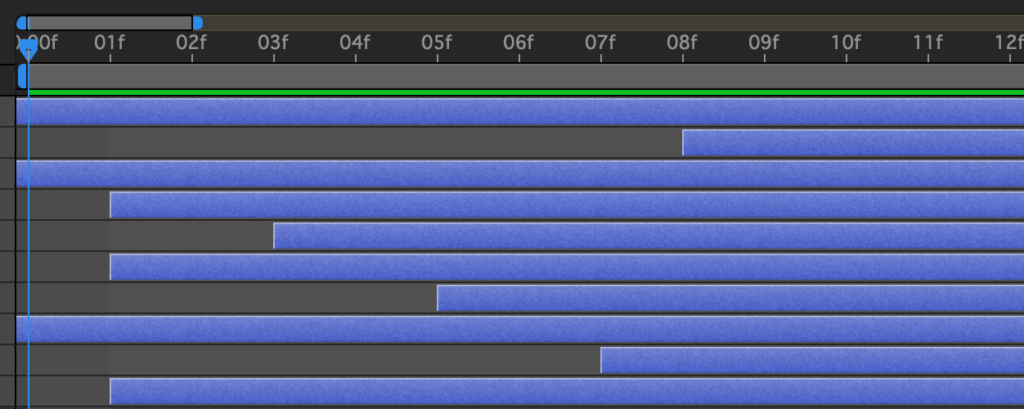
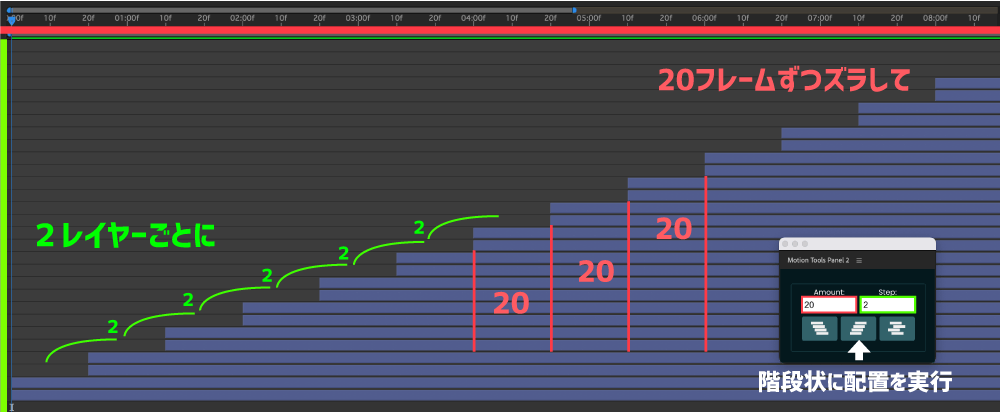
Amount ▶︎ 20、Step ▶︎ 2、階段状に再配置を実行した場合は以下のようになります。
連続して実行ボタンを押すと同じ効果が追加されていきます。
【NEW】Ease Copy
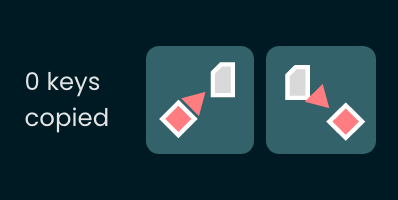
『Ease Copy』はキーフレームのイージング情報(カーブ)をコピー&ペーストすることができるツールです。
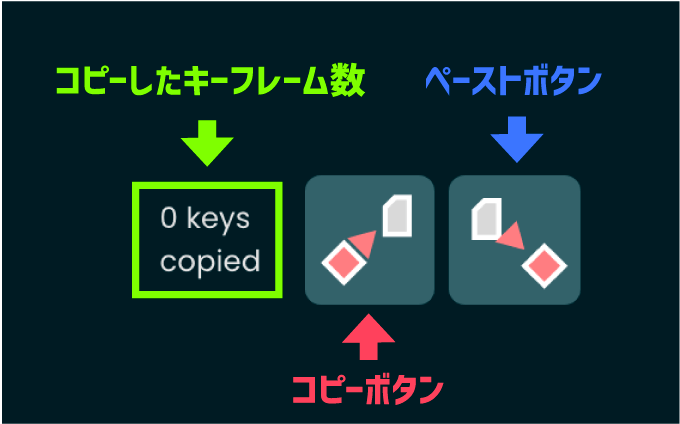
左側がイージング情報(カーブ)のコピーボタン、右側がコピーしたイージング情報(カーブ)のペーストボタンになります。
一番左側にコピーしたキーフレーム数が表示されるようになってます。
使い方はカーブをコピーしたいキーフレームを選択した状態で左側のコピーボタンをクリック
カーブをペーストしたいキーフレームを選択した状態で右側のペーストボタンをクリックすると、カーブをコピペすることができます。
このコピー機能は残念ながら他のプロパティーのキーフレームにはイージング情報をコピペすることができません_(┐「ε:)_
『Motion Tools Pro』の『Ease Copy』機能にプラスしてさらに便利な機能を備えた人気の無料スクリプトがあります。
その名も『EaseCopy』!! ◀︎ こちらはスペースがありません…w
『EaseCopy』では位置プロパティーのキーフレームから取得したイージング情報(カーブ)を回転や不透明度など別のプロパティーにもコピペすることができます。

しかもショートカットにも設定できる優れもの。あと『KBar』もサポートしてます。
無料でダウンロードできますし、気になる方はぜひインストールして使ってみてください⬇︎⬇︎カナリオススメ !!
『Motion Tool Pro』ツールパネルのカスタマイズ方法

今回アップグレードされてから、新しいツールパネルのカスタマイズ性がかなり向上してます。
ここでは『Motion Tools Pro』パネルのカスタマイズ方法や設定について解説をしていきます。
ツールパネルを4つまで作ることができる
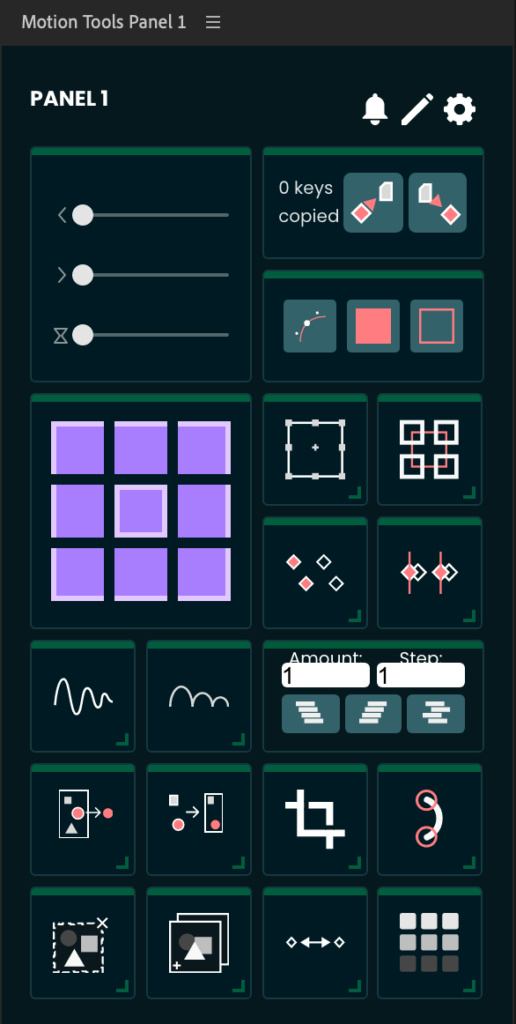
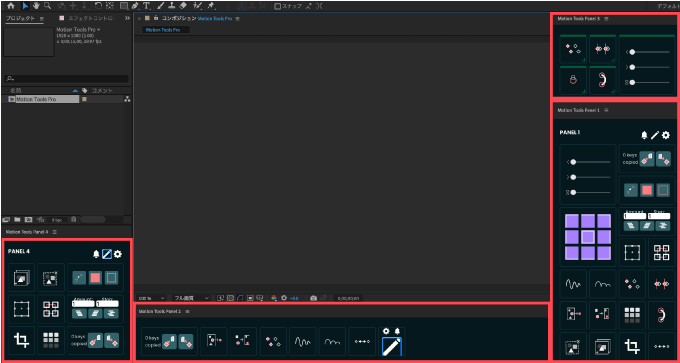
『Motion Tools Pro』ではツールパネルを4つ作ることができます。
『Motion Tools Pro』のインストールが完了すると上部メニューのウィンドウ▶︎エクステンションの中に『Motion Tools Pro』が4つ表示されます。
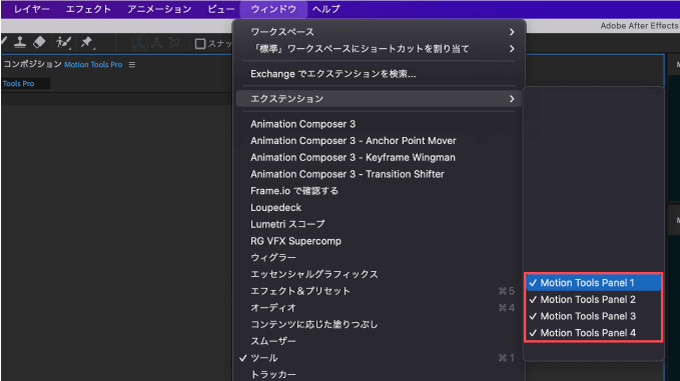
4つ全て1つのワークスペースに配置してもいいですし、各編集のスタイルに合わせて作ったワークスペースにそれぞれ配置して登録しておいてもいいですね。
最近はかなりの機能を詰め込んだユーティリティーツールが多くなってきて、タブをクリックする手間が煩わしいという声も上がっていましたが…w
タブをクリックする手間すら与えず
必要なツールを好きな部分に好きなだけ配置して、4つのパネルにカスタマイズできる仕様にしてきたところは「さすが『Motion Design School』!!」といったところでしょうか。
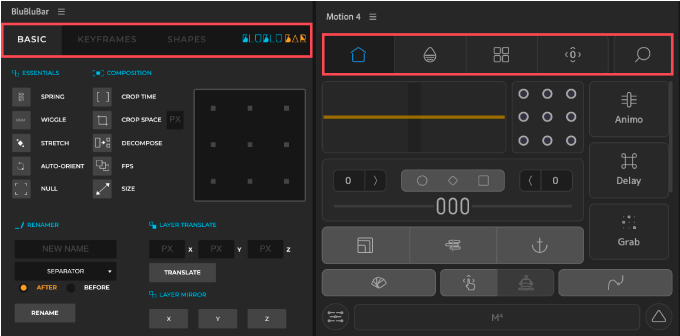
色々考えたくない!!カスタマイズめんどくさい!!という方は、『BluBluBar』や『Motion4』のようなタブ付きで多機能なユーティリティツールがあってるのかもしれないですね( ´ ▽ ` )
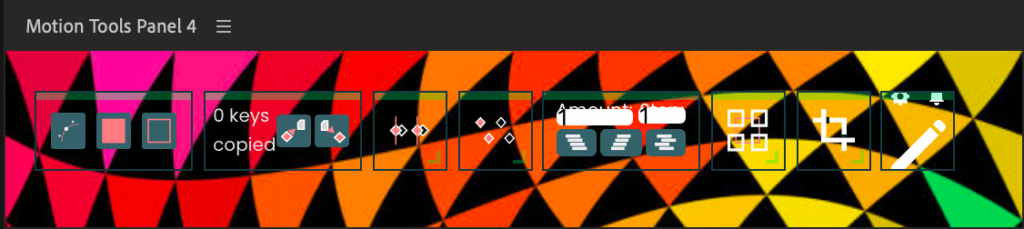
各パネルごとパネルカラー、ボタンカラー・サイズ・間隔などを設定できる
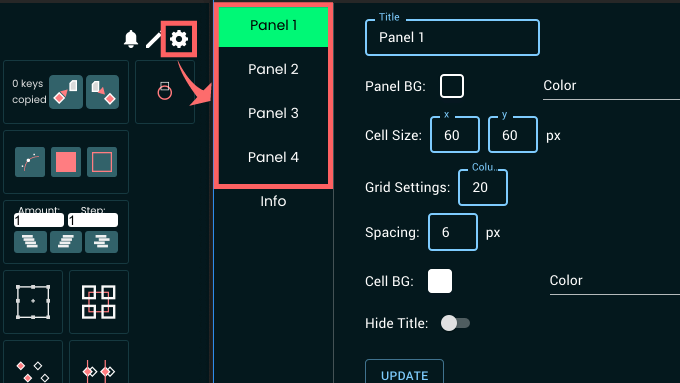
4つのパネルは各パネル毎に個別にカスタマイズすることができます。
ツールパネルの設定(歯車)アイコンをクリックすると4つのパネルをセッティングできるウィンドウが開きます。
それぞれの設定内容をまとめてみました。
『Grid Settings』は『Colu』がグリットの桁(Colum)だと思うのですが、不具合なのかよくわかりませんでした…
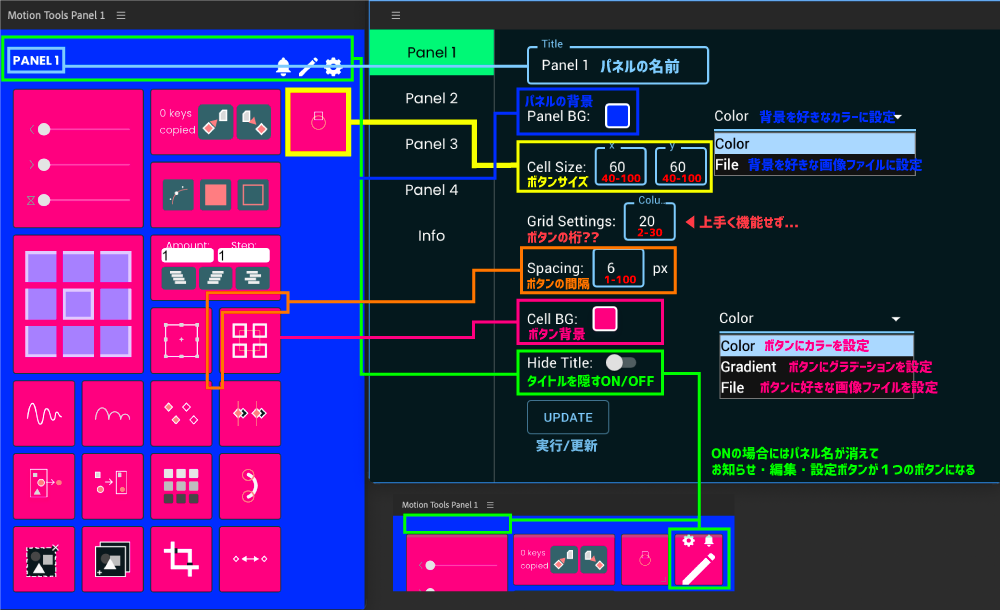
『Cell BG(ボタン背景)』にGIFを設定してみましたが、少しだけ動いてバグったり微妙…
Cell BG ▶︎ 透明
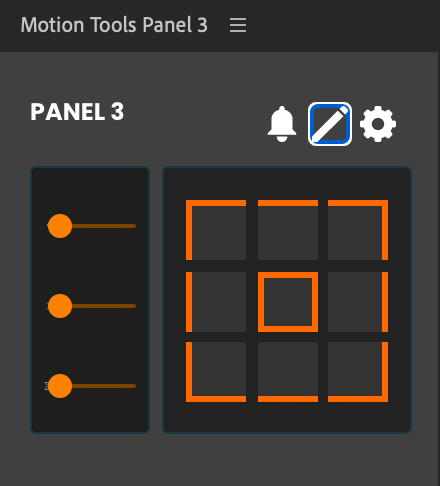
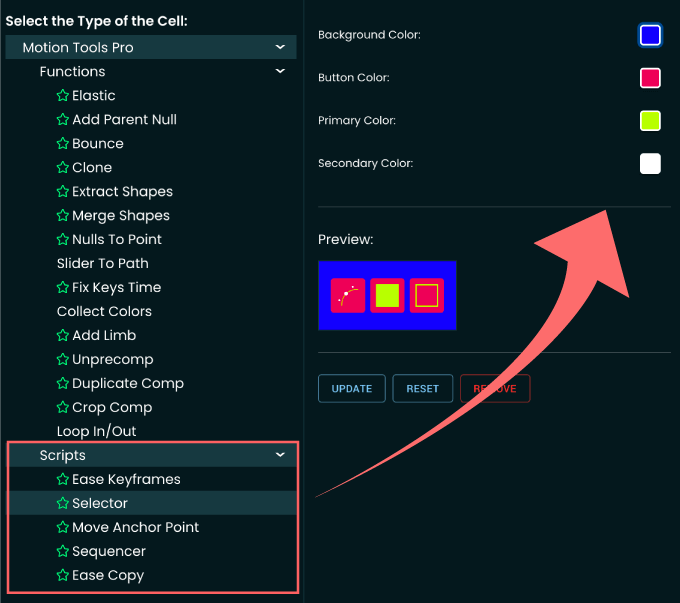
ボタンの配置、アイコン、アイコンカラーを設定できる
『Motion Tools Pro』ではボタンの配置、アイコン、アイコンカラーをある程度自由に設定することができます。
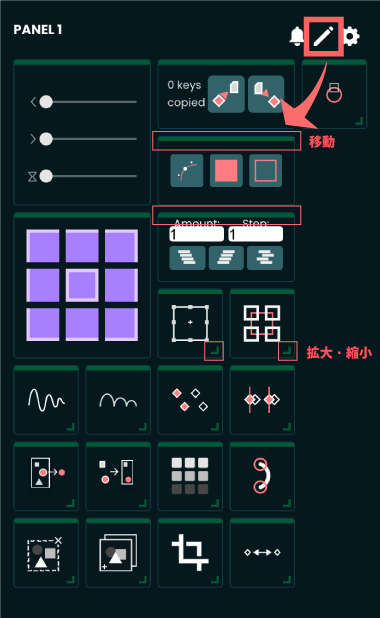
編集(ペン)アイコンをクリックするとボタンの上側に移動用のバーと右下に拡大・縮小できる 」が表示されます。
それぞれドラッグ&ドロップすることで、ボタンの移動と拡大・縮小することができます。
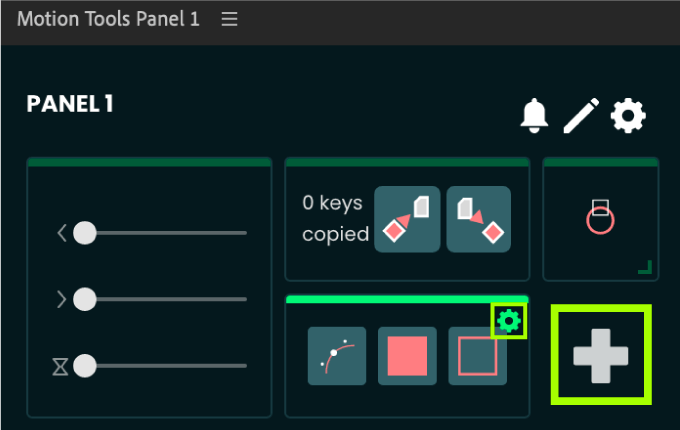
ボタンにカーソルを合わせるとボタンの右上に小さい設定(歯車)アイコンが表示されます。
ボタンのないスペースにカーソルを合わせるとプラスマークが表示されます。
どちらをクリックしてもボタンのカスタマイズウィンドウが開きますが、設定(歯車)ボタンの方はクリックしたボタンの設定画面がダイレクトで開きます。
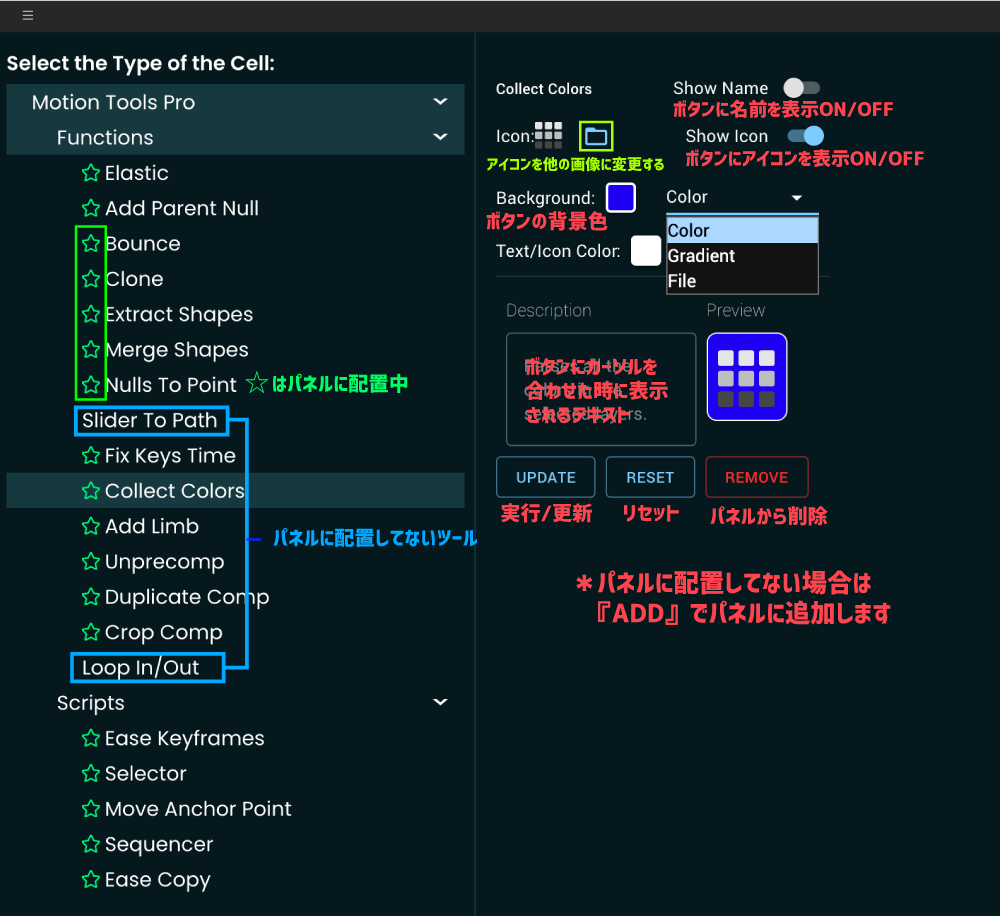
ボタンのカスタマイズウィンドウが開きます。
『Functions』のボタンアイコンはオリジナルに変更可能ですが、pngなのに背景が白くなったり…バクなのか変更できませんでした。
ボタンにカーソルを合わせると表示される『Description』は変更できません…
変更できれば便利なのに(´Д`;)
ボタンのアイコンはテキストに切り替えることができて、カラーも変更できますがテキスト自体を編集することはできません。需要はあるのだろうか…
『Scripts』のツールたちはオリジナルアイコンの設定はできませんが、アイコンカラーを細かく変更することができます。
『Motion Tools Pro』アップデート
最新(2023年9月28日)のアップデート『Motion Tools Pro(v1.3)』の新機能をまとめた記事はこちら⬇︎⬇︎
過去のアップデート情報はこちら⬇︎⬇︎
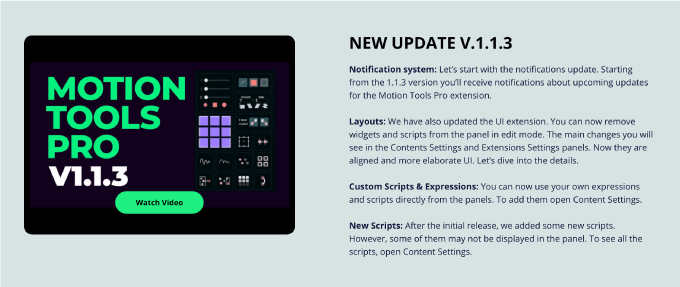
2023年5月23日に『Motion Tools Pro(1.1.3)』へアップデートされました。
*『Motion Tools Pro(1.1.3)』アップデートで追加された新機能やバグの改善点、アップデート方法をまとめて解説した記事はこちら⬇︎⬇︎
最後に
一通り『Motion Tools Pro』を使ってみて、いくつか不具合のある状況ではありましたが…
パネルのカスタマイズ性の向上や新機能などかなり便利に進化してます。これを無料で手に入れられた人たちは幸運ですね。
『Moton Tools Pro』のようなユーティリティーツールは効率化するために使い倒してなんぼのツールなので、思う存分使い倒して時間単価を上げていきましょう!!
今回紹介した『Motion Tools Pro』以外にも『After Effects』で使える便利な無料・有料ツールはたくさんあります。
*『After Effects』で使えるおすすめの無料ツールをまとめた記事はこちら⬇︎⬇︎
*『After Effects』で使えるおすすめの有料プラグインやスクリプトをまとめた記事はこちら⬇︎⬇︎
以上、最後まで読んでいただきありがとうございました(=゚ω゚)ノ