
Adobe After Effects 133

ネクスタさ〜んっヽ(´o`;『Motion4』を買ったのはいいのですが…
日本語で使い方を解説した記事が全くなくて使い方がわかりません…_(┐「ε:)_
きちんと調べてから買いなよ〜っ( ´Д`)y━・~~
『Motion4』の機能は異常だから、解説は嫌だよ〜 考えただけでゲロ吐きそう…(ー ー;)
そこをなんとかっヽ(´o`;
きっと困ってる豚たちがたくさんいるはずです\(T🐽T)/ オ~カミヨ~
豚さんたちって…( ´ ▽ ` 😉
それじゃその困ってる豚さんたちのためにいっちょやってみるか〜っ_(┐「ε:)_
『Motion4』 を買ってはみたものの…
「日本語での解説がほぼない…使い方がわからない…」
「ほとんどの機能がわからないので、使える機能だけ使ってます…」
「Motion4??あ…もう…そっと見ないようにしました…」
と、便利そうだから買ったけど、いまいち使い方がわからずに放置してる方も多いのではないでしょうか。
実は私も昨年『Moiton4』を買ってから
「使うと便利なのはわかってるけど、機能を一々調べるのがめんどくさい…情報ないし…」
とよくわからない機能は見て見ぬふりをしてました…
ただ、使い方がわからず困ってる方も多いですし、解説を希望される方も多いので、『Motion4』の機能や使い方を全てをまとめようと決心しました。
機能が豊富すぎて、解剖しきれない機能もあるかもしれませんが…
「その機能はこうですよ〜っ」など、教えていただければ嬉しいです。
『Motion4』の購入を検討している方は
『Motion4』は一体どんなツールなのか?概要や価格比較、アクティベート方法などについて解説した記事を書いてるので、参考にしていただければ幸いです⬇︎⬇︎
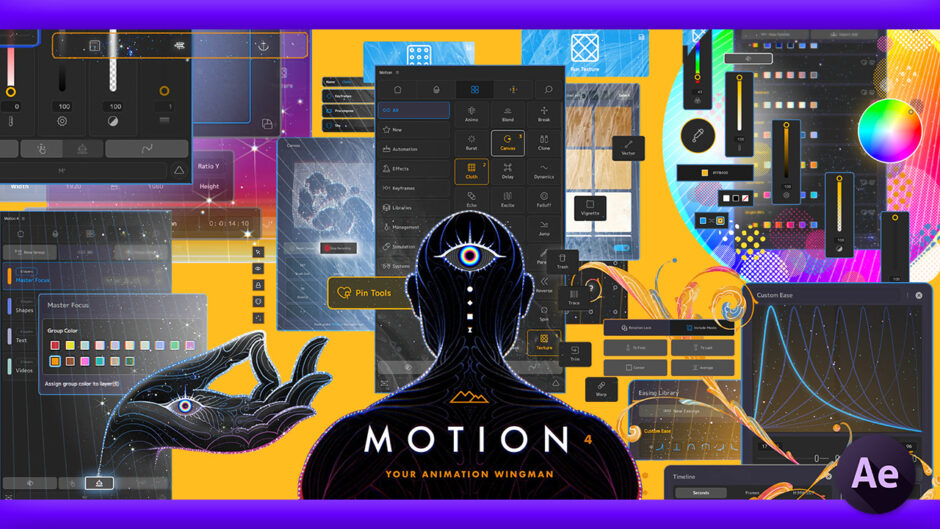
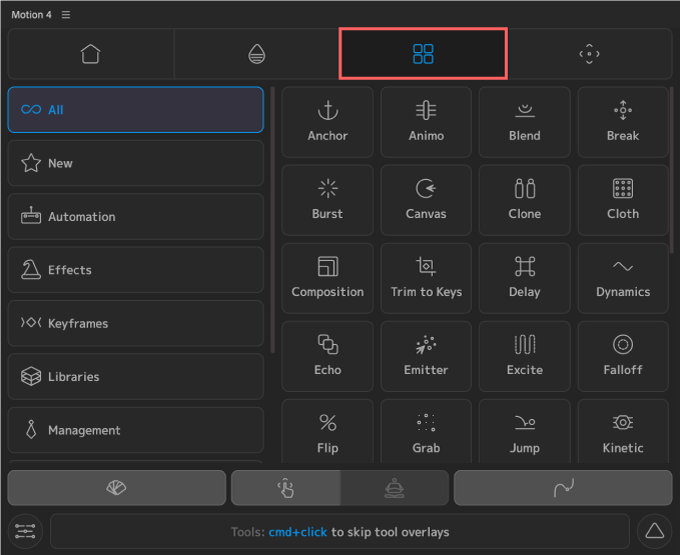
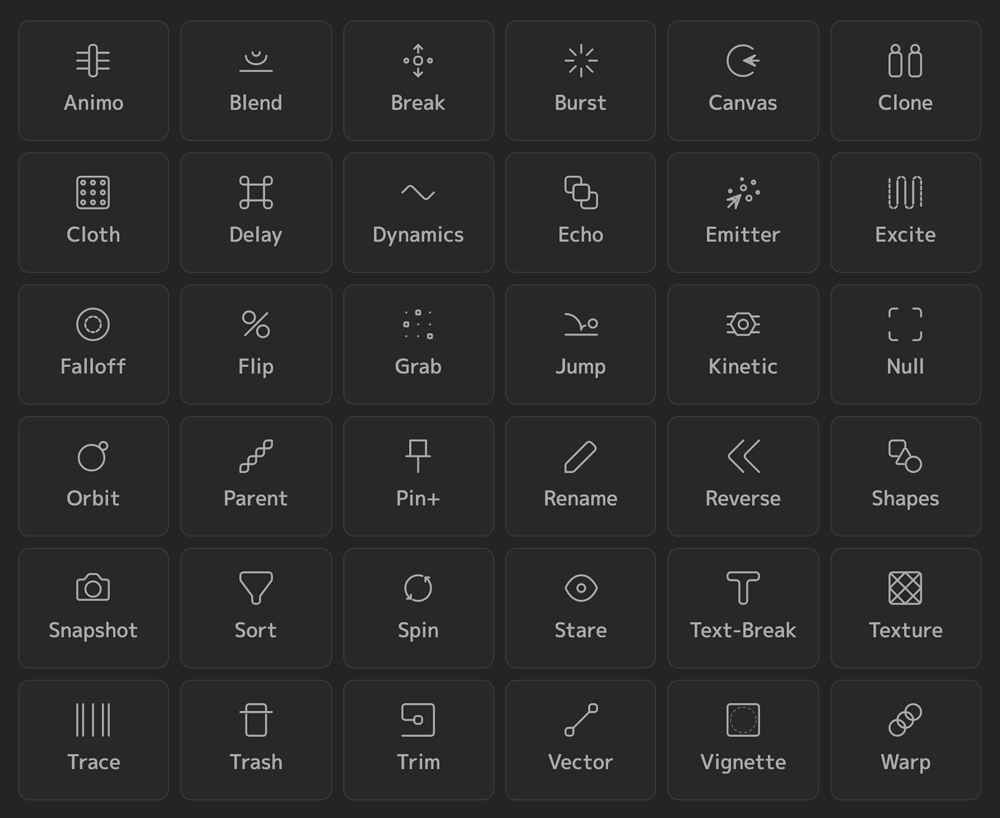
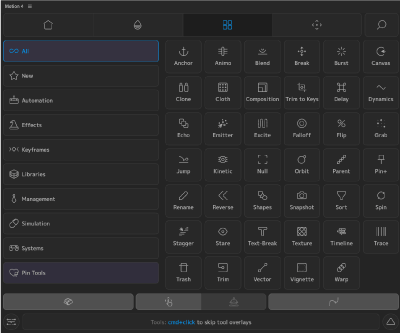
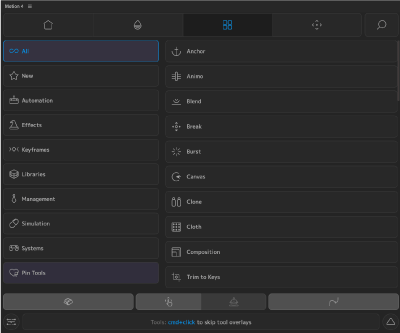
『Motion4』の機能や使い方
『Motion4』の機能や使い方を解説していきます。
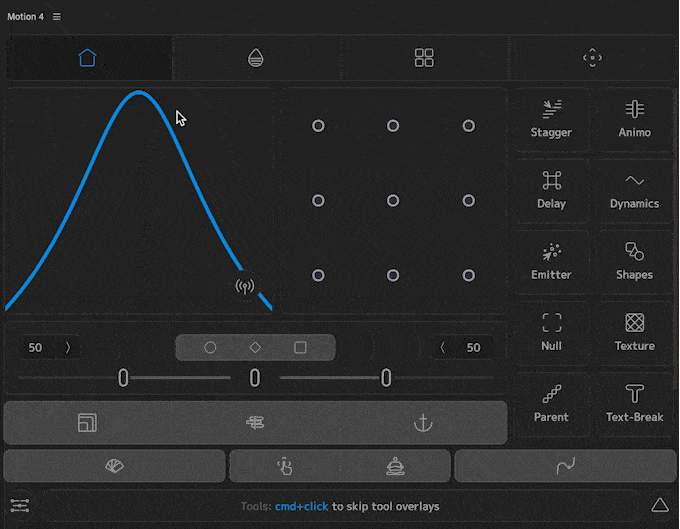
- Home(カスタマイズ方法含む)
- Color
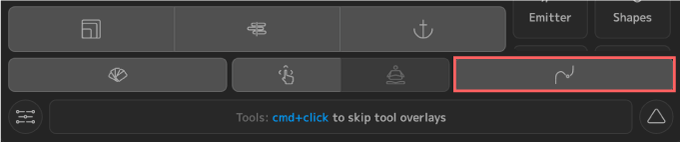
- Tools(合計41種類全て解説!! 【新規追加 7種類】)
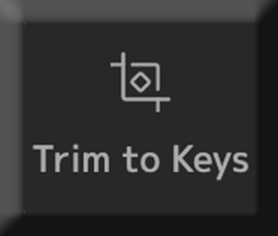
▶︎【NEW】Trim to Keys
▶︎【NEW】Stagger
▶︎【NEW】Canvas
▶︎【NEW】Emitter
▶︎【NEW】Kinetic
▶︎【NEW】Shapes
▶︎【NEW】Snapshot - Settings(UI/UX)
*『Motion4』の機能や使い方を全て解説した動画はこちら⬇︎⬇︎
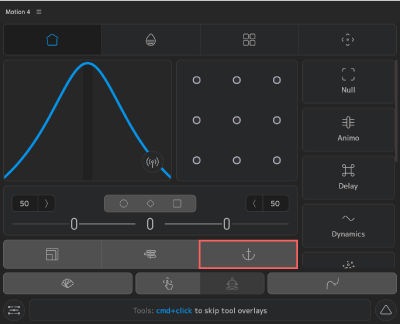
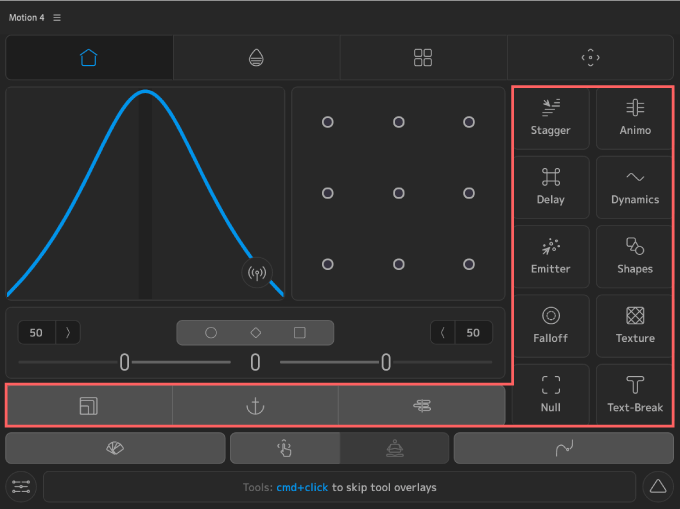
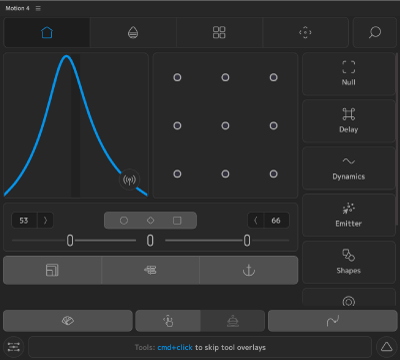
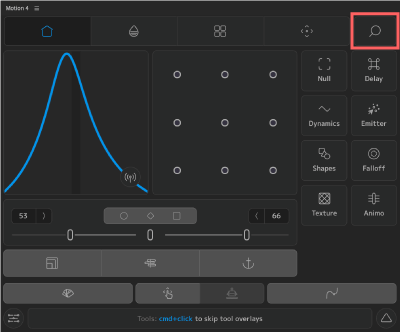
Home
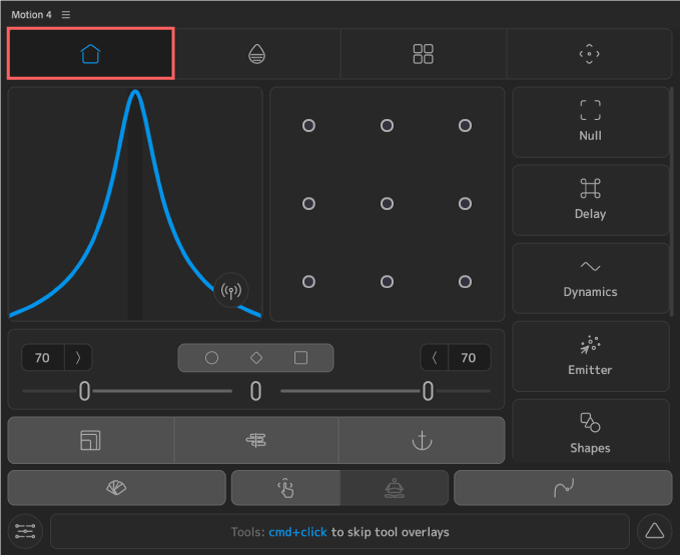
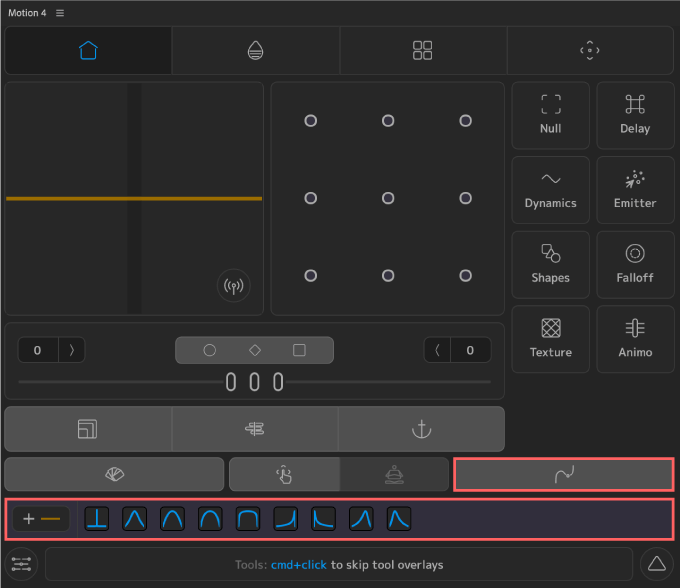
『Home』タブではイージングやアンカーポイント移動ツールに加えて
使用頻度の高いツールやお気に入りに登録したツールを配置して使うことができますd(゚∀゚)
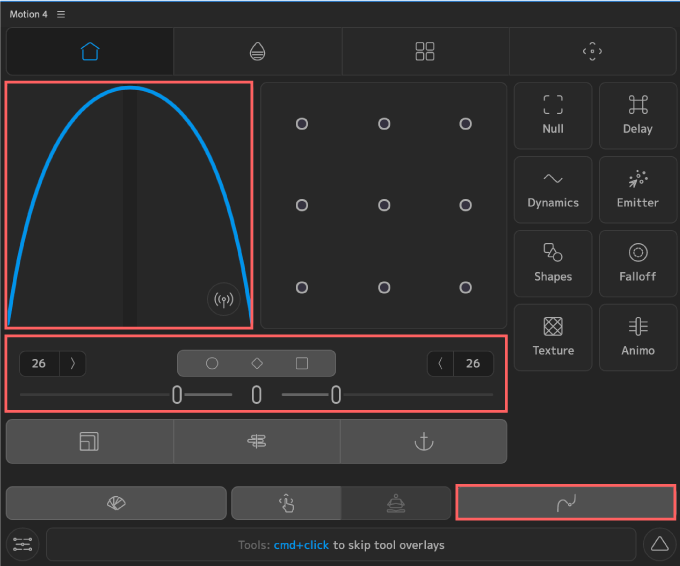
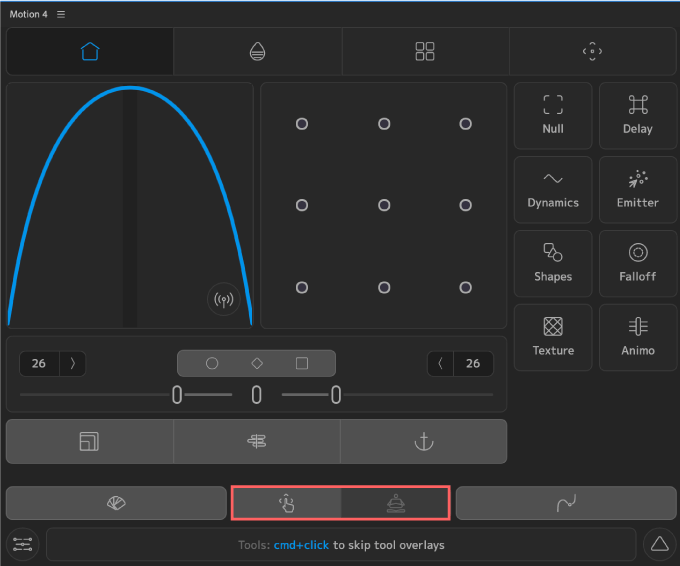
『Easings Graph / Easing Slider』ではカーブを調整することができます。
直感的にカーブを調整することができます。
ドラッグ&ドロップ、スライド、数値入力、それぞれ好きな方法でコントロールできます。
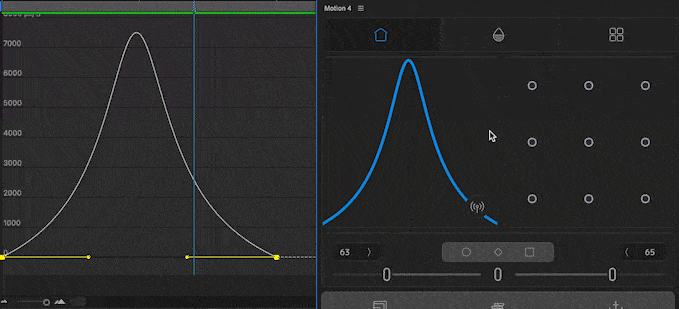
真ん中のスライドをクリックした状態で左右にドラッグすると『Ease Ease』をコントロールすることができます。
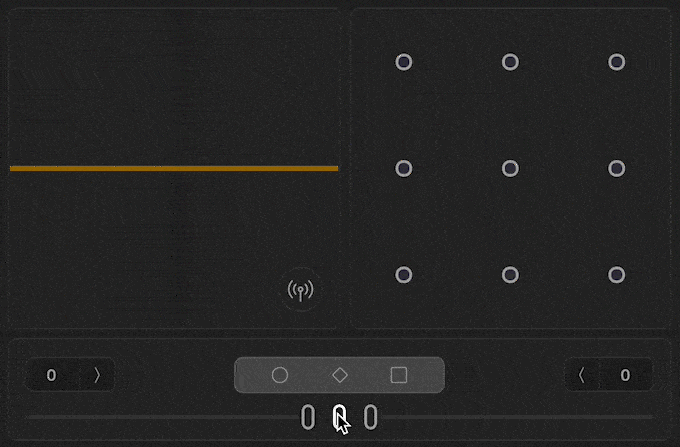
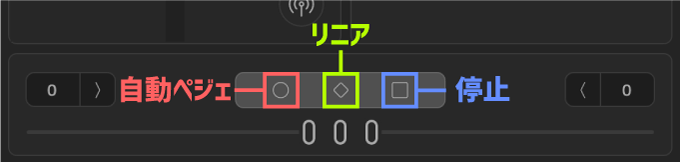
スライドの上にある3つのボタンはそれぞれキーフレームの時間補間法を変更できます。
◯ ▶︎ 自動ぺジェ
◇ ▶︎ リニア
☐ ▶︎ 停止
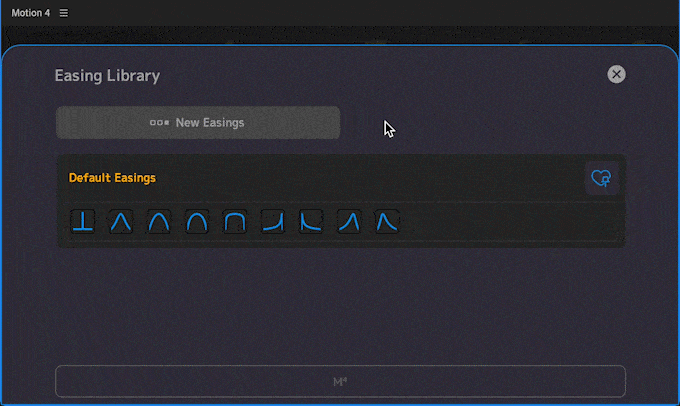
『Easing Library』では調整したカーブをプリセットとして保存することができます。
保存したカーブプリセットはパレットとして『Home』タブに表示することができます。
『Easing Library』ではカーブプリセットの登録と削除、パレットの作成と削除などができます。
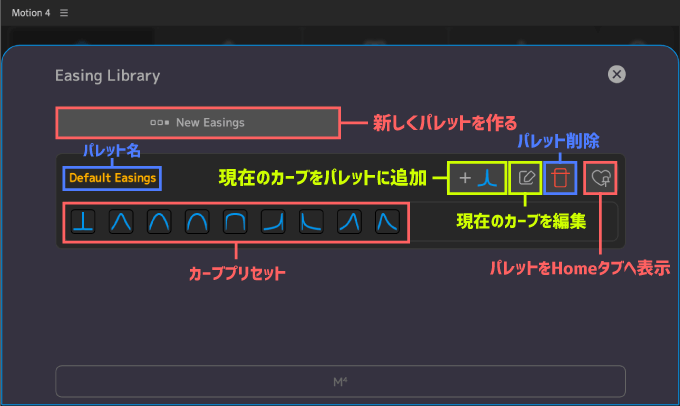
一番右側にあるハートボタンでパレットをHomeタブへ表示することができます。
ただし表示できるのは1つのパレットのみですd( ̄  ̄)
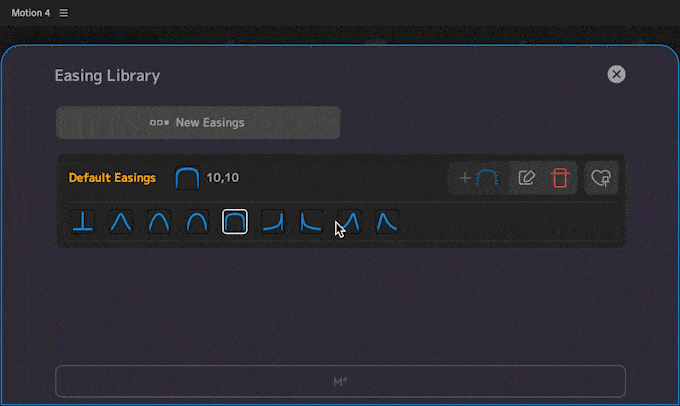
適用したカーブプリセットやプリセットをダブルクリックすると右上にカーブが表示されるので
右上にある左から2番目の編集アイコン(鉛筆アイコン)をクリックして
プリセットから新しいカーブを作成 ▶︎『Add』ボタンでパレットに追加することができます。
『Composition』ツールは『Motion4』のパネル上でコンポジション設定を調整することができます。
『Composition』ツールを開くと設定パネル(Compositionタプ)が開きます。
よく変更する項目がまとめられてるので、とても扱いやすくて便利です。
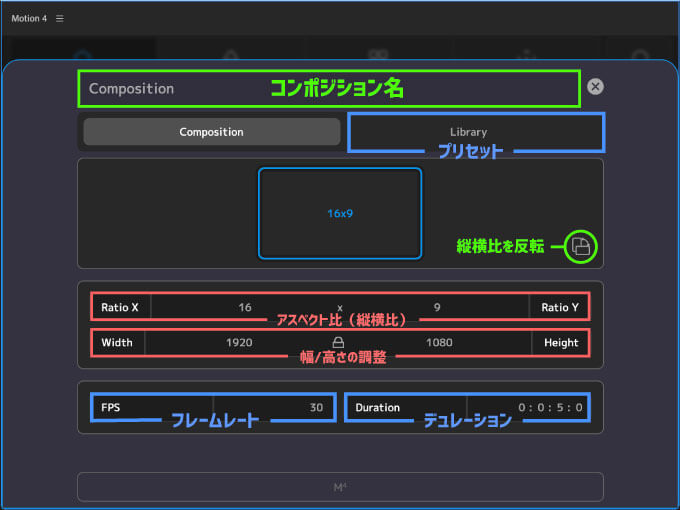
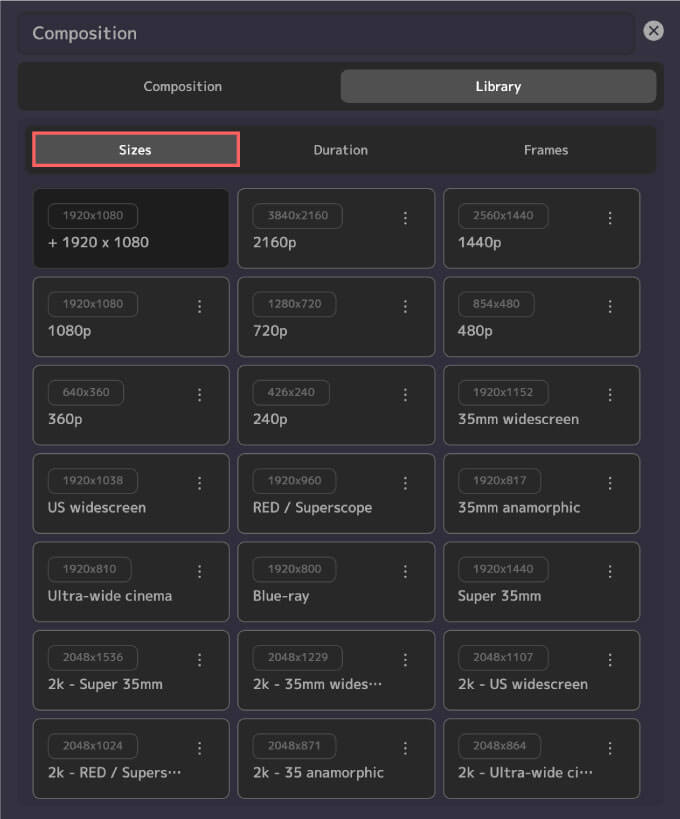
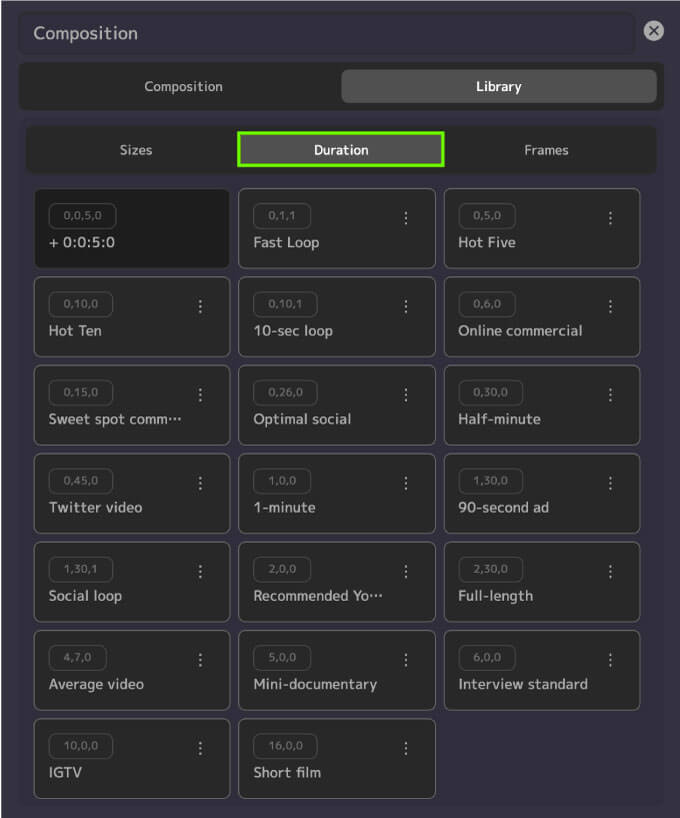
『Library』タブにはコンポジションのプリセットが『Sizes』『Durations』『Frames』に分けて用意されています。

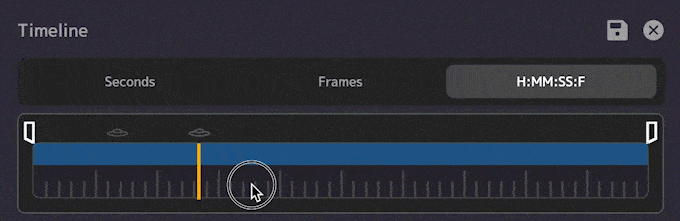
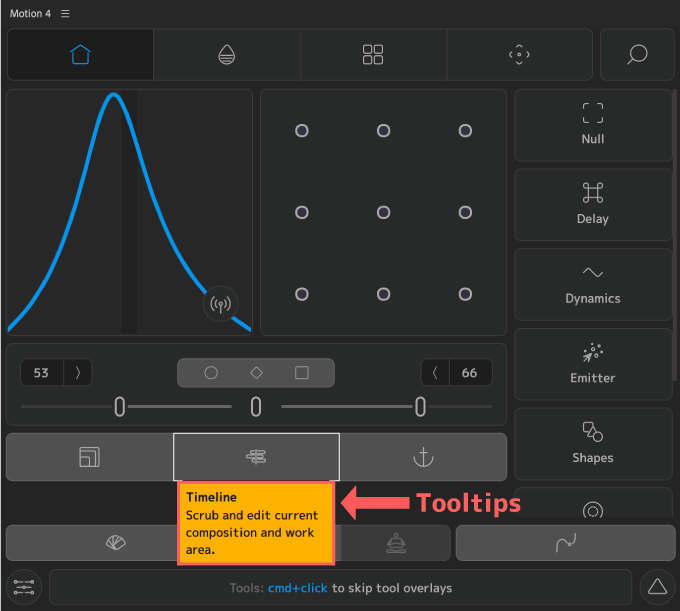
『Timeline』ツールではタイムラインをスクラブしたりワークエリアの範囲を調整したり
『Motion4』のパネルスペースだけでタイムラインをコントロールすることができます。
『Timeline』ツールのパネルには3つタブが用意されていて、それぞれの数値でタイムラインをコントロールすることができます。
Seconds ▶︎ 時間
Frames ▶︎ フレームレート数
H:MM:SS:F ▶︎ デューレーション
『Frame Snap』機能はパネル上にあるタイムラインをスクラブしたときに
設定したフレーム数だけスナップしてシークバー(オレンジ)が移動します。
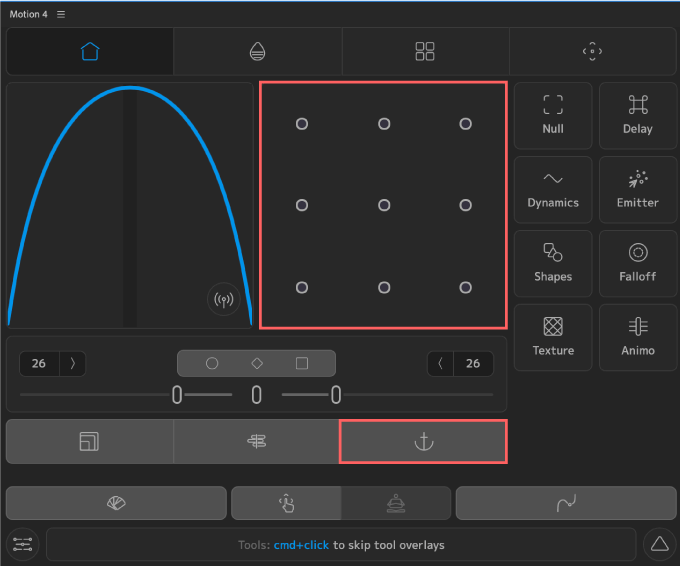
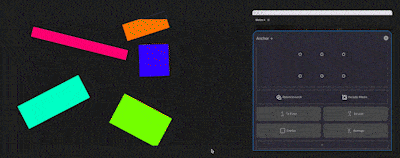
『Anchor』ツールはアンカーポイントを移動できるツールになります。
『Anchor+』にはいくつかの便利な追加オプションが用意されてます。
『Anchor』は『After Effects』のスクリプトではお馴染みの機能ですね^ ^
『Anchor+』を開くと『Anchor』ツールの追加オプションとして6つのボタンが用意されてます。
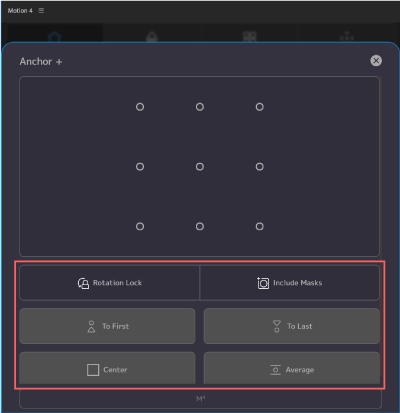
『Rotation Lock』は通常はレイヤーを180°反転するとアンカードットの左右の位置も反転しますが
『Rotation Lock』をONにすると回転しても左右の位置関係を保つことができます。
『Include Masks』は『ON』にするとマスクパスの範囲も含めたアンカーポイントを計算して移動します。
『Include Masks』はデフォルトで『ON』になってますd(゚∀゚)
『To Fast』▶︎ すべてのレイヤーアンカーポイントを最初に選択したインデックスに調整
『To Last』▶︎すべてのレイヤーアンカーポイントを最後に選択したインデックスに調整
『Center』▶︎ 選択したレイヤーのアンカーポイントを中心に配置後、中央座標に集める
『Average』▶︎ 選択した全てのレイヤーの中央位置に全てのアンカーポイントを集める

『Motion4』では『Tools』タブの中からツールからお気に入りのツールをいくつでも『Home』タブへ配置することができます。
『Home』タブの以下(黄色)の位置⬇︎⬇︎に『Tools』タブ内にあるツールをいくつでも配置できます。
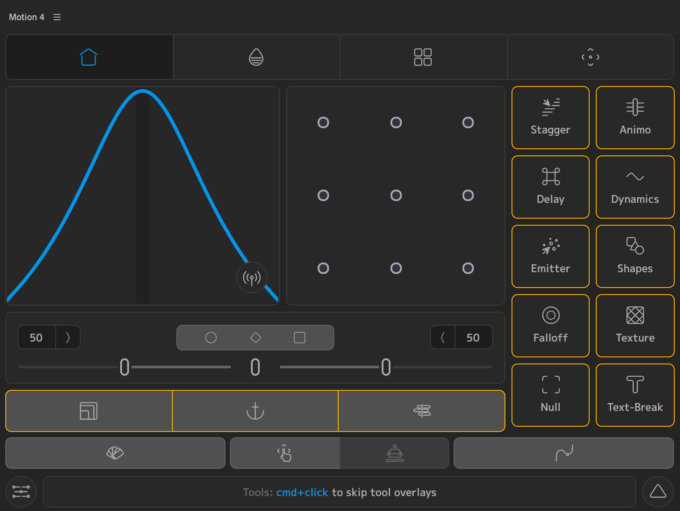
カスタマイズ方法は『Tools』タブの左下にある『Pin Tools』を選択するとツールに数値と黄色枠が表示されます。
黄色枠以外のツールをクリックすると選択したツールを『Home』タブへ追加表示することができます。
カ『Tools』タブの『Pin tools』で選択した数値は『Home』タブでは以下の順序で表示されます⬇︎⬇︎
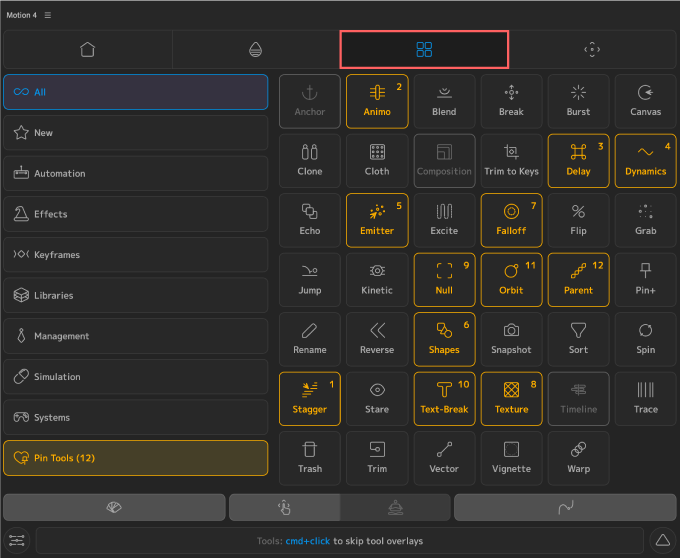
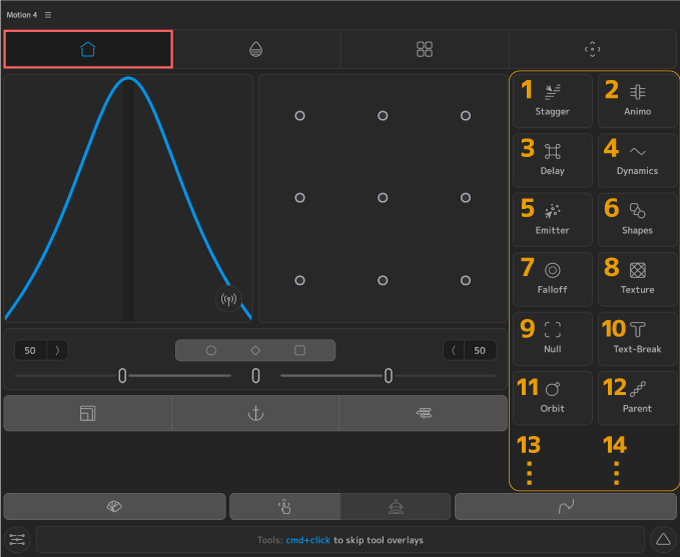
『Home』タブにある3つのカスタマイズボタンはドラッグ&ドロップで右側のツールボタンと入れ替えて設定することができます。
『Swatches』ではカラーパレットを作成することができます。
作成したカラーパレットは『Home』タブへ配置することができます。
『Swatches』を開くとカラーパレットを作成・調整できるカスタマイズパネルが開きます。
カラーの編集アイコン(えんぴつマーク)をクリックすると編集パネルが開くので
カラーを調整 ▶︎ Add でパレットに追加することができます。
私のMacではスポイトツールが機能しません…d(゚∀゚;)
各パレットの右側にあるハートアイコンをクリックすれば、カラーパレットを『Home』タブへ表示することができます。
『Home』タブへ表示できるカラーパレットは1つのみですd(゚∀゚)
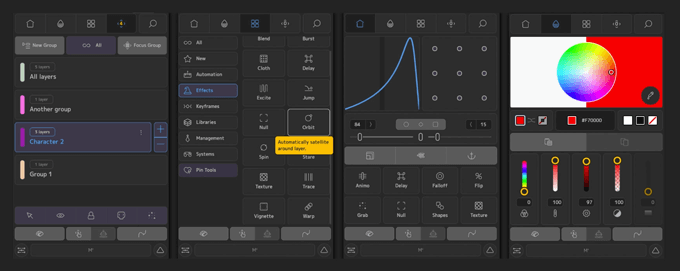
『Focus / Refocus』ツールは選択したレイヤーをグループ化(フォーカスグループ)して扱うことができる機能です。
『Focus』タブを使えば『Focus』でグループ化したレイヤーを調整・管理することができます。
例えば、レイヤーの中からテキストだけを選択した状態で『Focus』ボタンを押すと
選択したテキストレイヤー以外のレイヤーはプレビューやタイムラインで非表示(シャイモード)になります。
『Refocus』ボタンを押せばシャイモードは解除され元に戻ります。
『Focus』タブを開くと『Focus』で選択したレイヤーグループを登録(フォーカスグループ)して一括管理したり、『Focus』ボタンの非表示(シャイモード)の範囲を切り替えることができます。
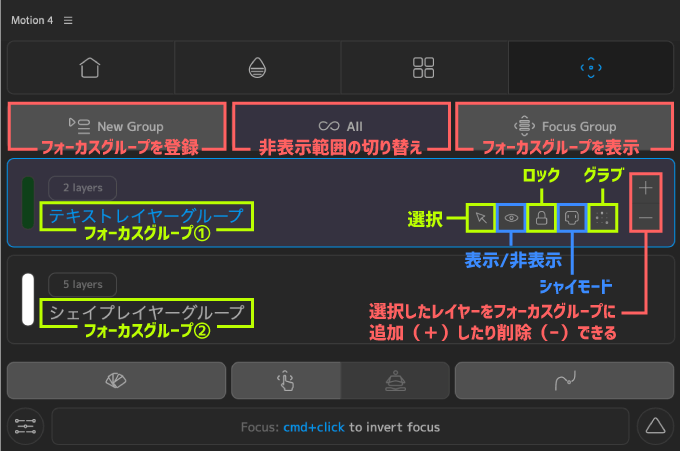
非表示範囲の切り替えは『Focus』ボタンを押したときの非表示の範囲を以下の3つのモードから選択できます⬇︎⬇︎
『ALL(デフォルト)』▶︎ プレビューとタイムラインの両方で非表示
『Timeline』▶︎ タイムラインのみ非表示
『Composition』▶︎ プレビューのみ非表示

グループ化したいレイヤーを選択した状態で『New Group』を選択するとフォーカスグループが作成されます。
作成したグループでは右側にあるツールで選択、表示/非表示、ロック、シャイ、グラブなど一括操作することができます。
作成したフォーカスグループを選択した状態で『Focus Group』ボタンを押すと
『Focus』ボタンと同じく、グループ外のレイヤーは全て非表示(シャイモード)にすることができます。戻すときは『Refocus』ボタンで戻せます。
フォーカスグループは複数作ることができるので、大量のレイヤーを扱うときは小まめにグループ登録しておくと、あとから変更・修正が楽です٩( ᐛ )و
右側にある+ボタン(Add Layer)とーボタン(Remove Layer)は選択したレイヤーを
+ボタン(Add Layer)でフォーカスグループに追加
ーボタン(Remove Layer)でフォーカスグループから削除できます。
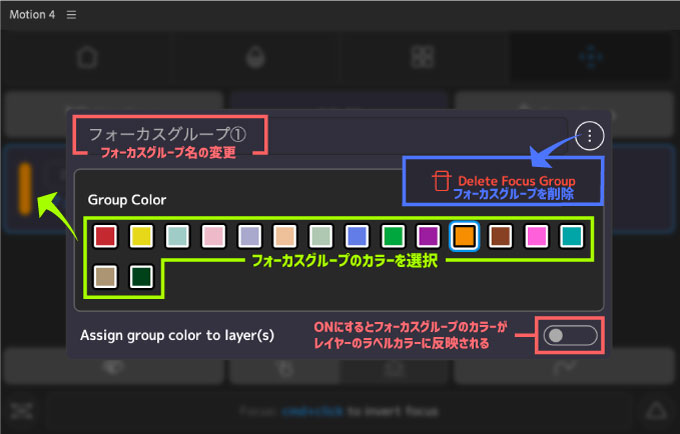
フォーカスグループをクリックすると編集パネルが表示されます。
編集パネルではフォーカスグループ名の変更やグループの削除、グループカラーの変更、グループカラーをレイヤーのラベルカラーに反映させるなど設定することができます。
Color
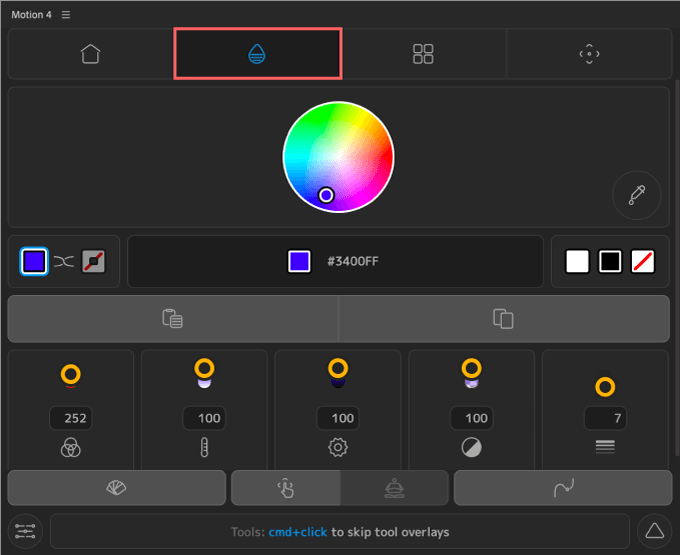
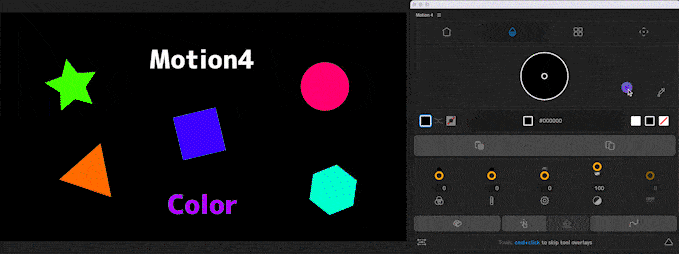
『Color』タブはカラー調整に関する便利機能を詰め込んだツールになります。
『Color』タブにはカラーホイールやカラーコード、各種調整スライダーを使って、選択したレイヤーやコンポジション(背景)のカラーを簡単に素早く調整することができます。
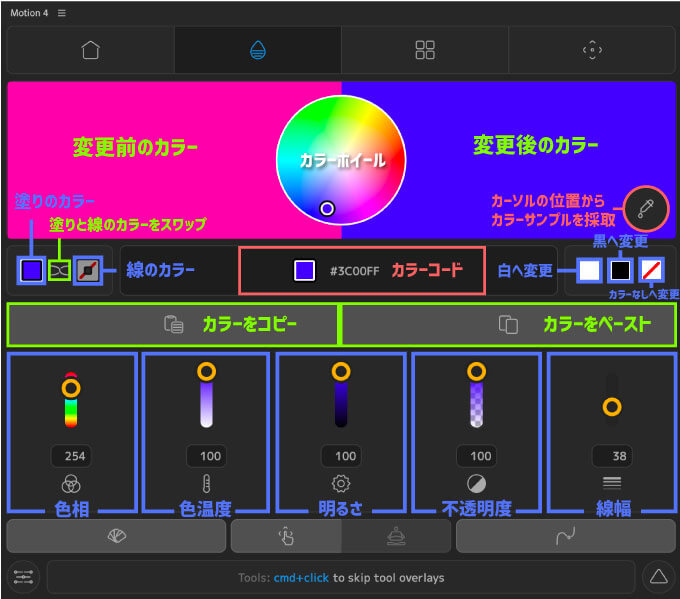
カラーコピー&ペースト機能が便利でよく使ってます( ´ ▽ ` )
Tools


『Trim to Keys』は選択レイヤーのキーフレーム部分だけを残してトリミングしてくれるツールになります。
使い方はレイヤーのキーフレームを選択した状態で『Trim to Keys』ツールを選択すると
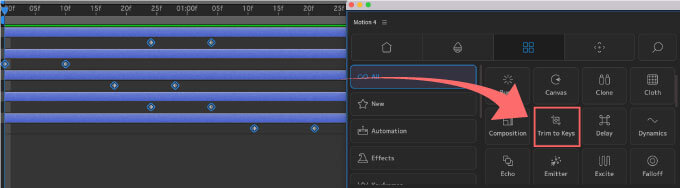
設定パネルが表示されます。
今回はデフォルトのまま『Run Trim to Keys』で適用します。
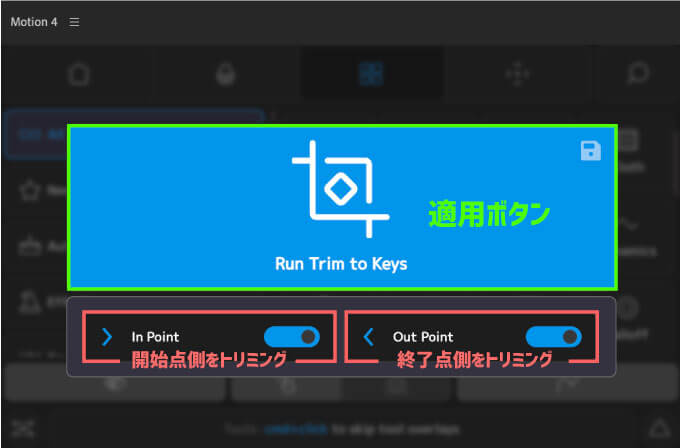
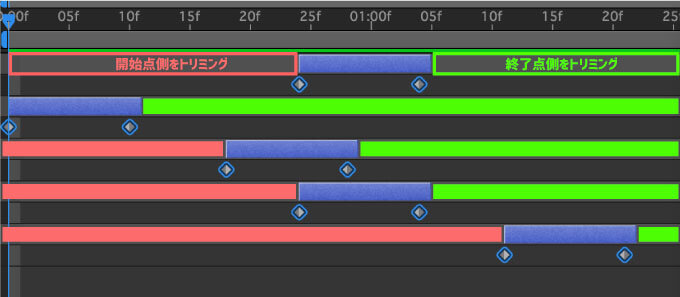
キーフレームを打った部分だけを残して選択したレイヤーの開始点側と終了点側をトリミングしてくれます。
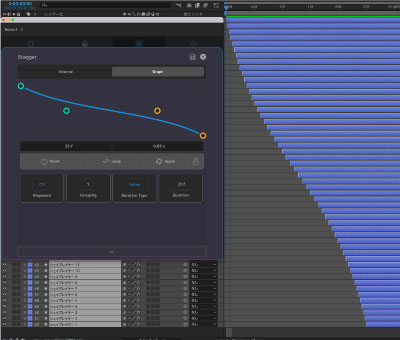
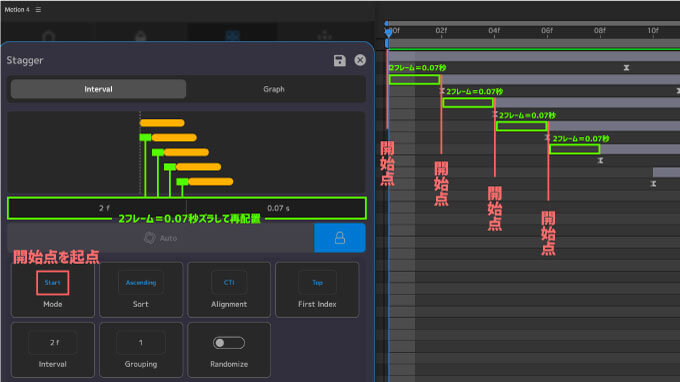
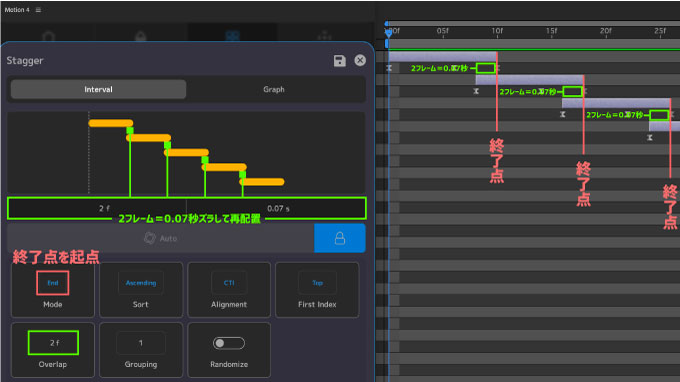
『Stagger』は複数のレイヤーを指定した条件でまとめて再配置(オフセット)できるツールになります。
『Stagger』には指定した間隔でレイヤーを再配置できる『Interval』機能と、再配置の間隔をグラフカーブでコントロールできる『Graph』機能があります。
✔︎ Stagger(Interval)
『Stagger』ツールを開くと『Interval』タブと『graph』タブがあります。
『Interval』の各ボタンの機能は以下の通りです⬇︎⬇︎
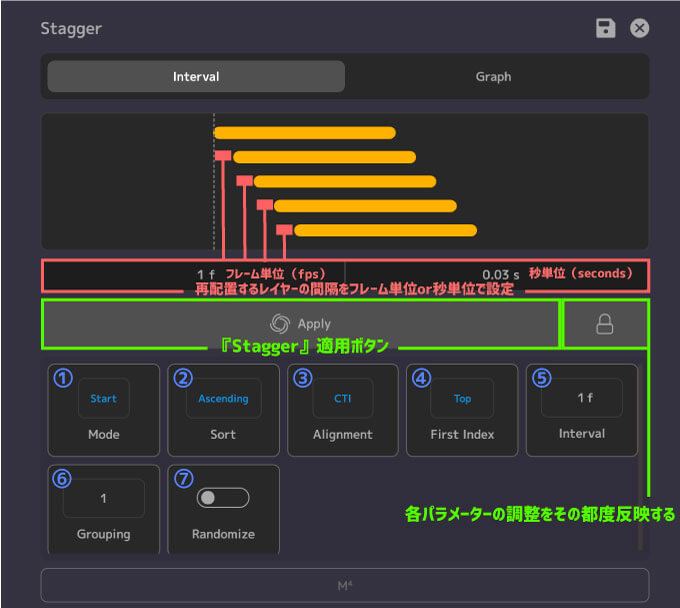
①『Mode』は『Start』or『End』を選択できます。
『Start』▶︎ レイヤーの開始点を起点に再配置
『End』▶︎ レイヤーの終了点を起点に再配置
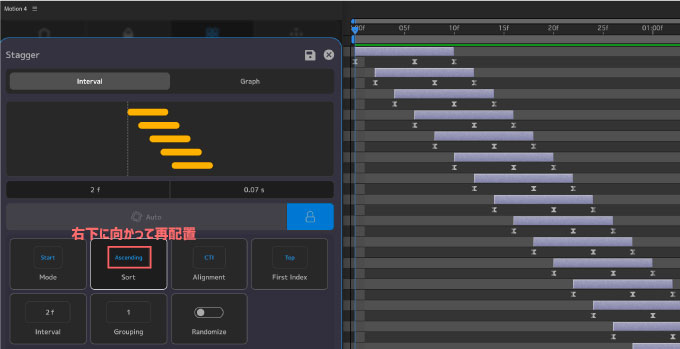
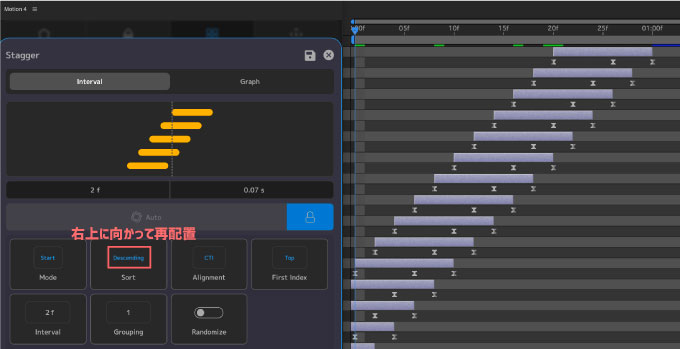
②『Sort』は『Ascending』or『Descending』を選択できます。
『Ascending』▶︎ 選択したレイヤーを右下に向かって再配置
『Descending』▶︎ 選択したレイヤーを右上に向かって再配置
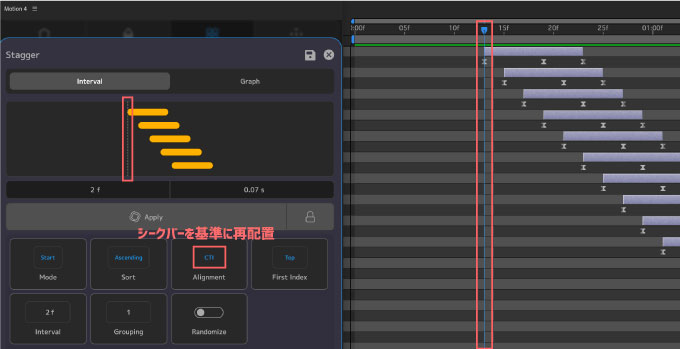
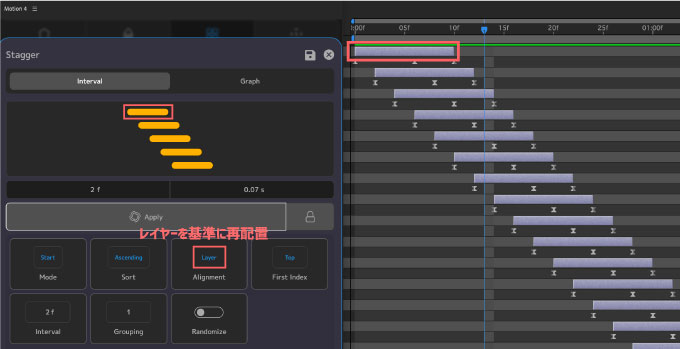
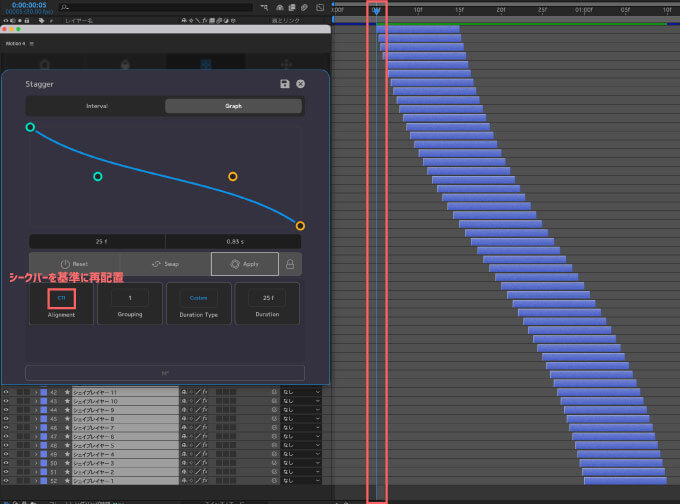
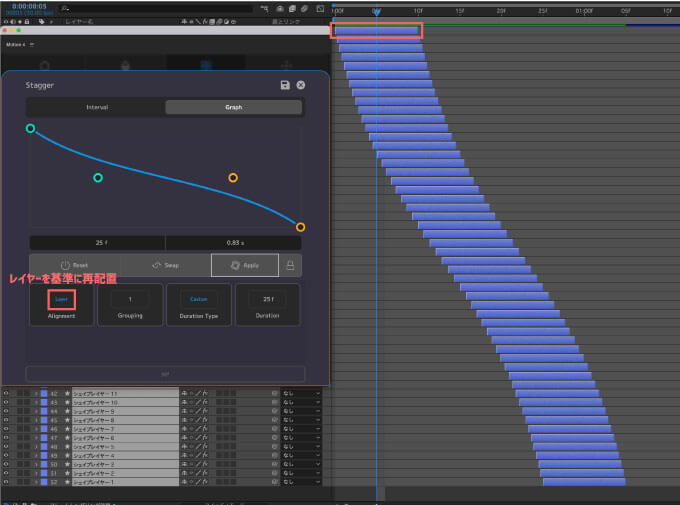
③『Alignment』は『CTI』or『Layer』を選択できます。
『CTI』▶︎ シークバー(タイムインジケーター)を基準に再配置
『Layer』▶︎ レイヤーを基準に再配置
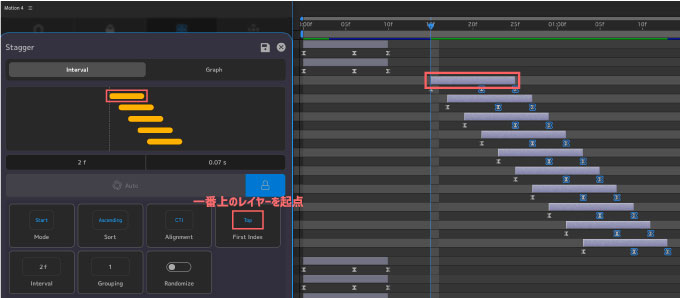
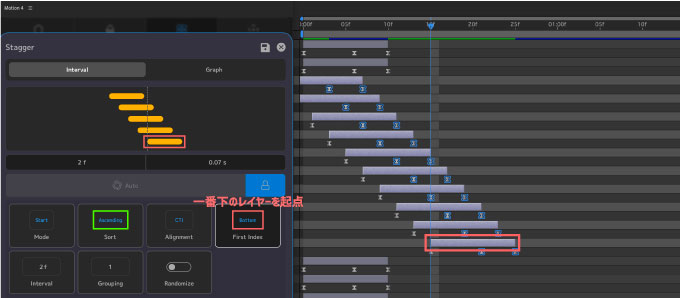
④『First Index』は『Top』or『Bottom』を選択できます。
『Top』▶︎ 選択したレイヤーの中で一番上のレイヤーを起点に再配置
『Bottom』▶︎ 選択したレイヤーの中で一番下のレイヤーを起点に再配置
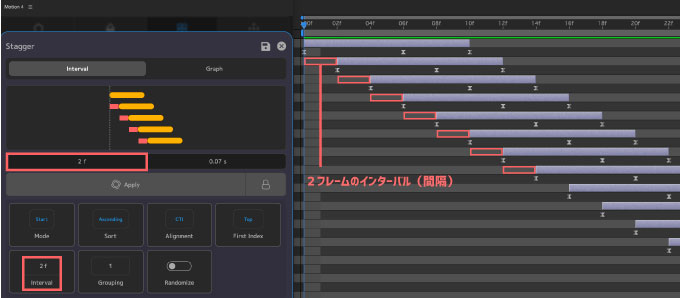
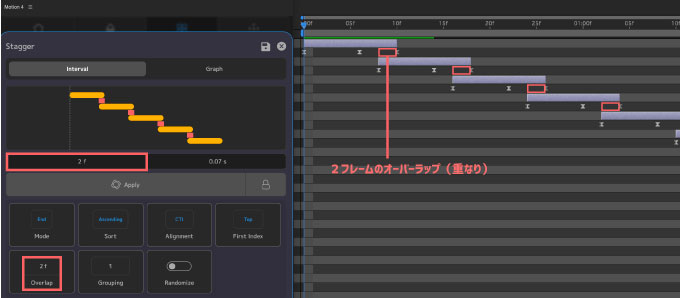
⑤『Interval』はレイヤーの間隔をフレーム単位で調整できます。
『Mode』を『Start』に設定している場合には『Interval』
『Mode』を『End』に設定している場合には『Overlap』に変わります。
『Interval』設定の数値はレイヤーの間隔を、『Overlap』設定の数値はレイヤーの重なりを調整するので
上部にあるレイヤーの間隔をフレーム単位や秒単位で入力する欄と連動してます。
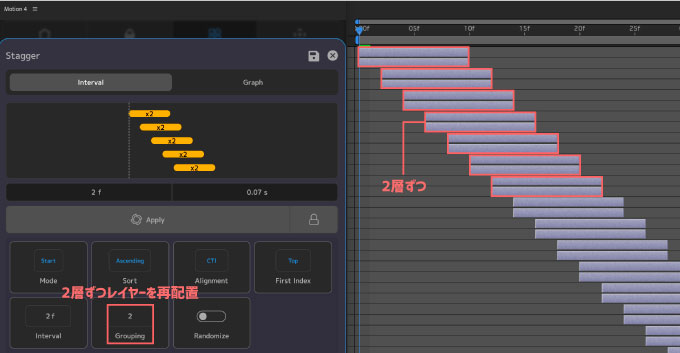
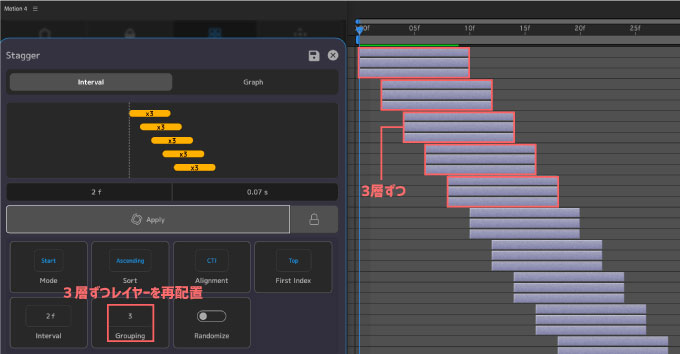
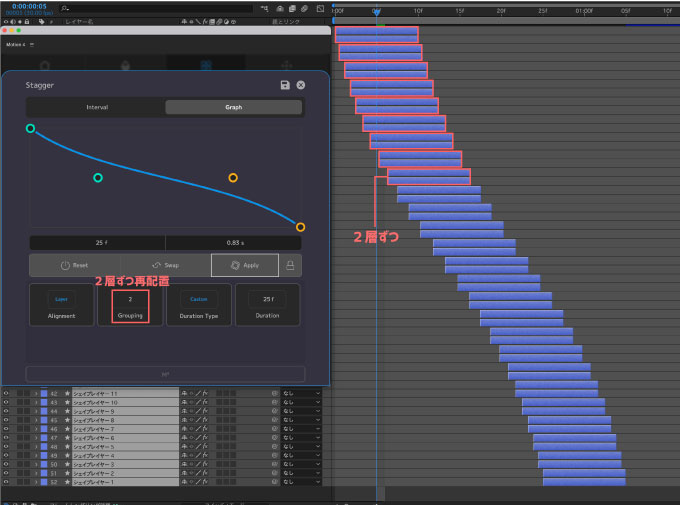
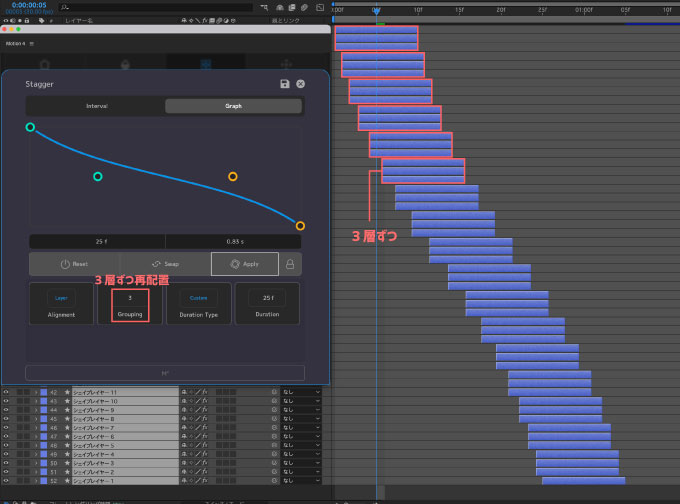
⑥『Grouping』は選択したレイヤーをグループ単位で再配置できる機能になります。
Grouping 2 ▶︎ レイヤーを2層ずつセットで再配置
Grouping 3 ▶︎ レイヤーを3層ずつセットで再配置
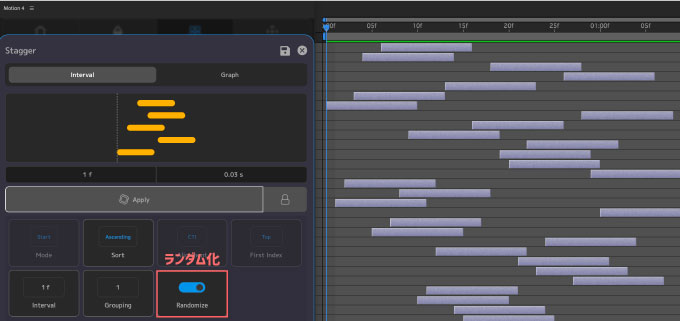
⑦『Randomize』はレイヤーの再配置をランダム化できます。
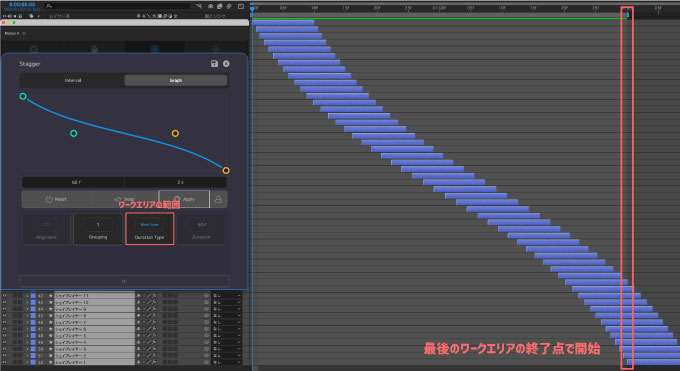
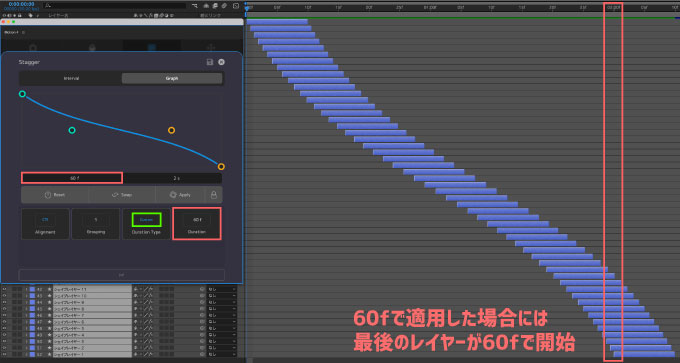
✔︎ Stagger(Graph)
『Graph』機能の各ボタンの機能は以下の通りです⬇︎⬇︎
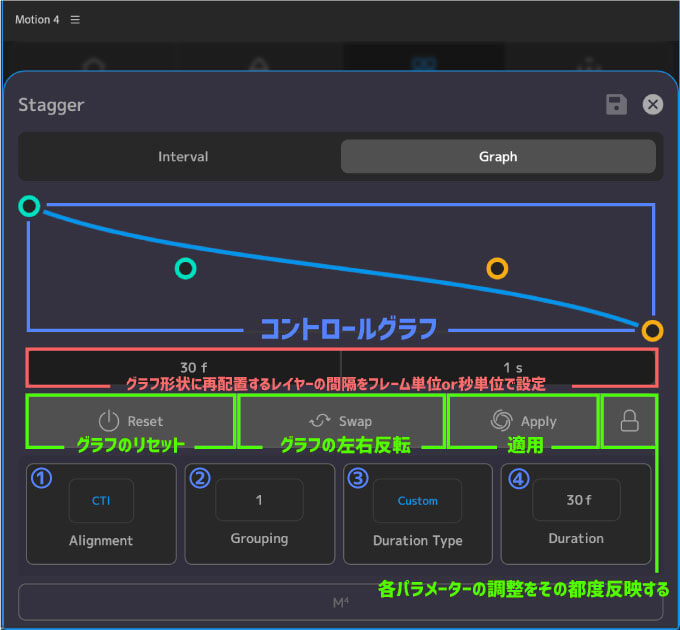
①『Alignment』は『CTI』or『Layer』を選択できます。
『CTI』▶︎ シークバー(タイムインジケーター)を基準に再配置
『Layer』▶︎ レイヤーを基準に再配置
②『Grouping』は選択したレイヤーをグループ単位で再配置できる機能になります。
Grouping 2 ▶︎ レイヤーを2層ずつセットで再配置
Grouping 3 ▶︎ レイヤーを3層ずつセットで再配置
③『Duration Type』は『Custom』or『Work Area』を選択できます。
『Custom』▶︎ フレーム数(f)または秒数(s)を指定して再配置
『Work Area』▶︎ ワークエリアの範囲で再配置
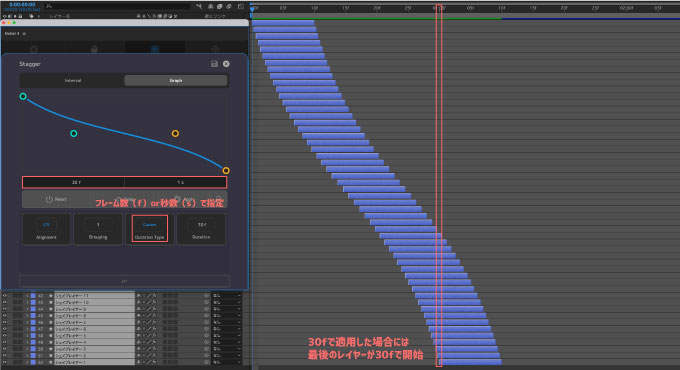
④『Duration』は『Duration Type』を『Custom』に設定した場合に入力できます。
上部にあるレイヤーの間隔をフレーム単位(f)や秒単位(s)で入力する欄と連動してます

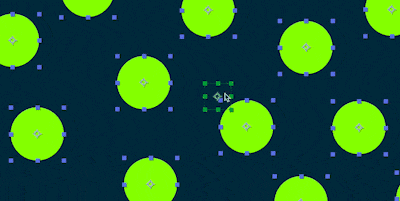
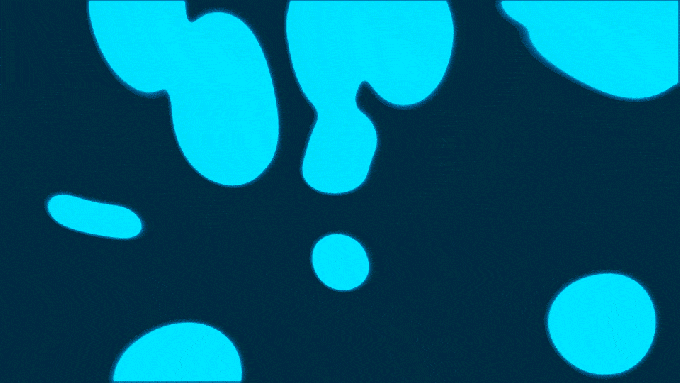
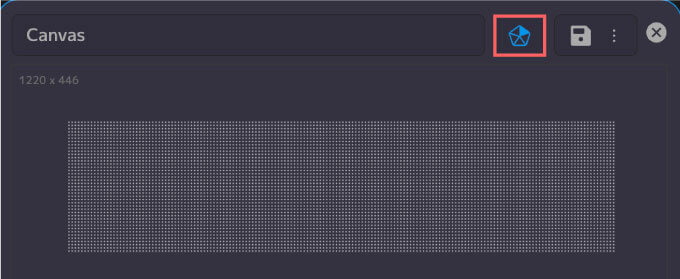
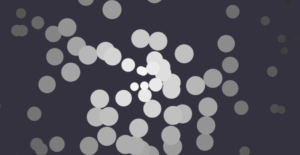
『Canvas』は専用の編集パネル(パーティクルフィールド)でパーティクルを拡散させて
それをリアルタイムで記録しタイムラインに追加して利用することができるツールになります。

追加されたばかりの新機能で、活用方法は色々とありそうですが私もまだ模索中ですd( ̄  ̄;)
『Canvas』ツールを選択するとパーティクルを調整するパーティクルフィールドが開きます。
各種設定で条件を指定▶︎『Record』でパーティクルを撮影▶︎『Add』ボタンでタイムラインに追加して利用する
といった流れになります。
パーティクルフィールドをマウスカーソルでクリック+ドラッグするとパーティクルが拡散します。
一点でクリックしたまま停止すると拡散が止まる範囲が『Brush Size』で設定できる範囲になります。
クリックした状態で設定したブラシサイズまで粒子が拡散するスピードを『Brush Down』で調整
拡散し終わった粒子が戻ってきて元に戻るまでの時間を『Brush Up』で調整します。
『Record』で撮影したパーティクルフィールドは『Add』ボタンでタイムラインに追加して利用することができます。
マスクやブレンドモードを使っていろんな使い方ができます。
タイムラインに追加した『Canvas』レイヤーを選択した状態で『Motion Path』▶︎『Save Motion Pass』を選択すると、パーティクルアニメーションを保存することができます。
『Preview』はパーティクルフィールドで保存したアニメーションをプレビューすることができます。
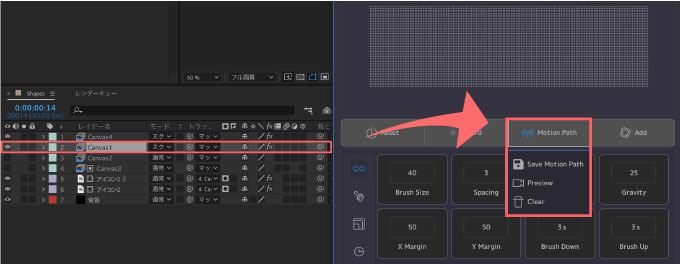
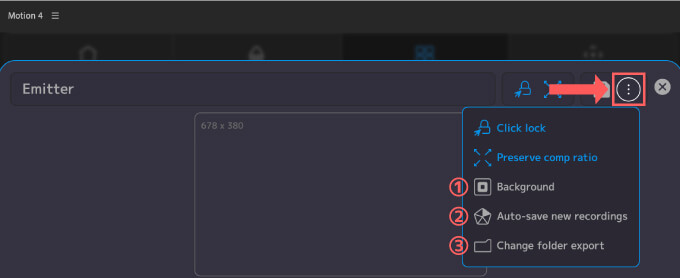
右上にはオプションメニューが用意されています。
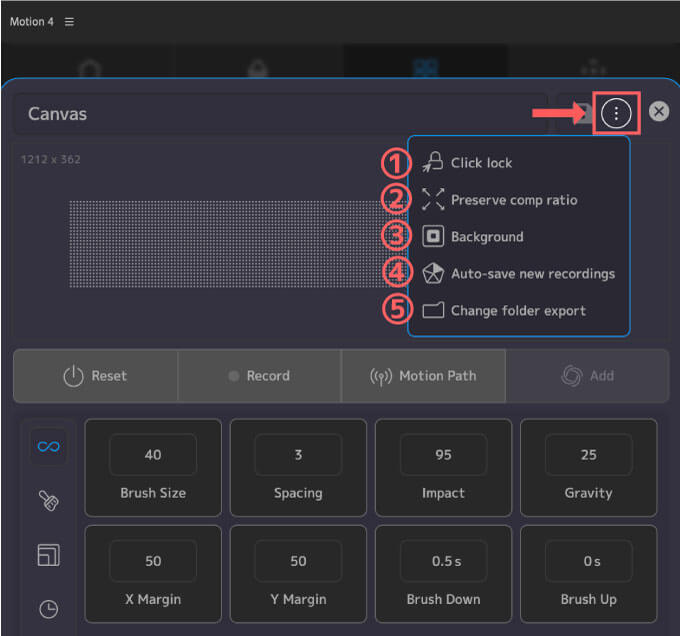
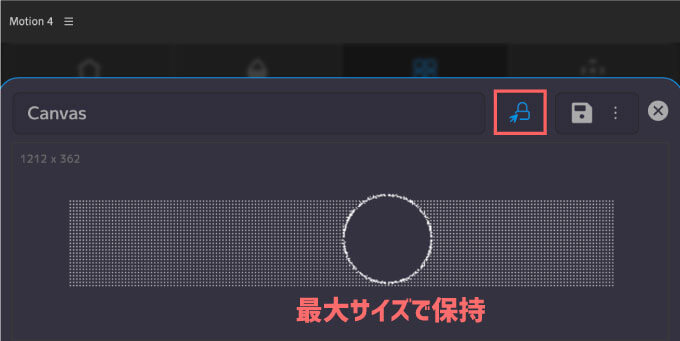
① 『Click lock』は ONにするとパーティクルフィールド上でワンクリックすると、ブラシが最大サイズに広がってその状態が保持されるようになります。
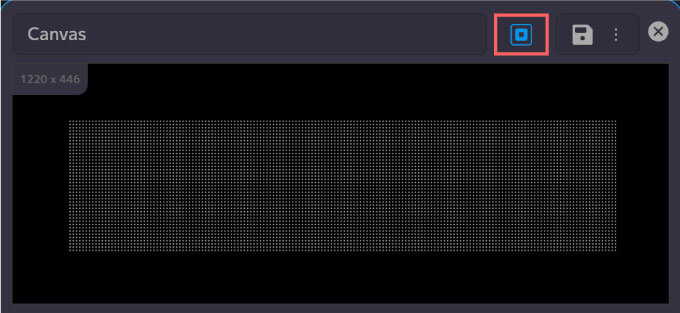
②『Persarve comp ratio』はパネルのサイズ一杯までパーティクルフィールドを広げてくれます。

③『Background』は背景を透過にします。
④『Auto-save to new recordings』は
例えば、同じ名前で『Canvas』レイヤーを撮影▶︎保存しようとした時に通常は上書きするか、名前を変更して保存するか警告が表示されますが
『Auto-save to new recordings』をONにすることで警告を表示せずに別の名前(Canvas1など)で自動保存してくれます。
⑤『Change folder export』は撮影したファイルの保存場所を変更することができます。

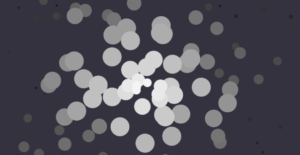
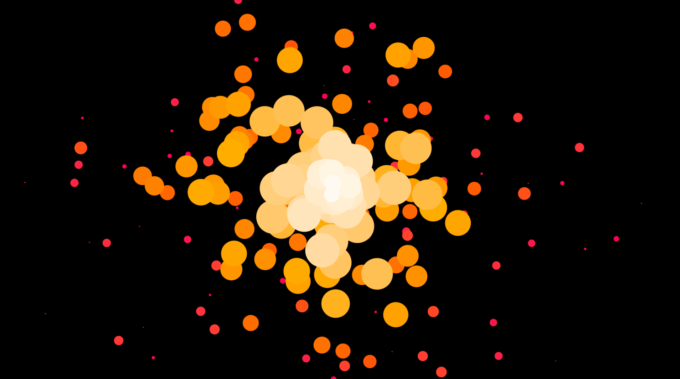
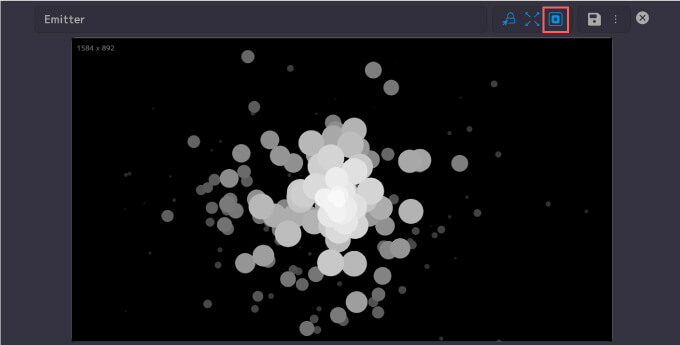
『Emitter』は専用のパーティクルフィールドで手軽にパーティクルを生成できるツールになります。
パーティクルフィールドはリアルタイムで記録でき、タイムラインに追加して利用することができます。

キーフレームを打ったり、生成にレンああダリンあグの必要もないので、手軽にパーティクルを生成した場合にはとても便利なツールですd(゚∀゚)
『Emitter』ツールを選択するとパーティクルを調整するパーティクルフィールドが開くので、フィールドをクリックするとパーティクルが自動生成されます。
各種設定でパーティクルの放出条件を指定▶︎『Record』でパーティクルを撮影▶︎『Add』タイムラインに追加して利用する
といった流れになります。

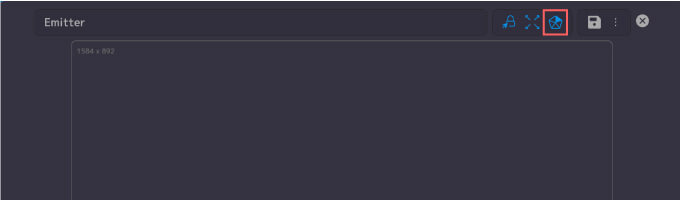
『Emitter』ツールを開くとデフォルトで以下の2つのオプションが適用された状態です。
Click lock ▶︎ フィールド上でクリックするともう一度クリックするまでパーティクルが放出され続ける
Preserve comp ratio ▶︎ パネルサイズを拡張・縮小しても、コンポジションと同じ比率でフィールドサイズを自動調整
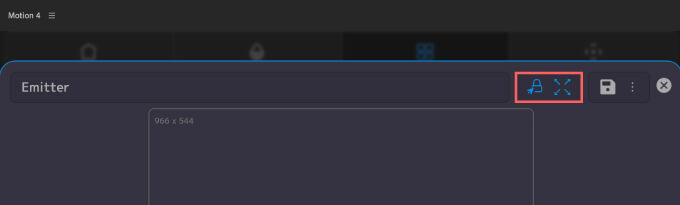
オプションはアイコンをクリックすると解除できますd(゚∀゚)
『Record』で撮影したパーティクルフィールドは『Add』ボタンでタイムラインに追加して利用することができます。
マスクやブレンドモードを使っていろんな使い方ができます。

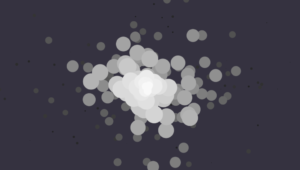
『Count』設定では1度に放出されるパーティクル(粒子)の数を調整することができます。
デフォルト設定は4つ、1〜99の間で調整できます。

『Distance』設定では放出されるパーティクル(粒子)1つ1つの間隔を調整することができます。
デフォルト設定は50%、1~200%の間で調整できます。
『Distance Variation』設定はパーティクル1つ1つの間隔に変化をつけることができます(ランダム化)。
デフォルト設定は100%、0~100%の間で調整できます。

(Default)
『Lifetime』設定はフィールドにパーティクルが表示される時間(寿命)を調整できます。
デフォルト設定は5.5s、0.1~20%の間で調整できます。

(Default)

『Scale Up Duration』設定はパーティクルが最大サイズになるまでの時間を調整できます。
デフォルト設定は0.35s、0〜5%の間で調整できます。

(Default)
『Initial Size』設定は放出時のパーティクルのサイズを調整できます。
デフォルト設定は5.5%、0〜200%の間で調整できます。

(Default)

『End Size』設定はパーティクルが消えるときのサイズを調整できます。
デフォルト設定は0%、0〜200%の間で調整できます。
『Birth Rate』設定はパーティクルを放出する間隔を調整できます。
デフォルト設定は1frame(s)、1〜30frame(s)の間で調整できます。
Count ▶︎ 4、Birth Rate ▶︎ 30frame(s)に設定した場合、1秒間(fsp30)に4つずつパーティクルが放出されるってことですd(゚∀゚)
『Color Variation』設定はパーティクルの色をランダム化する度合いを調整できます。
調整できるといってもカラーはモノトーンのみです。
デフォルト設定は90%、0〜100%の間で調整できます。


(Default)
『Color Burn』設定をONにするとパーティクルの色を徐々にフェード(段々と薄く)してくれます。
デフォルトでは『Color Burn / ON』になってます。
Color Variation ▶︎ 90%
Color Variation ▶︎ 90%
パーティクルをタイムラインに追加した後に
エフェクト▶︎カラー補正▶︎トライトーンでカラーを調整するといい感じになります。
塗りだと一色になので、トライトーンが手軽でおすすめです( ´ ▽ ` )
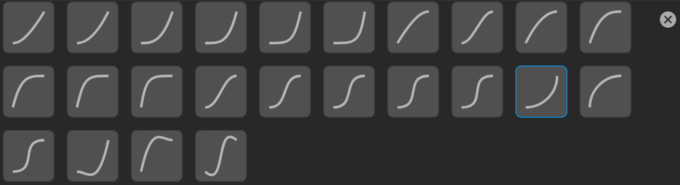
『Easing』設定はパーティクルの放出から消失までの動きにイージングをつけることができます。
イージングプリセットは24種類用意されてます。


パネルの右上にはオプションメニューが用意されています。
『Click lock』と『Preserve comp ratio』は最初の方で解説したので省きますd(゚∀゚)
①『Background』はフィールドの背景を透過にします。
④『Auto-save to new recordings』は
例えば、前回撮影したときと同じ名前で『Emitter』を撮影▶︎保存しようとした時に
通常は上書きするか、名前を変更して保存するか警告が表示されますが
『Auto-save to new recordings』をONにすることで警告を表示せずに
別の名前(Emitter1など)で自動保存してくれます。
⑤『Change folder export』は撮影したファイルの保存場所を変更することができます。
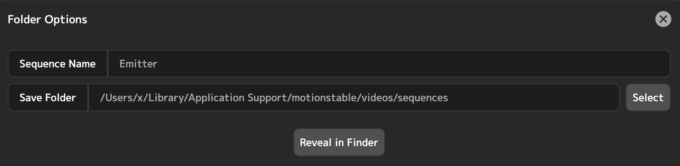
『Kinetic』は速度でアニメーションをコントロールすることができるツールになります。
例えば、シェイプレイヤーの色が黄色から青紫に変化するアニメーションをつけたとします。
このカラーのアニメーションを『Kinetic』ツールを使って速度でコントロールをしてみます。
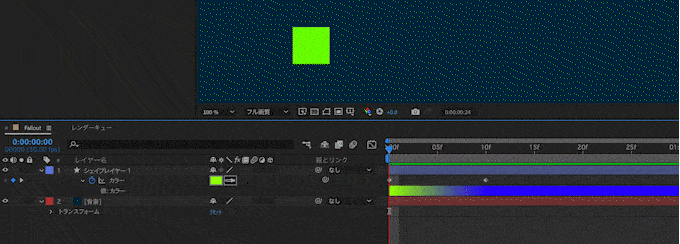
カラーにつけたキーフレームを選択した状態で『Kinetic』を選択すると
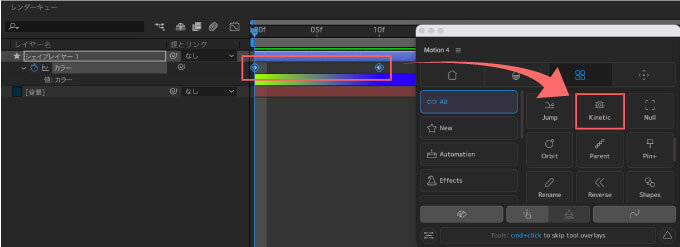
設定パネルが表示されます。基本的にはそのままの設定でOKです。
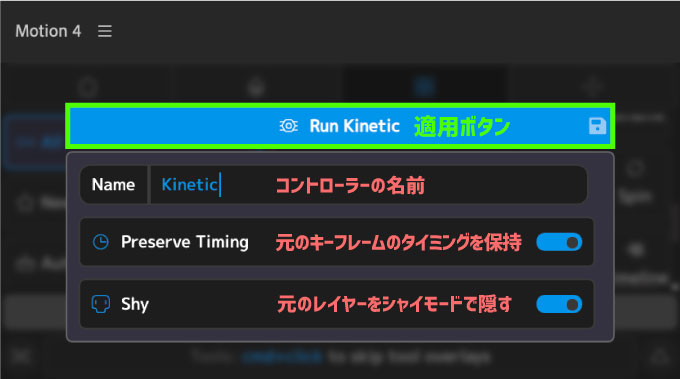
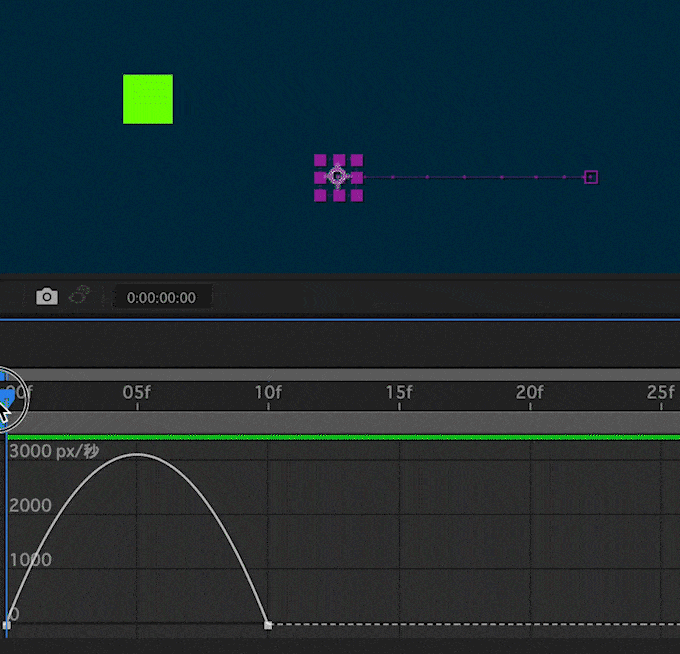
『Kinetic』を適用するとコントロール用のヌルレイヤーが作成され、元のレイヤーはシャイモードで非表示になります。
まずはヌルレイヤーの位置プロパティーにキーフレームを打ってアニメーションをつけ、イージーイーズをかけます。
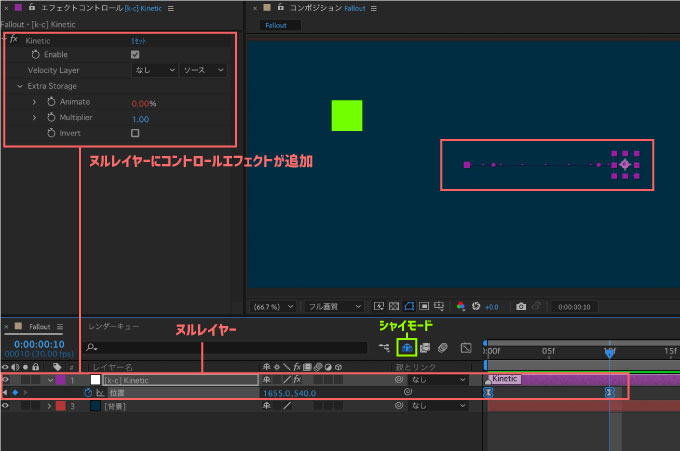
このヌルレイヤーにつけたアニメーションの速度で、『Kinetic』を適用したシェイプのカラーをコントロールしますd(゚∀゚)
ヌルレイヤー▶︎エフェクトコントロールパネル▶︎Kinetic▶︎Velocity Layer のなしを新規作成されたヌルレイヤー([k-c]Kinetic)に設定します。
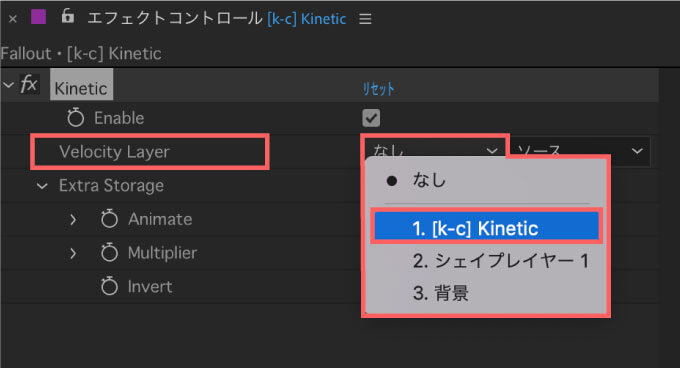
これでヌルレイヤーと『Kinetic』を適用したシェイプレイヤーのカラーアニメーションとの紐付けが完了しました。
ヌルレイヤーの動きに対してシェイプレイヤーのカラーがチラチラしてるのが確認できます。
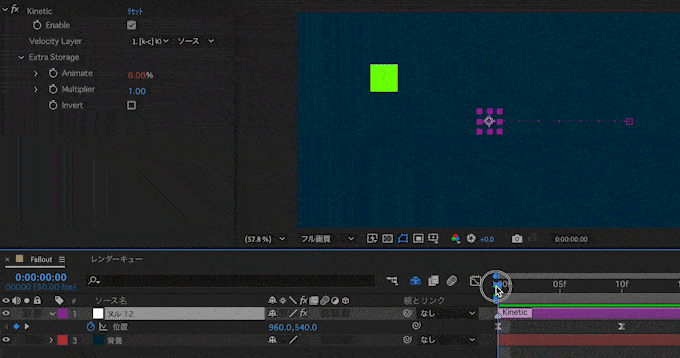
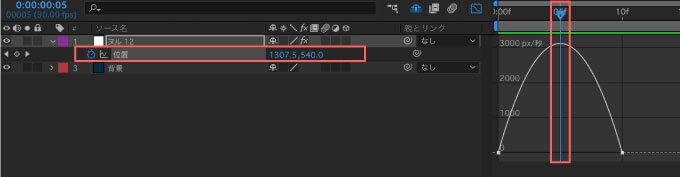
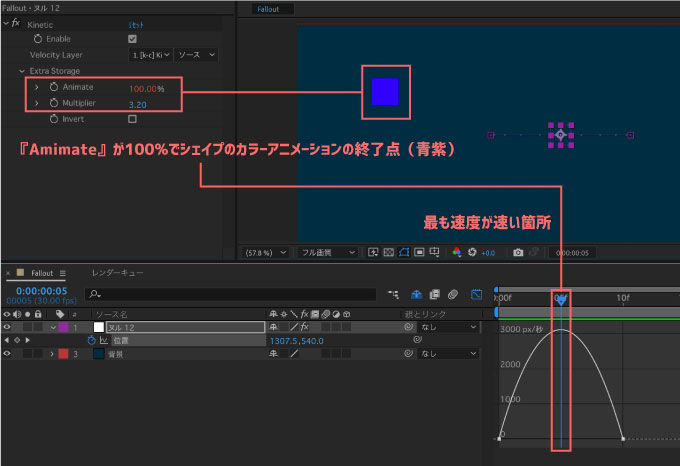
『Kinetic』では基本的に速度が最も速くなった箇所で設定したアニメーションが終点になります。
今回の例ではシェイプレイヤーのカラーは黄色から青紫に変わるアニメーションだったので、ヌルレイヤーの速度が最も速い箇所でシェイプのカラーが青紫になるように微調整します。
調整方法はヌルレイヤー(位置)の速度グラフを表示してシークバーを速度が最も速い箇所に合わせます。
ヌルレイヤー▶︎エフェクトコントロールパネル▶︎Kinetic▶︎Animate の数値が100になるとシェイプのカラーが青紫になる終了点なので
ヌルレイヤー(位置)の速度が最も速い部分で『Animate』の数値が100になるように『Multiplier』の数値を調整します。
再生すると速度が最も速い箇所で青紫になり、速度が遅くなるにつれて黄色になります。
応用すると停止しているときは黄色、速度が最も速い箇所は青紫になるアニメーションができます。
これを不透明度のプロパティーに同じように設定すれば停止したら出現・消失させたり
スケールのプロパティーに同じように設定すれば最速のときに拡大・縮小したり…いろんなアレンジができます。
速度とアニメーションをバインドして使いたい方にはおすすめのツールですd(゚∀゚)
『Shapes』は15種類のシェイプの中から1つをワンボタンでタイムラインに追加できるツールになります。
『Shapes』を開くと15種類のシェイプが表示されます。
追加したいシェイプを選択して『Run Shapes』を押せばタイムラインに追加できます。
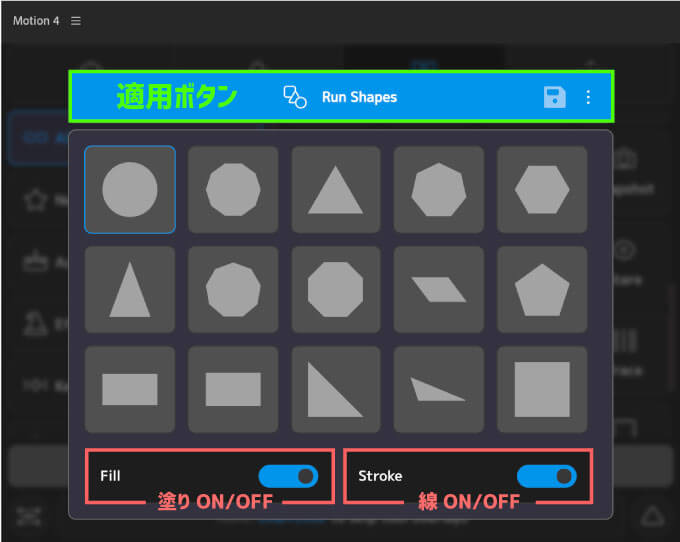
塗りと線は選択できますがカラーはグレーのみです。
カラーも設定できればよかったのですが…
おそらく次のアップグレードあたりで追加されると( ´∀`)
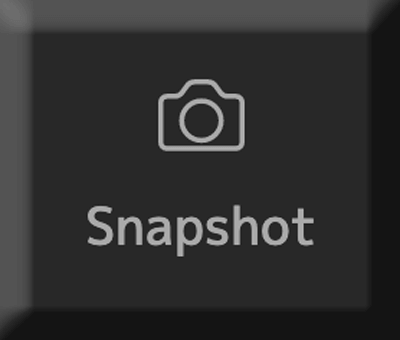
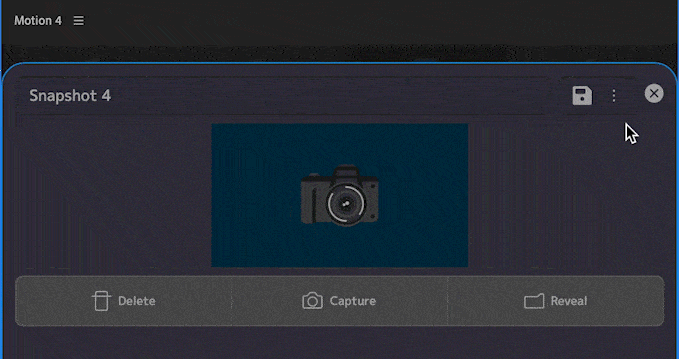
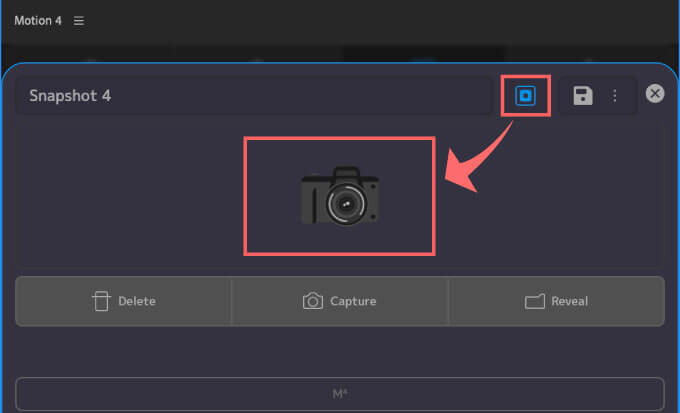
『Snapshot』はプレビューのスナップショットを撮影・保存できるツールになります。
『Snapshot』ツールを選択すると以下のツールパネルが開きます⬇︎⬇︎
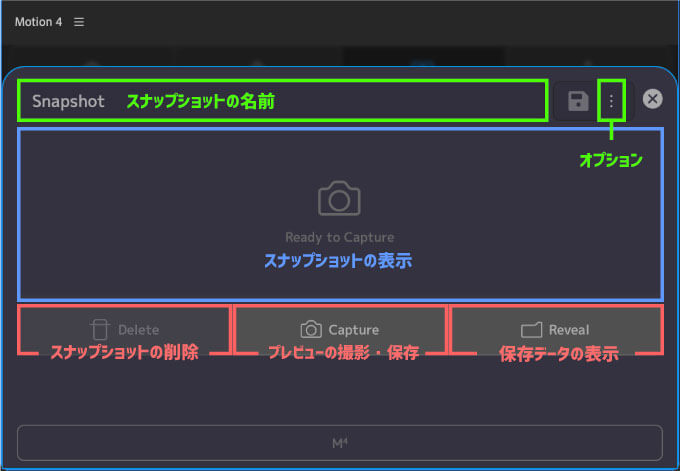
真ん中の『Cupture』ボタンを押すとプレビューに表示されているフレームが撮影され、中央に表示されます。
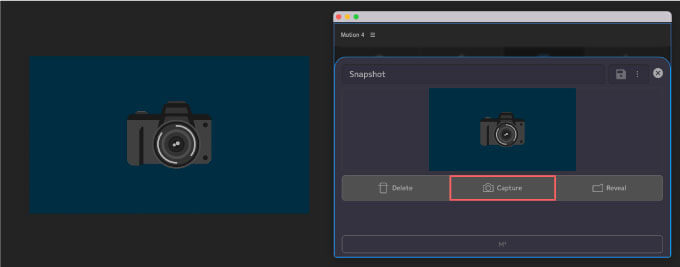
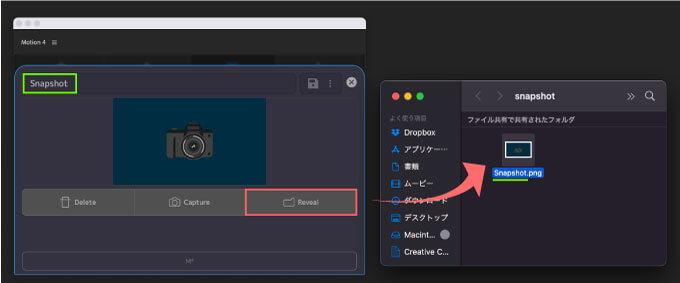
『Reveal』ボタンを押すと設定した名前(Snapshot)で撮影した画像がフォルダに保存されています。
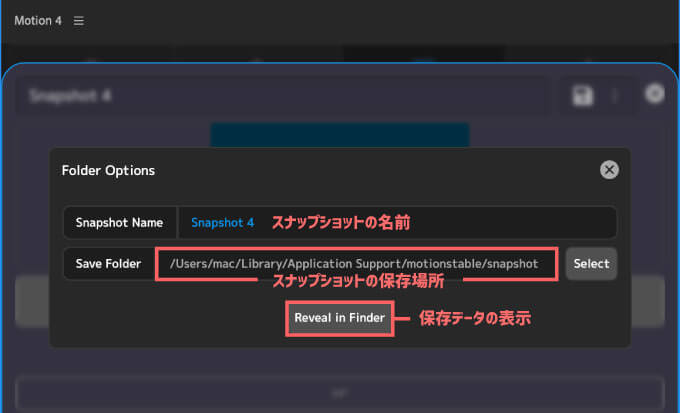
画像はデフォルトで/Users/mac/Library/Application Support/motionstable/snapshotに保存される設定になってます。
『Delate』ボタンでは最後に撮影したスナップショットを削除することができます。
1枚目は1枚目のみ削除、3枚撮ったら3枚目のみ削除されます。
以前撮影したスナップショットは『Delate』ボタンでは削除できないので、保存されたフォルダから直接削除してください。
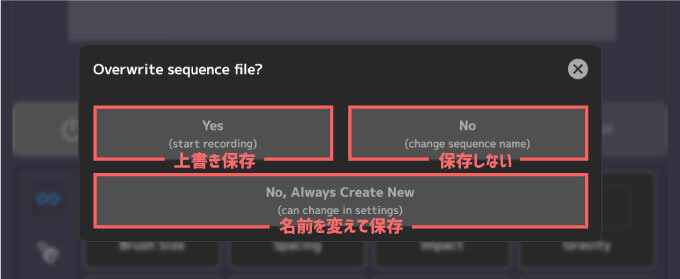
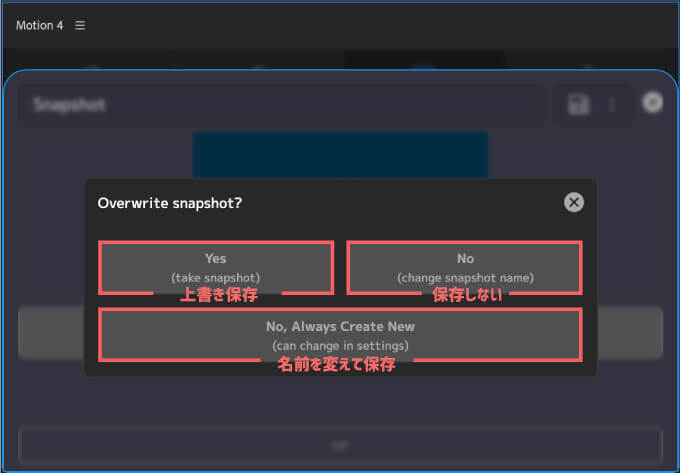
同じ名前(Snapshot)の設定で2回目も同じ名前で撮影すると『Overwrite snapshot?(上書きしますか?)』と表示されるので
Yes ▶︎ 上書き保存
NO ▶︎ 保村しない
No,Always Create New ▶︎ 名前を変えて保存(数字がついて『Snapshot 1』で保存)
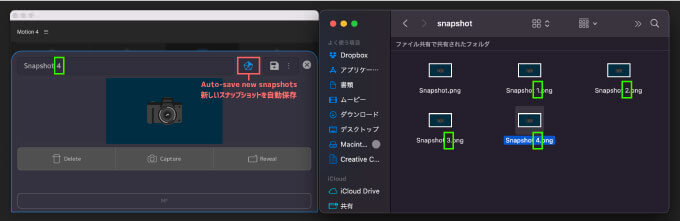
『No,Always Create New』を選択するとパネルの右上に青いアイコン『Auto-save new snapshots(新しいスナップショットを自動保存)』が表示されます。
このアイコンが表示されてると名前をそのままで連続撮影しても名前に数字が追加された状態で自動保存されます。
右上に表示された青いアイコン『Auto-save new snapshots(新しいスナップショットを自動保存)』は、右上にあるオプションメニューからも設定することができます。
アイコンをクリックすると設定が解除されます。
オプションメニューの『Change save folder(保存フォルダの変更)』では画像データの保存場所を変更することができます。
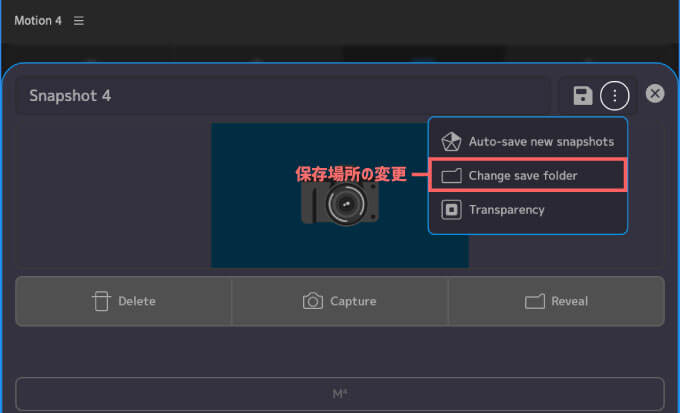
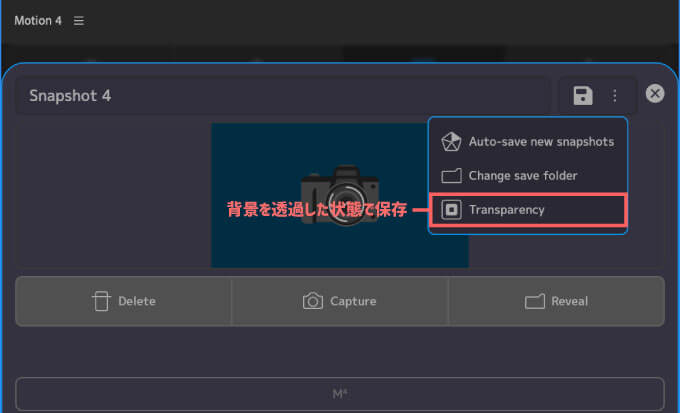
オプションメニューの『Transparency(透明度)』を設定するとアルファ情報を含む(背景が透明)状態で保存することができます。
『Anchor』ツールは色んな条件を指定してレイヤーのアンカーポイントを移動することができます。
『Anchor』ツールを開くとアンカーポイント移動ツール下に6つのボタンが用意されてます。
『Rotation Lock』は通常はレイヤーを180°反転するとアンカードットの左右の位置も反転しますが
『Rotation Lock』をONにすると回転しても左右の位置関係を保つことができます。
『Include Masks』は『ON』にするとマスクパスの範囲も含めたアンカーポイントを計算して移動します。
『Include Masks』はデフォルトで『ON』になってますd(゚∀゚)
『To Fast』▶︎ すべてのレイヤーアンカーポイントを最初に選択したインデックスに調整
『To Last』▶︎すべてのレイヤーアンカーポイントを最後に選択したインデックスに調整
『Center』▶︎ 選択したレイヤーのアンカーポイントを中心に配置後、中央座標に集める
『Average』▶︎ 選択した全てのレイヤーの中央位置に全てのアンカーポイントを集める
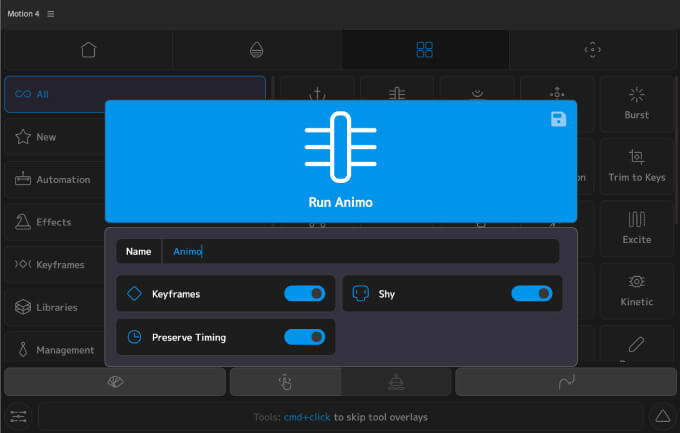
『Animo』はアニメーションをつけたレイヤーのキーフレームを統合(Merge)して一括制御できるヌルレイヤー+コンローラーを作成し、一括管理・調整できるようにするツールです。
例えば、複数のシェイプにアニメーションをつけたとします。まだイージングはつけてません。

アニメーションの動きを一括管理したいレイヤーのキーフレームを全て選択した状態で『Tools』▶︎『Animo』をクリックします。
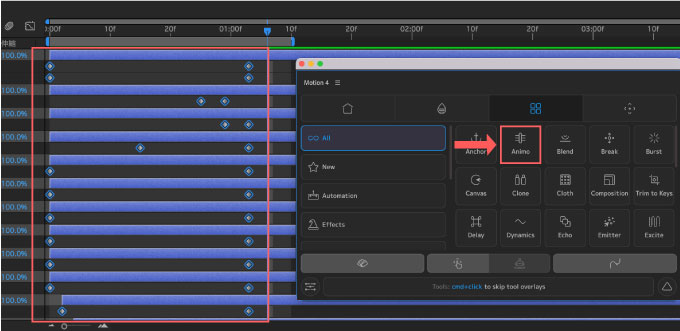
『Animo』ツールの設定パネルが表示されます。
『Keyframes』▶︎ 一括制御するために作成されるヌルにキーフレームの情報をつけるかどうかを設定
『Shy』▶︎ 新規作成されるヌルレイヤー以外のレイヤーをシャイモードで隠すかどうかを設定
『Preserve Timing』▶︎ 選択した元のキーフレームのタイミングをそのまま保持するか設定
設定後水色の『Run Animo』で『Animo』を適用します。
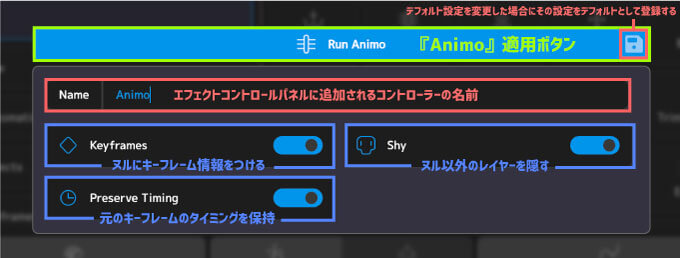
今回はデフォルト設定のまま適用しますd(゚∀゚)
『Animo』を適用するとヌルレイヤーが作成され
エフェクト▶︎『Animo』▶︎『Animate』プロパティーにキーフレームの情報が引き継がれます。
ヌルレイヤーに集約されたキーフレームを『Animo』のエフェクトコントローラーで一括制御できます。
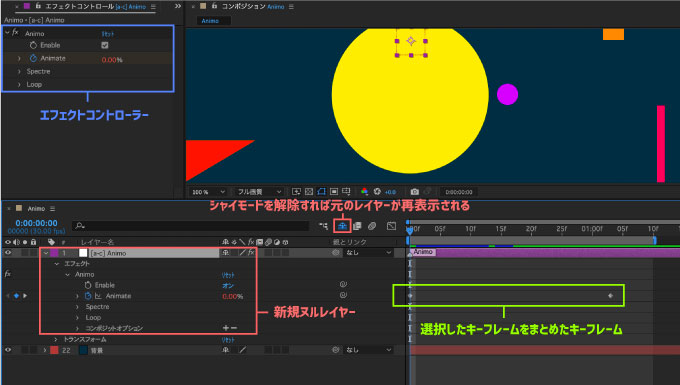
シャイモードを解除すれば消えたレイヤーを再表示できますd( ̄  ̄)
『Animo』でまとめられたシェイプのキーフレームに同じタイミンングで一気にイージングをつけることができます。

エフェクトコントロールパネル ▶︎ Animo ▶︎ Loopでは
『Enable』にチェックを入れた状態で『Type』から『Cycle』ループもしくは『Ping-Pong』ループをつけることができます。

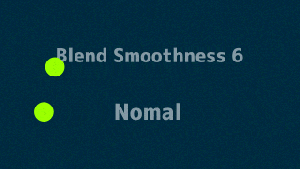
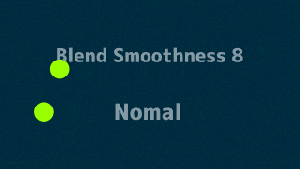
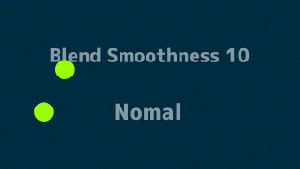
『Blend』はアニメーションの軌道を滑らかに(偏平化)することができます。
位置プロパティーにキーフレームを打ってアニメーションをつけたシェイプレイヤーに
位置プロパティーを選択した状態で『Blend』を適用するとエフェクトコントロールにBlendコントロールエフェクトが追加されます。
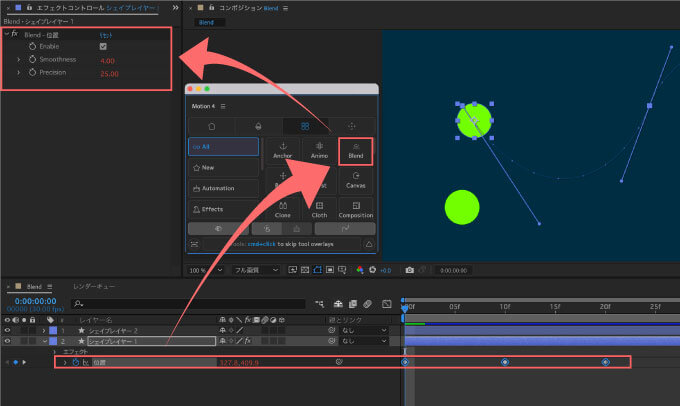
『Smoothness』の数値を上げるほどパスの軌道が偏平化します。
ペジェやキーフレームをいじらずに手早くアニメーションの軌道を滑らかにしたい場合に便利です( ´ ▽ ` )
『Break』ツールでは『Illustrator』で作られたベクターファイルをシェイプに変換して各レイヤーを個別に分解することができます。
ベクター画像には『Illustrator』のファイル(.ai)以外にも『SVG』や『EPS』『PDF』がありますねd(゚∀゚)
『After Effects』に読み込んだベクターレイヤーに『Break』を適用すると、ベクター画像がシェイプ化(アウトライン化)されます。
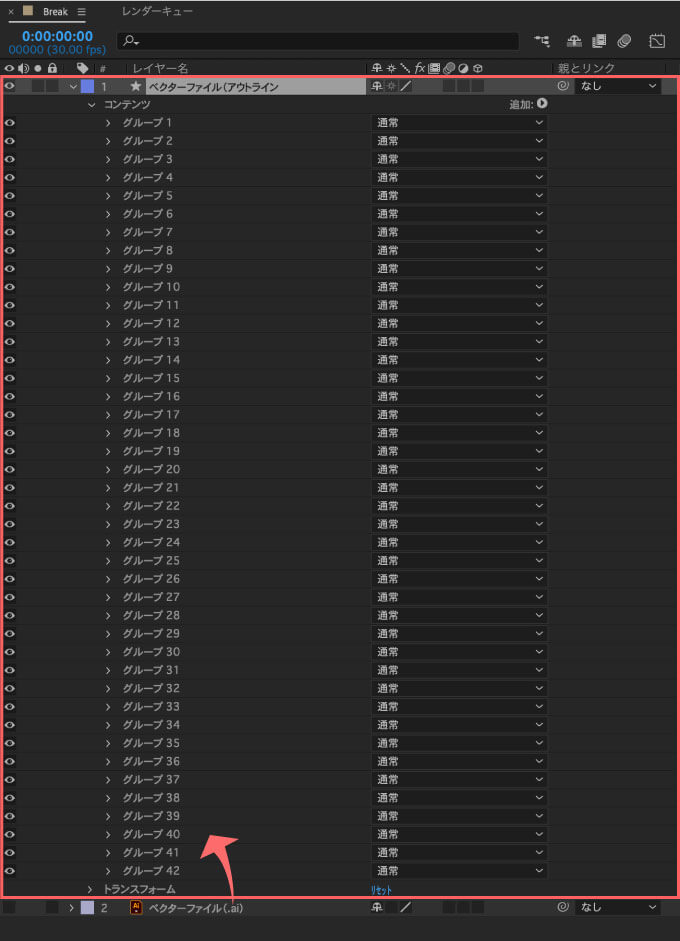
このままだと1つのレイヤーにまとめられてるので使いにくい…(ー ー;)
『Break』ツールでシェイプ化(アウトライン化)したレイヤーを選択した状態で、もう一度『Break』を適用すると、1つのレイヤーにまとめられたシェイプを全て別々のシェイプレイヤーに分解してくれます。
この『Break』ツールで2回押すことでベクターファイルを全て個別のシェイプレイヤーに分解してくれる機能を
『Illustrator』で作成した通りにレイヤーの階層も保ったまま1ボタンでAfter Effectsに飛ばしてくれる超人気スクリプトが『Overload』になります⬇️⬇️
『Overload』はほんと神スクリプトですね…(〃ω〃)
『Burst』は花火のように弾けるラジアルバーストアニメーションを簡単に作ることができるツールになります。
『Brust』ツールを選択するとエフェクトコントローラーの適用されたシェイプレイヤー(Burst)が作成されます。
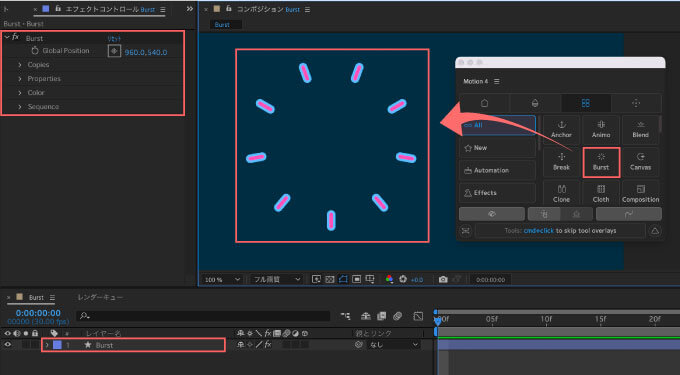
各エフェクトプロパティーの機能は以下の通りです⬇︎⬇︎
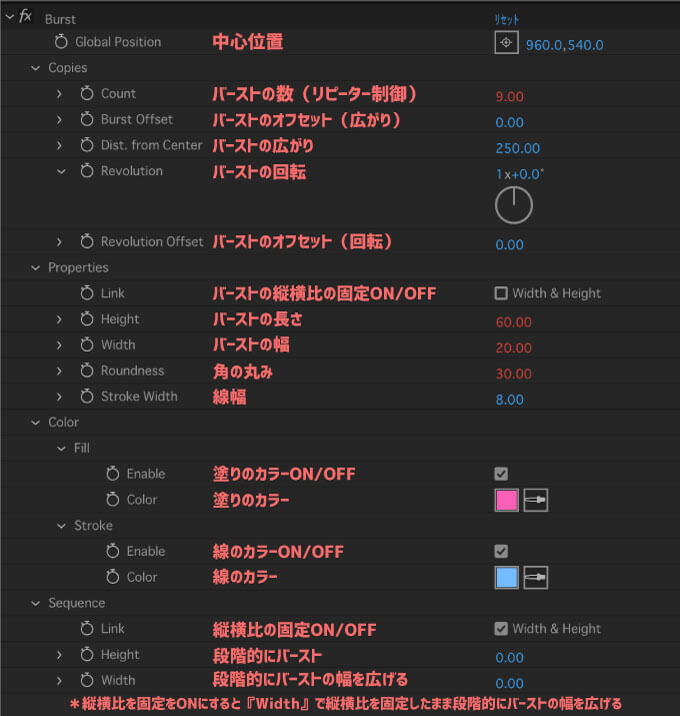
各プロパティーを調整することで色んな形のラジアルバーストアニメーションが作れます٩( ᐛ )و
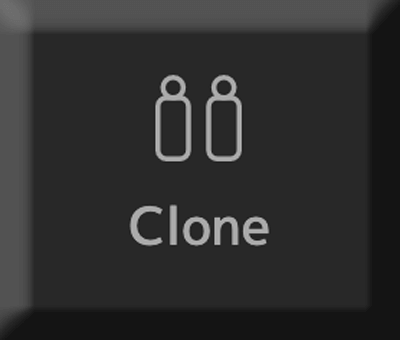
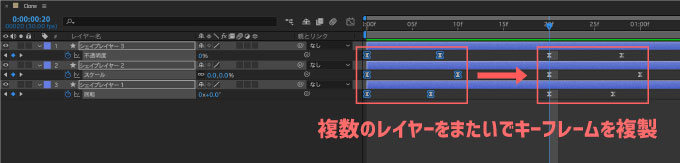
『Clone』ツールでは複数のレイヤーに打たれたキーフレームを全て同時に複製することができます。
例えば、通常の場合は複数のレイヤーに打たれたキーフレームを全て同時に複製しようとすると
選択したキーフレームのレイヤー自体がそのまま複製されてしまいますが
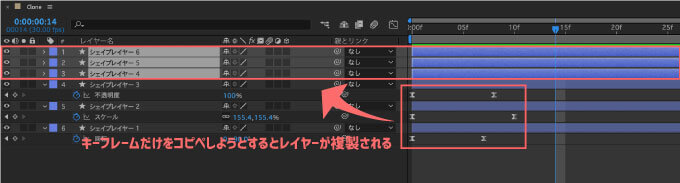
『Clone』ツールを使えば、複数のレイヤーをまたいでキーフレームを複製することができます。
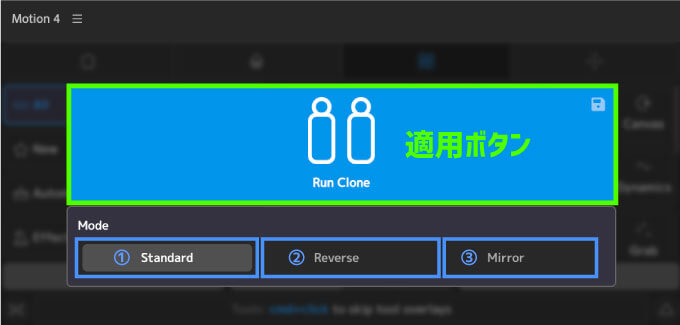
『Clone』ツールには3つの機能が用意されています⬇︎⬇︎
①『Standard』▶︎ 選択したキーフレームをそのまま複製する
②『Reverse』▶︎ 『Clone』ツールには3つの機能が用意されてい
③『Mirror』▶︎ 鏡に映ったように選択したキーフレームをそのまま反転複製します。
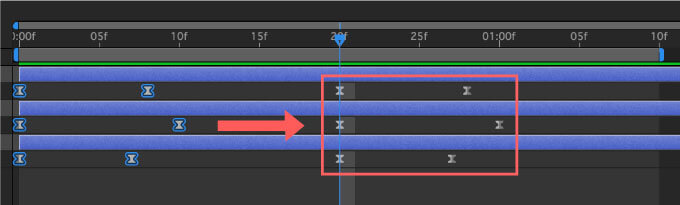
①『Standard』機能は選択したキーフレームをシークバーの位置にそのまま複製することができます。


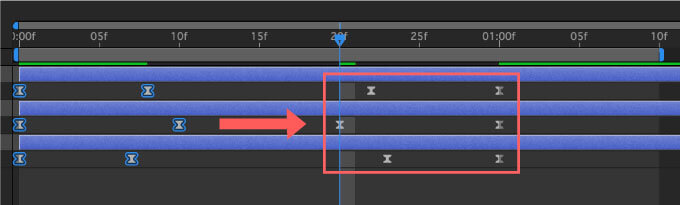
②『Reverse』機能はキーフレームの位置関係を保ったまま、値のみを反転させた状態で選択したキーフレームを複製することができます。

③『Mirror』機能は 鏡に映ったように選択したキーフレームをそのまま反転複製することができます。

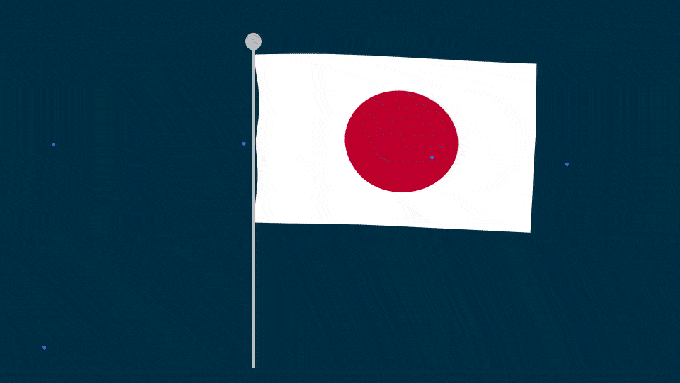
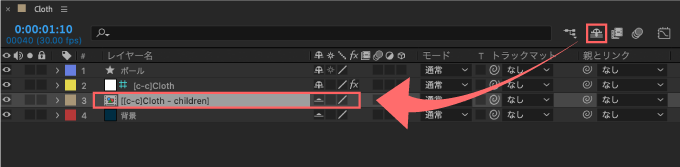
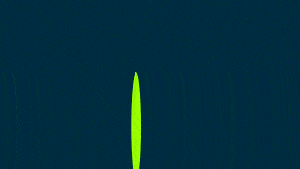
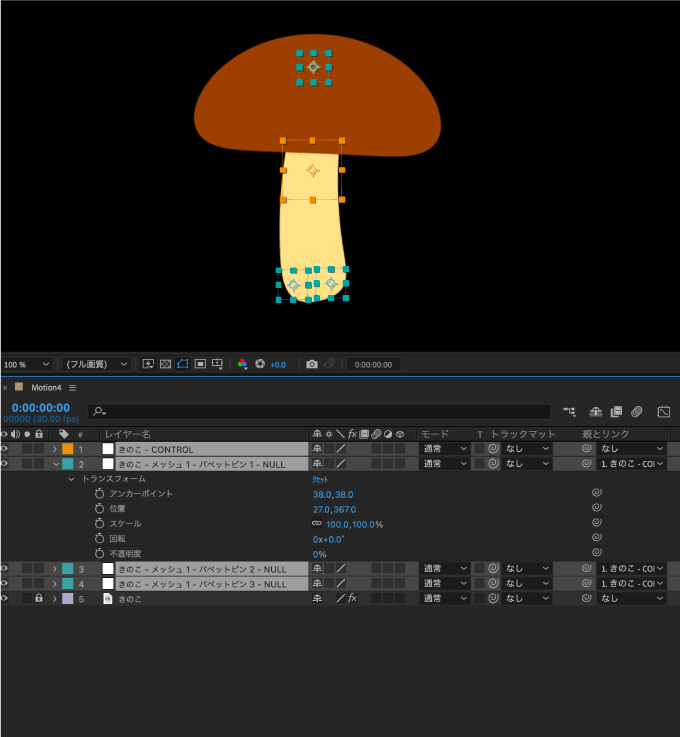
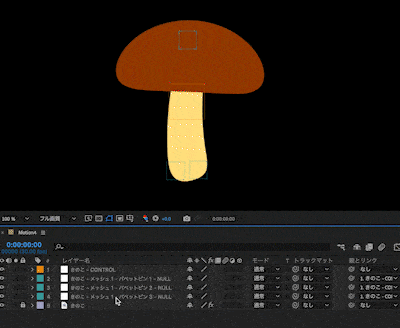
『Cloth』はソフトボディーオブジェクト=ヒラヒラと布が揺れるようなオブジェクトを作ることができるツールになります。
例えば、以下の旗をパタパタとはためかせたいときに⬇︎⬇︎

まずはパペットピンツールで旗とポールの接着面あたりと旗の中央にピンを打ちます。
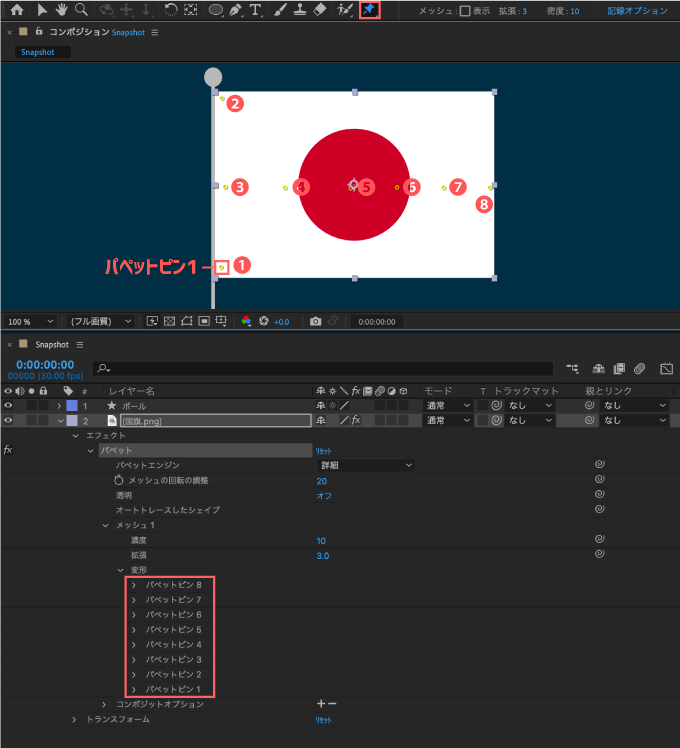
旗とポールの接着面(固定して動かさない位置)から先にピン留めした方が、後々作業がしやすいですd(゚∀゚)
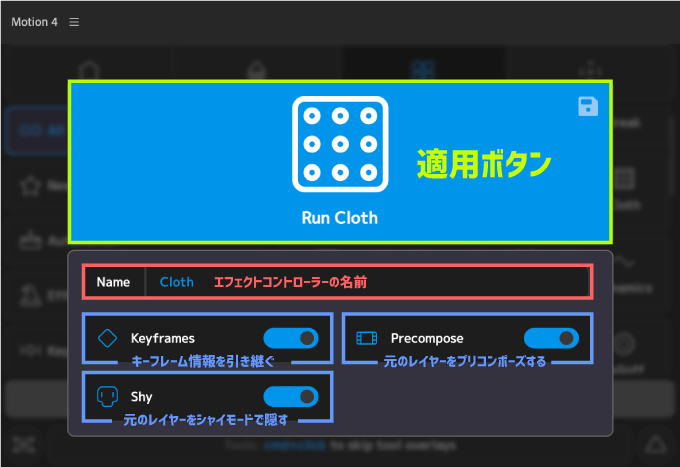
ピン留めをした旗のレイヤーを選択した状態で『Cloth』ツールを選択すると
以下のパネルが表示されます⬇︎⬇︎ 今回はデフォルトの設定で適用します。
『Cloth』のエフェクトコントローラーが付いたヌルレイヤーが作成され、元のレイヤーはシャイモードで非表示になります。
エフェクトコントロールパネルの[d-p]位置 ▶︎ Advanced ▶︎ Dynamics ▶︎ Enable をONにします。
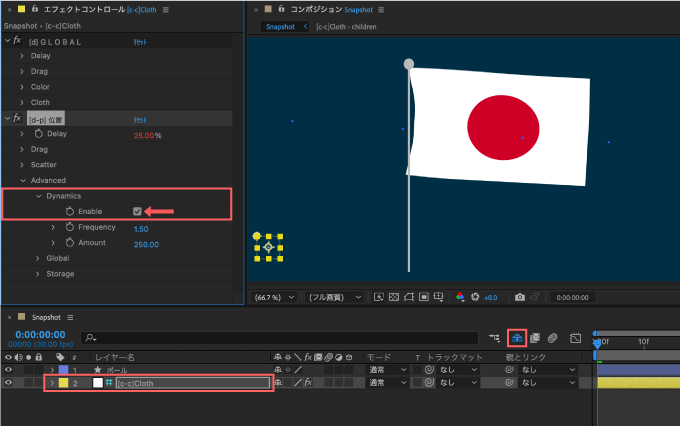
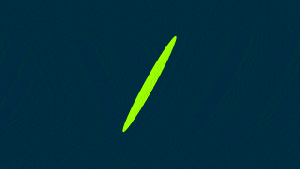
すると旗の部分がパタパタと動きます。
そのままだと旗がポールから離れてしまっているので、エフェクトコントローラーで調整していきます。

シャイモードを解除するとプリコンポジションが表示されるので開きます。
パペットピンがシェイプ化されたレイヤーが表示されるので
ポールの接着面にピン留めしたパペットピン1〜3のエフェクト ▶︎ [d-c]位置 ▶︎ Magnetism ▶︎ Enable と Mirrored をオンにします。
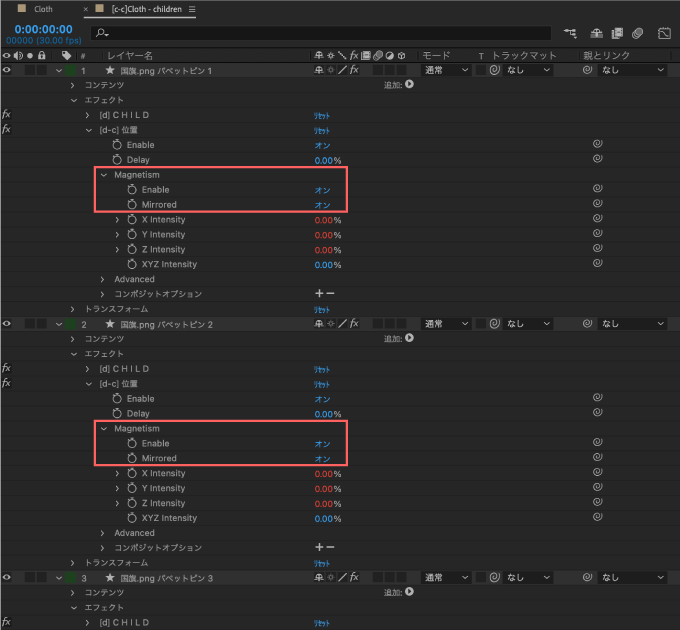
これでパペットピン1〜3が固定=旗がポールに固定されていい感じにパタパタなります。
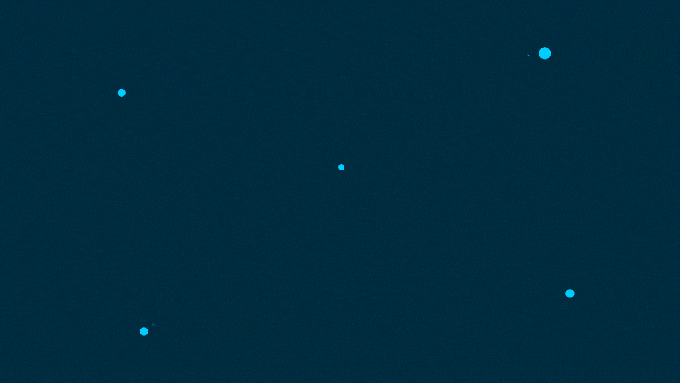
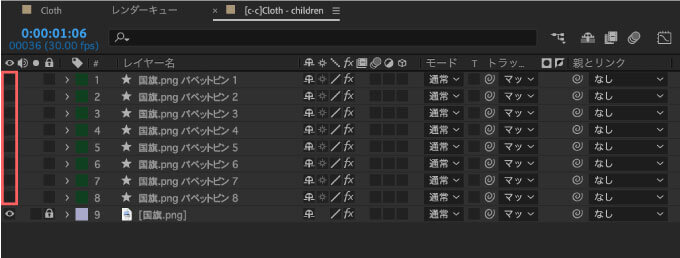
このままだと青い点(パペットピン)の位置が映像に表示されてしまうので、コンポジション内のパペットピンを全て非表示にしておきます。
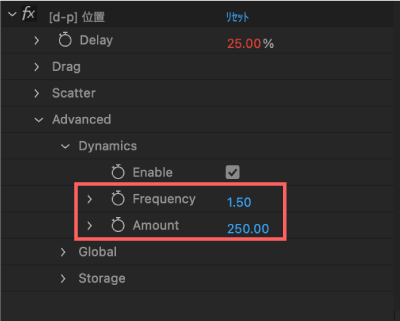
旗のパタパタ具合はエフェクトコントロールパネルの[d-p]位置 ▶︎ Advanced ▶︎ Dynamics ▶︎ Frequency,Amount で調整することができます。

『Composition』ツールは『Motion4』のパネル上でコンポジションの各種設定を調整することができます。
『Composition』ツールを開くと設定パネル(Compositionタブ)が開きます。
よく変更する項目がまとめられてるので、とても扱いやすくて便利です。
『Library』タブにはコンポジションのプリセットが『Sizes』『Durations』『Frames』に分けて用意されています。
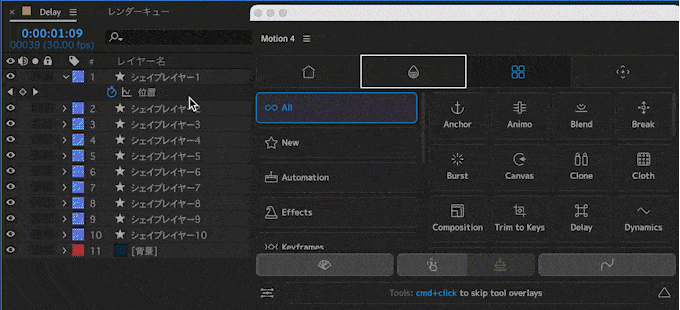
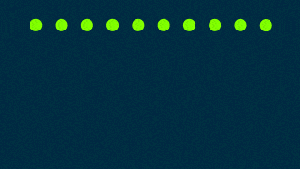
『Delay』ではキーフレームを移動せずにレイヤーをオフセットできるツールになります。
例えば、以下のようなアニメーションを作ったとします⬇︎⬇︎
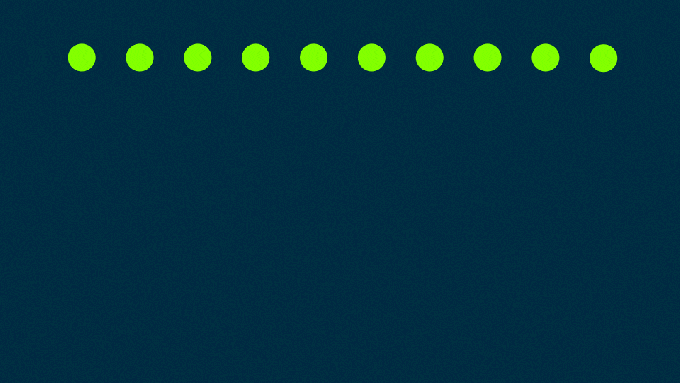
一番左端のシェイプレイヤー ▶︎ キーフレームを打っているプロパティー(位置)を選択した状態でオフセットしたいシェイプレイヤーをShift+クリックで一括選択します。
この状態で『Delay』ツールをクリックしてください。
シェイプレイヤーだけだったり、全てのプロパティー、ここでは全ての位置プロパティーを選択した状態で『Delay』を適用してもエラーになります( ´ ▽ ` 😉
今回はデフォルト設定のままで適用します。
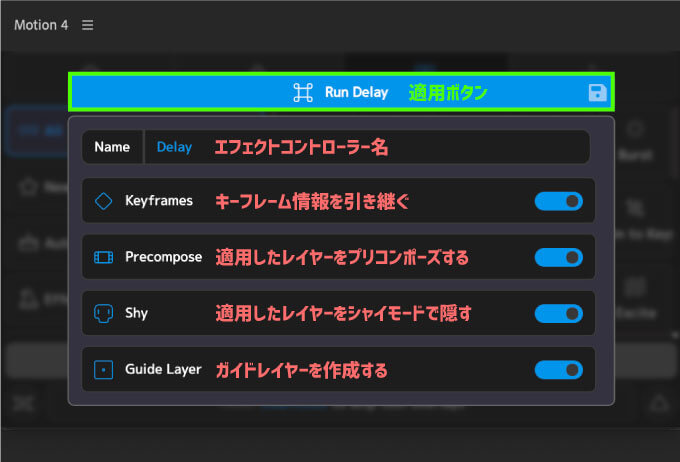
『Guide Layer』をOFFにするエフェクトコントローラーを適用したシェイプレイヤーが作成されますd( ̄  ̄)
『Delay』のエフェクトコントローラーが適用されたガイドレイヤーが作成され、適用したレイヤーがオフセットします。
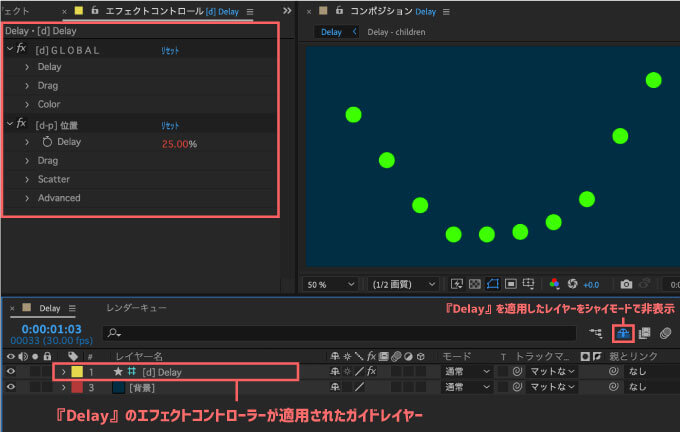
エフェクトコントロールパネル ▶︎ [d-p]位置 ▶︎ Delay を調整すれば、オフセットのタイミングをコントロールすることができます。
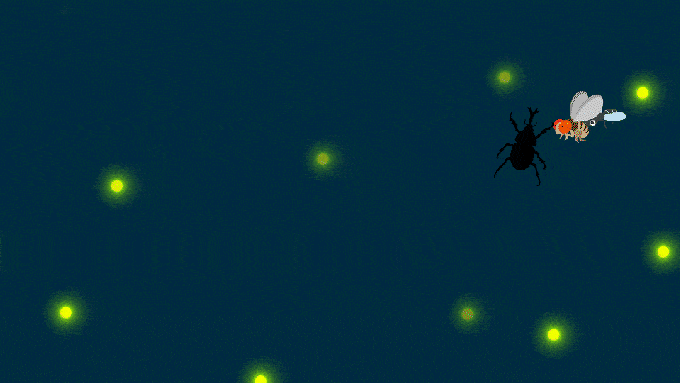
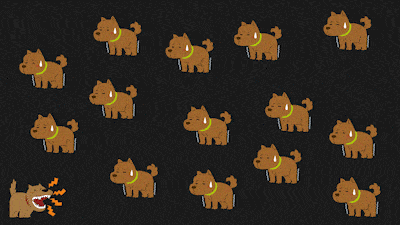
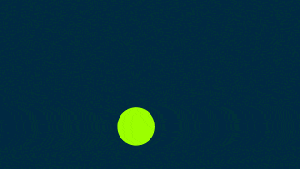
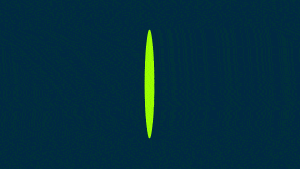
『Dynamics』ツールでは各プロパティーをランダム化して制御することができます。
『Dynamics』を使えば簡単にエクスプレッションの『Random』をつけてコントローラー制御できるといった感じです٩( ᐛ )و 光や虫の動きに使ったりしますd(゚∀゚)
ランダム化したいレイヤーのプロパティーを選択した状態で『Dynamics』を適用すると、適用したプロパティーがランダム化されエフェクトコントローラーが追加されます。

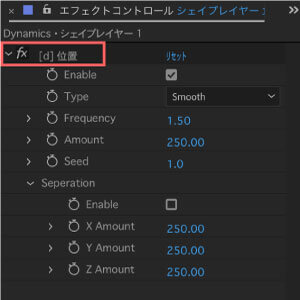
『Dynamics』を適用するとデフォルトでエクスプレッションの『Random』のような効果が付与されます。
複数のプロパティーやレイヤーに同時に適用できます。


エフェクトコントロールパネルに追加された『Dynamics』エフェクトコントローラーでは、適用した各トランスフォームプロパティー毎に以下のプロパティーを調整することができます。
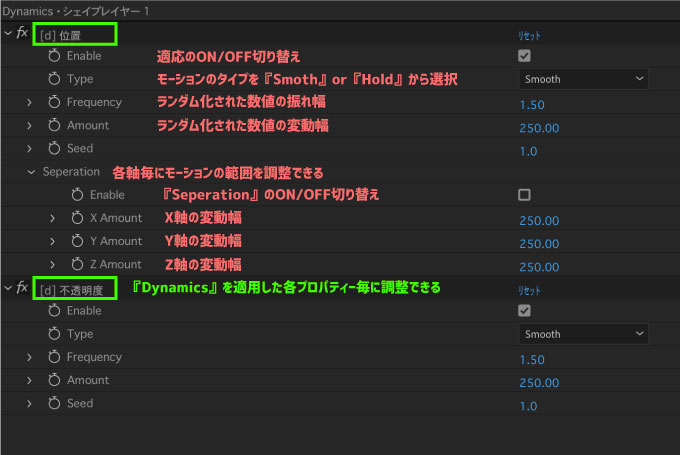
『Type』はランダム化されたモーションのタイプを『Smooth』or『Hold』から選択することができます。


『Seperation』は各軸(x.y.z)毎にモーションの範囲を調整できます。


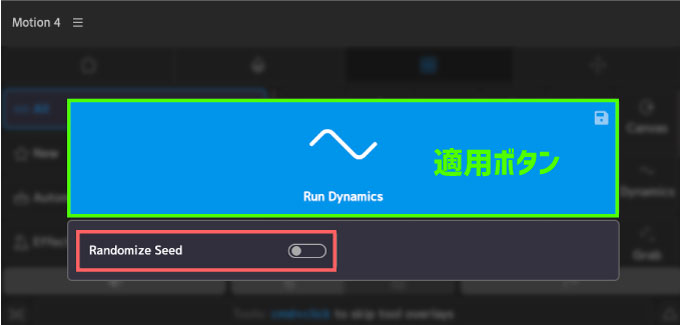
『Dynamics』ツールの適用ボタン下にある『Randomize Seed』は
『OFF(デフォルト)』の場合は同時にランダム化したトランスフォームプロパティーの全てが同じ動き
『ON』の場合は同時にランダム化したトランスフォームプロパティーの全てが異なった動きになります。

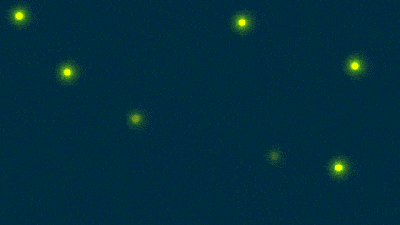
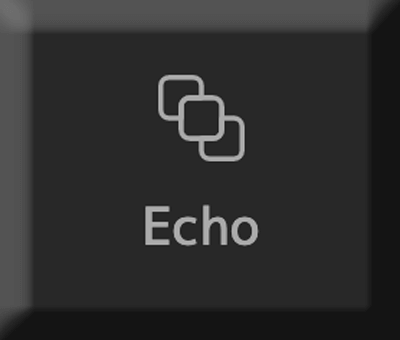
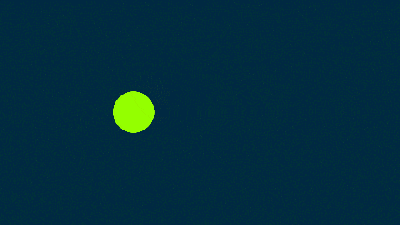
『Echo』はオブジェクトに残像をつけることができるツールになります。
エフェクトのエコーと同様の効果が得られます。
例えば、以下のようなアニメーションのキーフレームを選択した状態で『Echo』ツールを適用すると

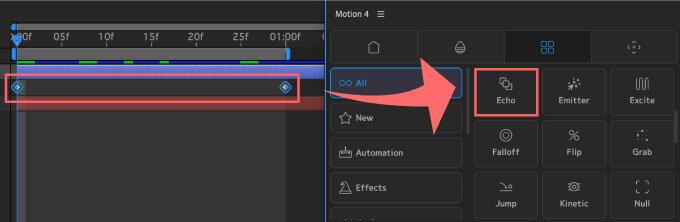
設定パネルが表示されます。
今回はデフォルトのまま『Add Echo』ボタンで適用します。
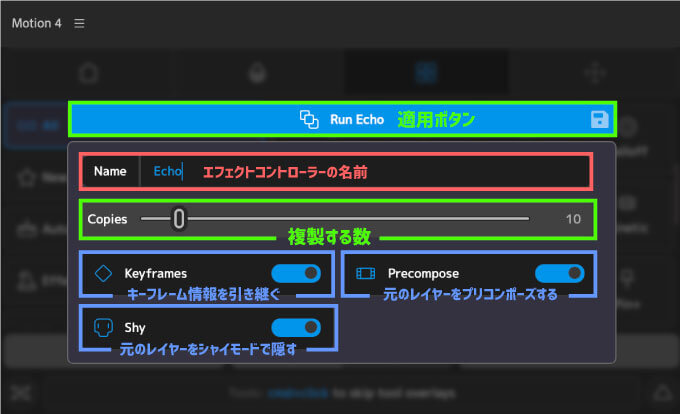
『Echo』ツールを適用するとコントロールレイヤーが作成され、元のレイヤーはシャイモードで非表示となります。
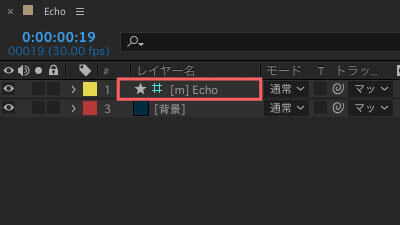
『Echo』ツールを適用するとコントロールレイヤーが作成され、元のレイヤーはシャイモードで非表示となります。
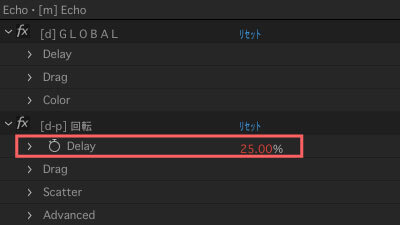
エフェクトコントロールパネルに追加された[d-p] の『Delay』で複製された残像の距離をコントロールできます。

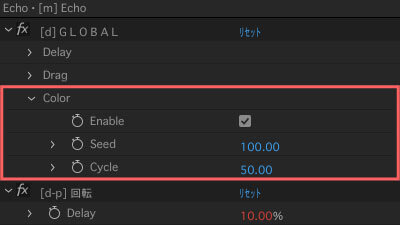
[d]GLOBAL ▶︎ Color ▶︎ Enable / ON にすると複製された残像にカラフルなカラーがつきます。
『Seed』でカラー調整、『Cycle』でカラーアニメーションをつけることができます。
他のエフェクトプロパティーも色々と試してみましたが、ほとんど使いものにならない…_(┐「ε:)_w
エフェクトのエコーの方が複数のプロパティーを調整できるので、エフェクトのエコーを使った方が扱いやすいかと思います…

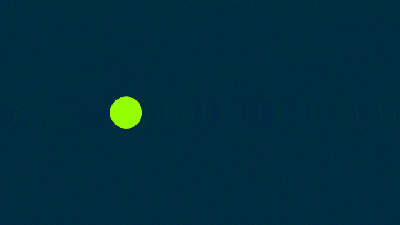
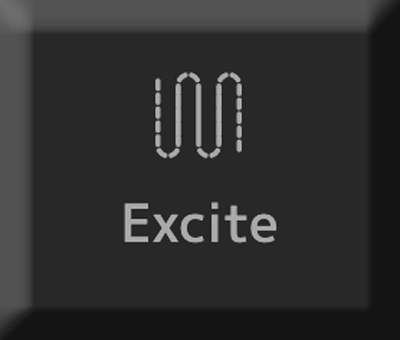
『Excite』はボヨヨーンと一旦広がって縮む弾むような効果をつけることができるツールになります。
他のツールでは『Elastic』と呼ばれることが多いですd(゚∀゚)
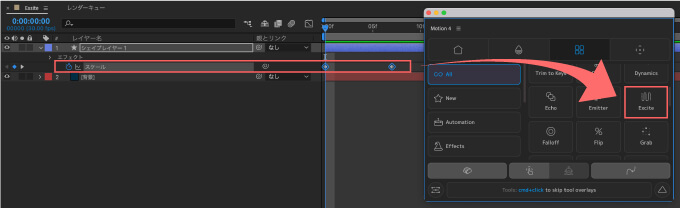
弾むような効果をつけたいレイヤーのキーフレームを選択した状態で『Excite』を適用します。
今回はスケールプロパティーのキーフレームに適用します。
以下のような弾むような効果をつけることができます⬇︎⬇︎

『Excite』は公式チュートリアルでも位置プロパティーに適用する方法で解説されてますが
どちらかといえば『Jump』ツールの方が跳ね返り効果をつけるのに適してますd(゚∀゚)
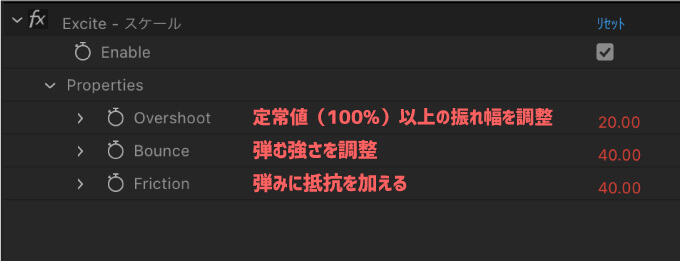
『Excite』を適用するとエフェクトコントローラーがつきます。
エフェクトコントロールパネルから各プロパティーを調整することで弾む効果を微調整することができます。
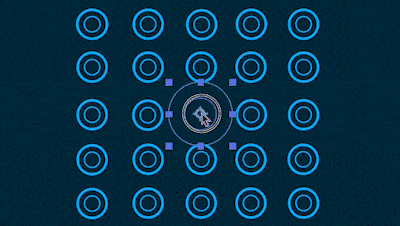
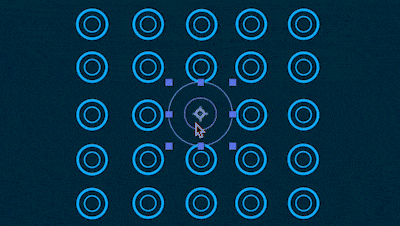
『Falloff』ツールは適用したトランスフォームプロパティーにサークルとコントローラーを使って一定の影響を与えることができるツールになります。

『Falloff』を適用したいプロパティーを選択した状態(複数可)で『Falloff』を適用すると
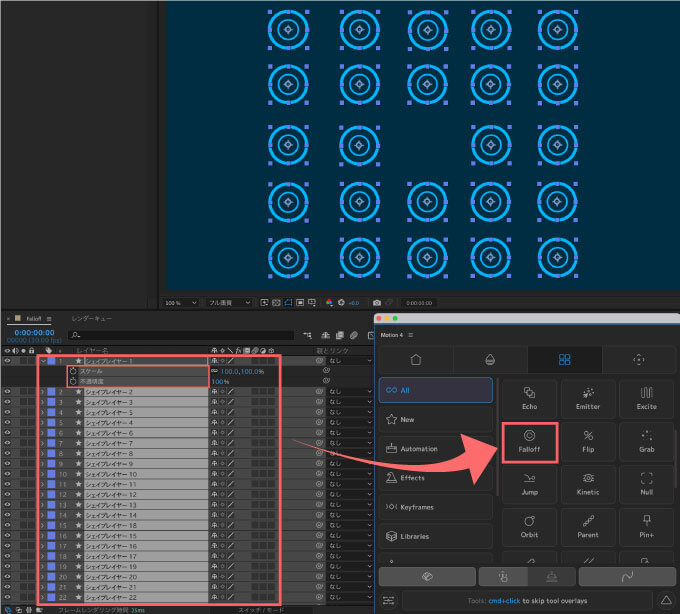
コントロールレイヤーとプレビューにサークルが追加されます。
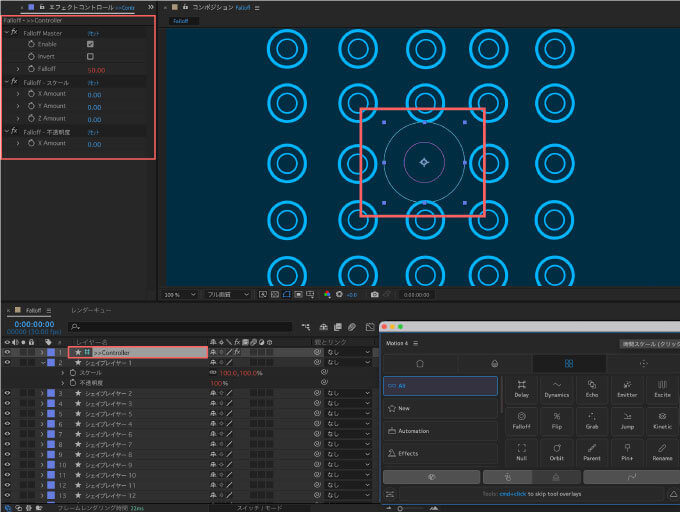
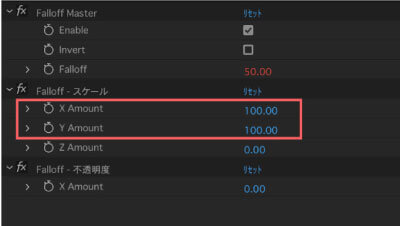
例えば、エフェクトコントロールパネル ▶︎ Falloff スケール ▶︎ X,Y Amountを100に設定すると
サークルが触れたシェイプレイヤーのスケールがX.Y軸に100拡大するようになります。
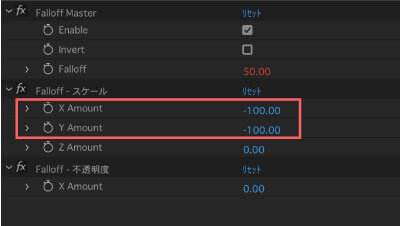
エフェクトコントロールパネル ▶︎ Falloff スケール ▶︎ X,Y Amountを-100に設定すると
サークルが触れたシェイプレイヤーのスケールが縮小します。
エフェクトコントロールパネル ▶︎ Falloff 不透明度 ▶︎ Xを-100に設定すると、サークルが触れたシェイプレイヤーが消えます。
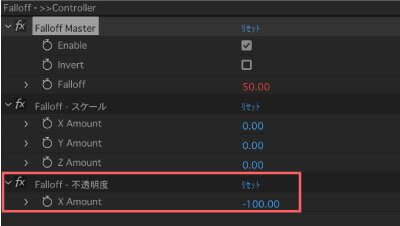
エフェクトコントロールパネル ▶︎ Falloff Master ▶︎ Invert / ONにすると
全てのプロパティーの効果が反転され、サークルが触れたシェイプレイヤーが出現します。

サークル(コントロールレイヤー)と一緒に動かしたいレイヤーを親子付けすれば、『Fallout』を適用したプロパティーを組み合わせていろんな表現ができます。

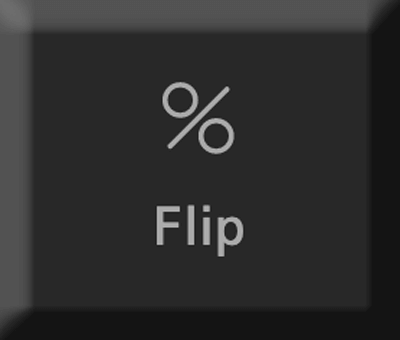
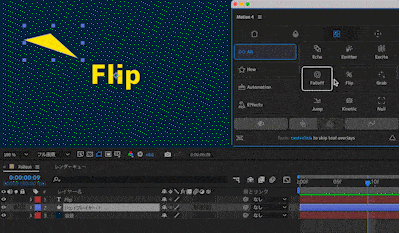
『Filip』ツールは選択したレイヤーのアンカーポイントを軸に垂直・平行・斜め45°、135°にフリップできるツールになります。
アンカーポイントの位置を軸に4方向へフリップできます。

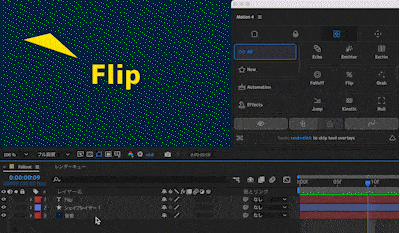
右下にある『Group』ボタンの機能はよくわかりませんでした…_(┐「ε:)_
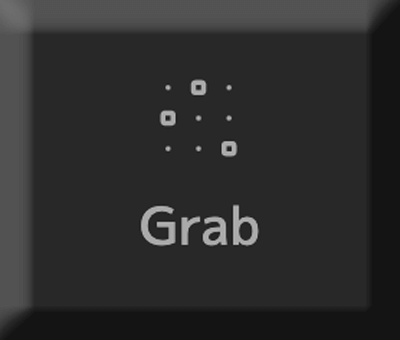
『Grab』は指定したプロパティーを一括選択できるツールになります。
通常は複数のレイヤーの特定のプロパティーを一度に選択して一括調整したい場合には
調整したいプロパティーを1つ1つ選択する、もしくは特定のプロパティーを一括で開いてドラッグで複数選択する必要があります。

①『Grab』ツールを使えば、1つのレイヤーの調整したいプロパティー、例えば『位置』を選択した状態で『Grab』を適用すれば
全てのレイヤーの位置プロパティーを一括選択できます。
② 特定範囲のレイヤーのプロパティーを一括選択したい場合には
一つのレイヤーでプロパティーを選択した状態で位置を選択したいレイヤーをShift+クリックで一括選択▶︎Grabで選択したレイヤーの全ての位置プロパティーを一括選択できます。
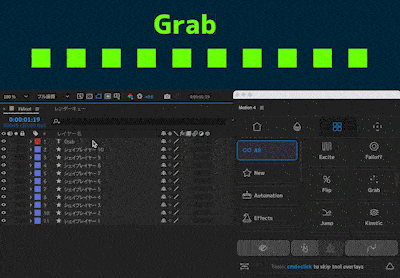
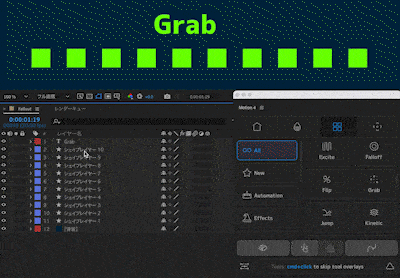
複数のプロパティーをまとめて『Grab』でつかむこともできますd(゚∀゚)
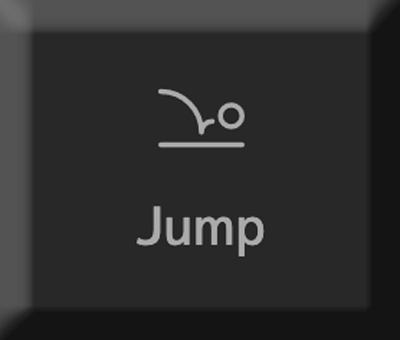
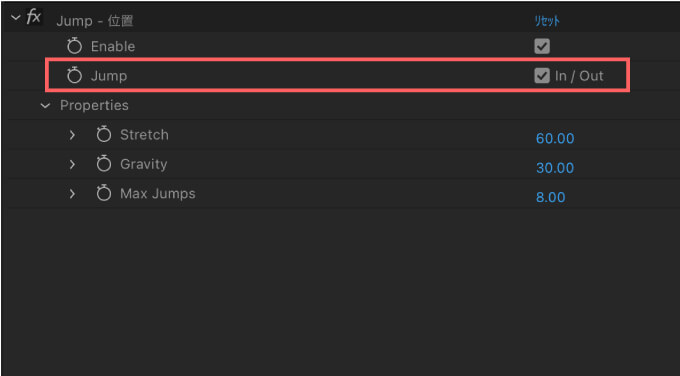
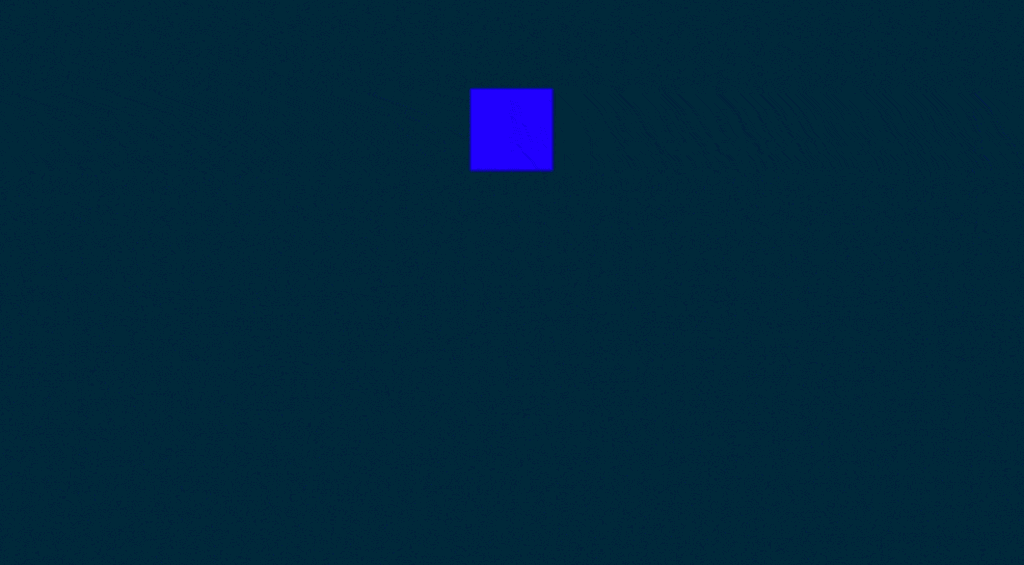
『Jump』は跳ね返り効果(バウンド)をつけることができるツールになります。
他のツールでは『Bounce』と呼ばれることが多いですd(゚∀゚)
バウンド効果をつけたいレイヤーのキーフレームを選択した状態で『Jump』を適用します。
今回は位置プロパティーのキーフレームに適用します。
以下のようなバウンド効果をつけることができます⬇︎⬇︎

デフォルト設定だと跳ね返りが大きいのでエフェクトコントロールパネルの以下のプロパティーを調整することで跳ね具合をコントロールします。
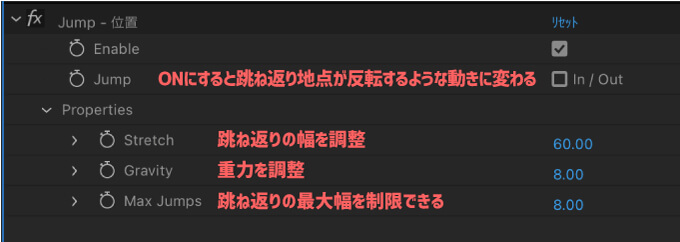


Gravity ▶︎ 30
Gravity ▶︎ 80
Max Jump ▶︎ 10
『Jump』のIn/OutをONにすると跳ね返りの軸が反転したような動きになるので
応用すれば以下のような動きのアニメーションをつけることができます⬇︎⬇︎

『Null』は選択したレイヤーを一括コントロールできる親ヌルを作成できるツールになります。
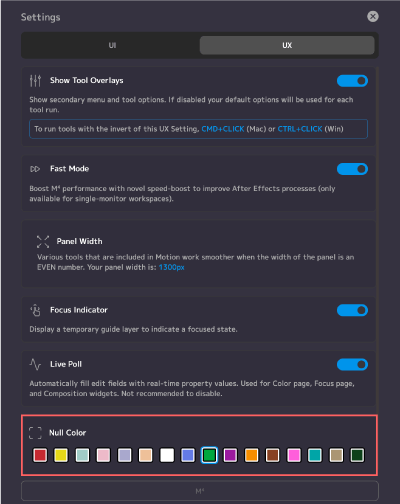
『Settings』▶︎『UX』▶︎『Null Color』でヌルレイヤー作成時のラベルカラーを設定変更することができます。
一括でコントロールしたいレイヤーを選択した状態で『Null』ツールを適用すると
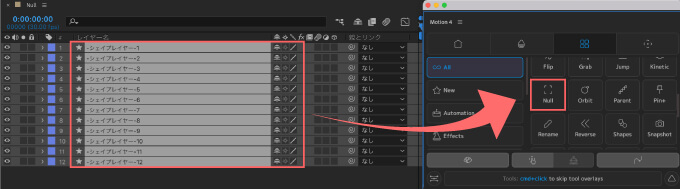
新規で親ヌルが作成され、選択したレイヤーが全て『子』として親ヌルにリンクします。
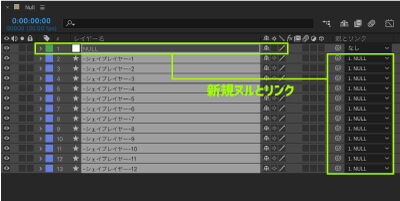
『Settings』▶︎『UX』▶︎『Null Color』でヌルレイヤー作成時のラベルカラーを設定変更することができます٩( ᐛ )و
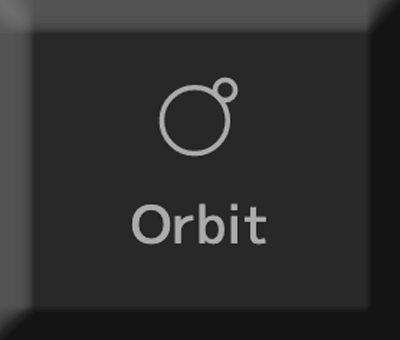
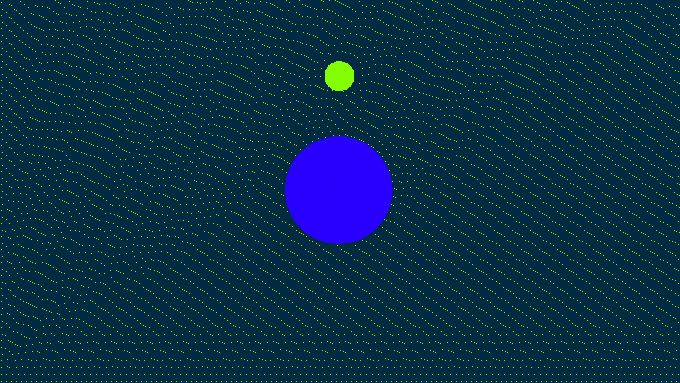
『Orbit』は指定したレイヤーの周りを回転させることができるツールです。
例えば、2つシェイプレイヤーを準備して、外側のレイヤー(黄色)を選択した状態で『Orbit』ツールを適用します。
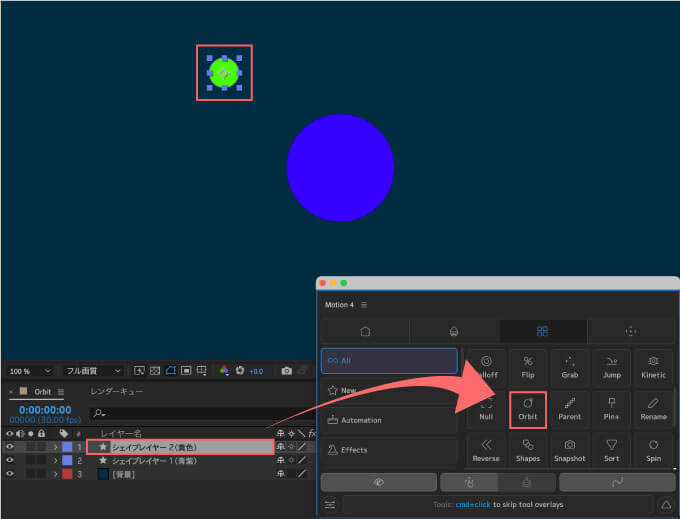
エフェクト(位置)が適用されるので『Taget』の設定をプレビューの中心にあるシェイプレイヤー1(青紫)に設定します。
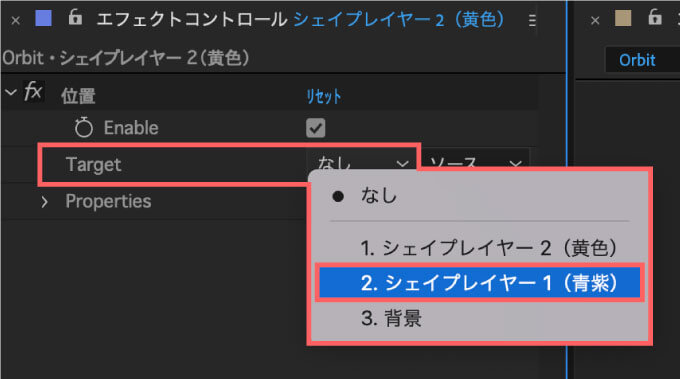
これで『Target』に設定したシェイプレイヤー1(青紫)を起点にシェイプレイヤ−2(黄色)が周囲を回転します。
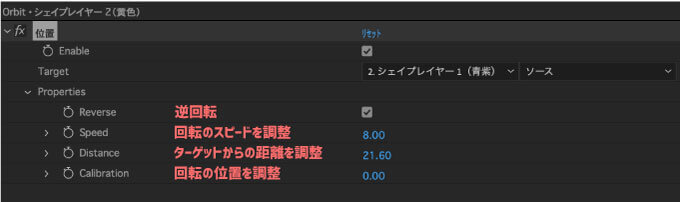
エフェクトの『Properties』を調整することで回転の位置や距離、スピードをコントロールできます。
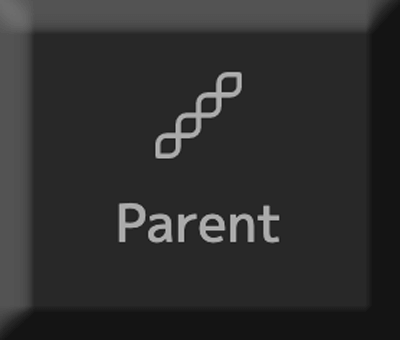
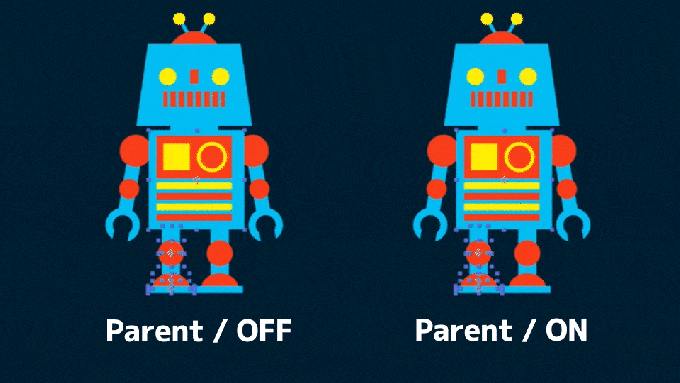
『Parent』はレイヤーを選択した順序で交互に親子設定することができるツールになります。
『Parent』を適用すると選択した順序で交互に親子づけ(チェーン)を作ってくれます。
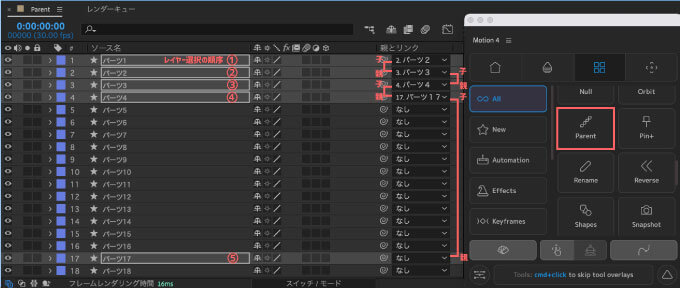
足先から下腿→大腿→胴体など親として接続される順序が決まってる場合に時間を節約することができます。
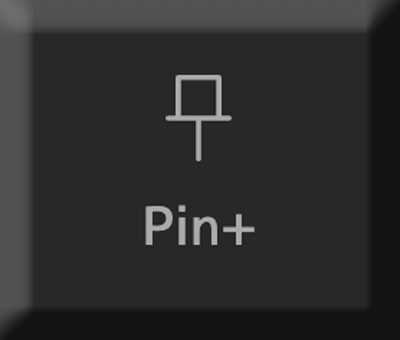
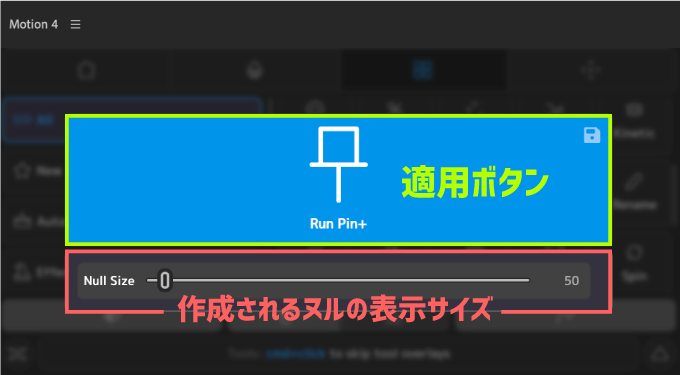
『Pin+』ではパペットツールでつけたピンをヌルオブジェクトに変換してくれるツールになります。
パペットツールでピンをつけたレイヤーを選択した状態で『Pin+』を選択すると
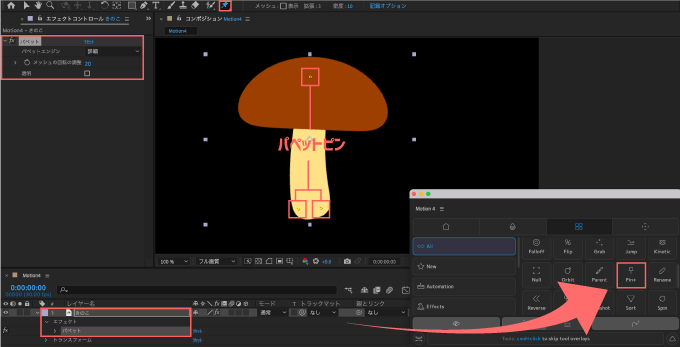
以下のパネルが表示されます⬇︎⬇︎
ヌルのサイズを設定して『Run Pin+』で適用すると
各ピン毎にヌルレイヤーが作成され
全てのヌルレイヤーの親ヌルとして大きいサイズのヌル(CONTROL)が1つ作成されます。
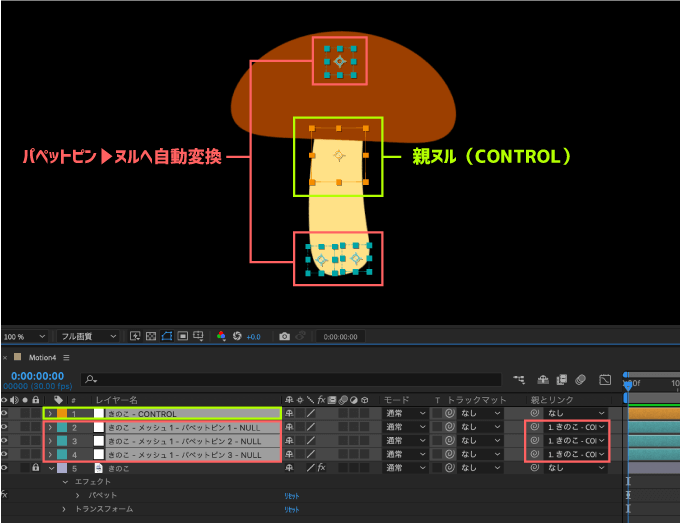
ピンごとにレイヤー分けされるので、タイムライン上で各ピンが扱いやすくなり
親子づけも視覚的にわかりやすいので操作もしやすくなります。
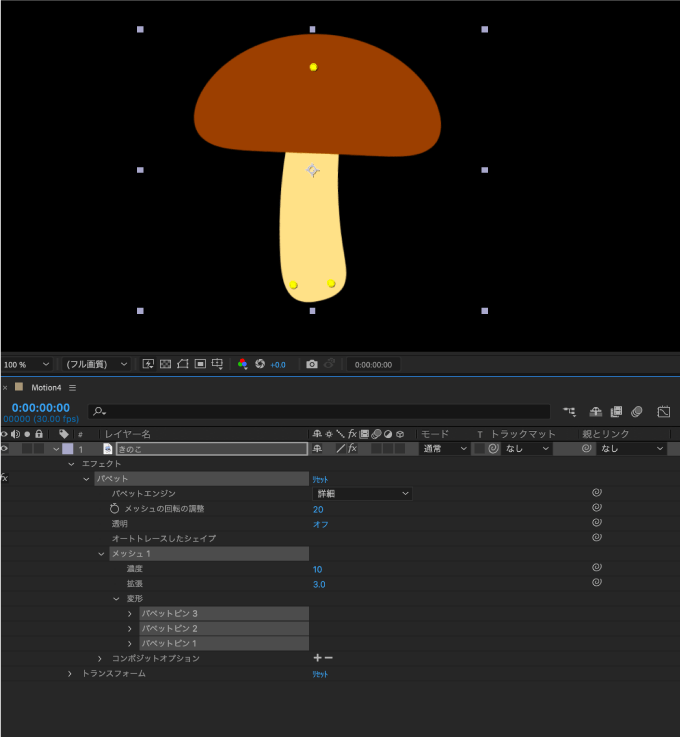
ただし、パペットピンの便利機能
例えば、オブジェクトに影響を与える範囲を視覚的に調整できるメッシュ機能が使えなかったり
動かすと自動でキーフレームが打たれたり
Ctrl or commandを押しながら動かすことでタイムリーに軌道をキーフレームに反映できる機能など使えなくなります。
簡単な操作でチャチャッとアニメーションをつけたいときに『Pin+』は便利なツールですd(゚∀゚)
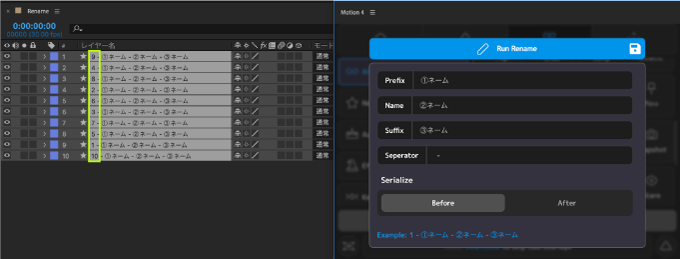
『Rename』ツールは選択したレイヤーの名前を一括でリネームすることができるツールになります。
『Rename』のツールパネルでは以下の設定ができます⬇︎⬇︎

下の方にリネーム後の名前が表示されるのでわかりやすいですd(゚∀゚)
選択したレイヤーの順番で番号がつきます。


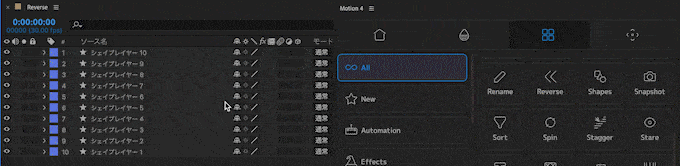
『Reverse』は選択したレイヤーの並びを反転することができるツールになります。
例えば、シェイプレイヤーをCtrlor command+ D で複製すると
上層に複製されていくのでレイヤー名の数字は逆さまになります。

順序を反転させたいレイヤーを選択した状態で『Reverse』を適用すると
レイヤーの並びが反転します。

『Sort』はプロジェクト内のファイルを種類別に自動でフォルダ分けしてくれるツールになります。
『Sort』ボタンをクリックすると以下の設定パネルが表示されます⬇︎⬇︎
各ファイルを収集したフォルダに付けられる名前を入力します。
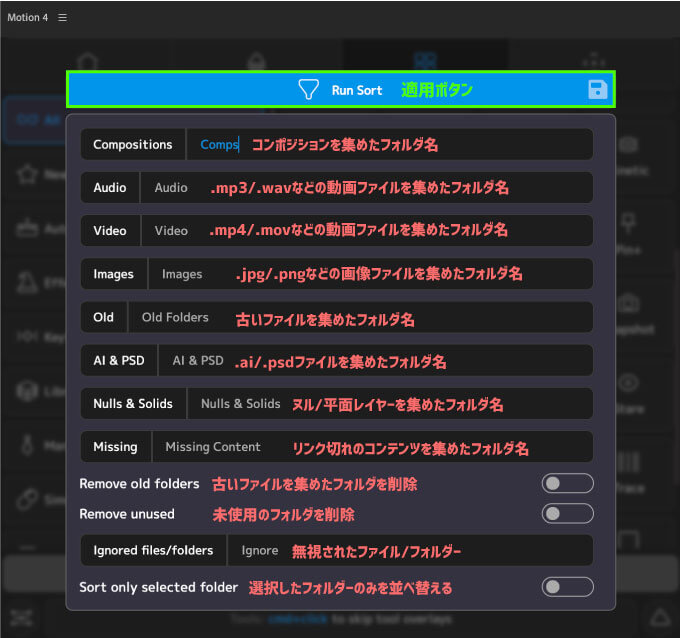
『Ignored files/folders』で収集さえるファイルの種類が分かりません…
分かる方がいたら教えてください( ´ ▽ ` 😉
例として各種類のファイルをプロジェクトパネルに集めてみました⬇︎⬇︎
ファイルを選択する必要はないので、そのまま『Sort』ツールを選択▶︎設定▶︎『Run Sort』で適用します。
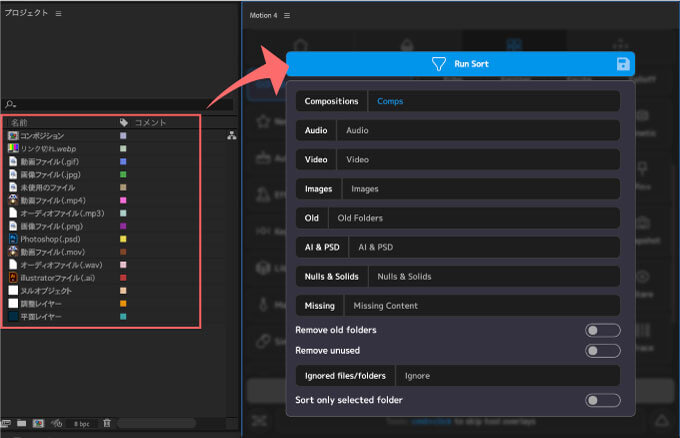
例として各種類のファイルをプロジェクトパネルに集めてみました⬇︎⬇︎
ファイルを選択する必要はないので、そのまま『Sort』ツールを選択▶︎設定▶︎『Run Sort』で適用すると、自動でフォルダ分けしてくれます。
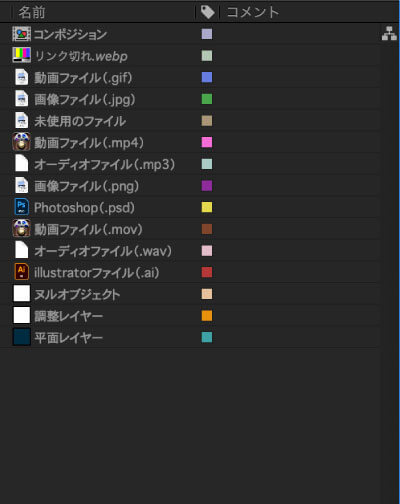
これはかなり重宝しそうですね〜(゚∀゚(゚∀゚)
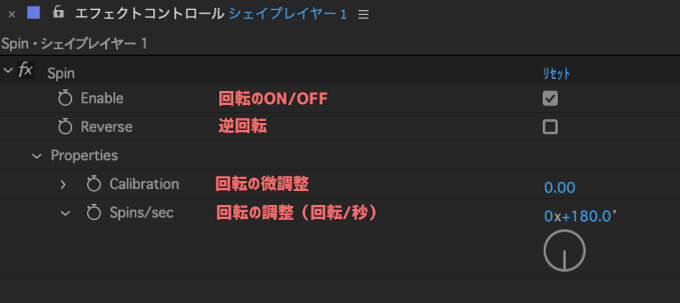
『Spin』はレイヤーを自動的に回転させてコントロールすることができるツールになります。
回転させたいレイヤーを選択して『Spin』ツールを選択します。
『Degrees per second』は1秒間で何度回転するかを設定できます。
デフォルトの180°/秒のまま適用すると
適用したレイヤーが180°/秒で回転します。
回転はエフェクトコントロールプロパティーでコントロールできます。
一々キーフレームを打ったり細かい調整する手間が減るので地味に便利です。
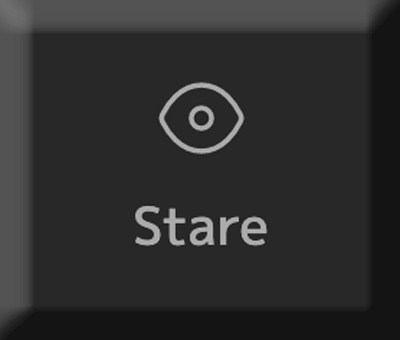
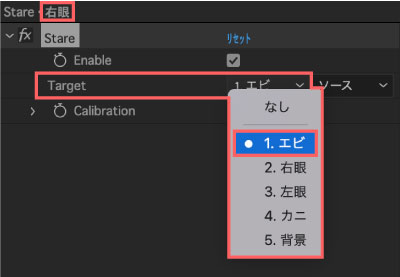
『Stare』はターゲットとして指定レイヤーに他のレイヤーの動きを追従させることができるツールになります。
例えば、カニとエビのレイヤーを用意して、エビを左右に動かすアニメーションをつけます。
カニの眼は左右それぞれ個別のレイヤーを分けておきます。
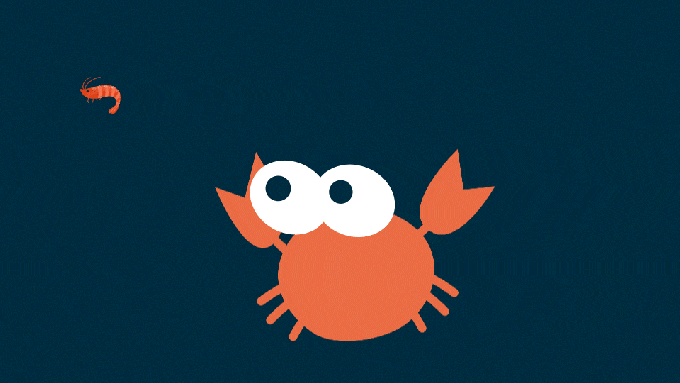
両眼のレイヤーを選択した状態で『Stare』を適用します。
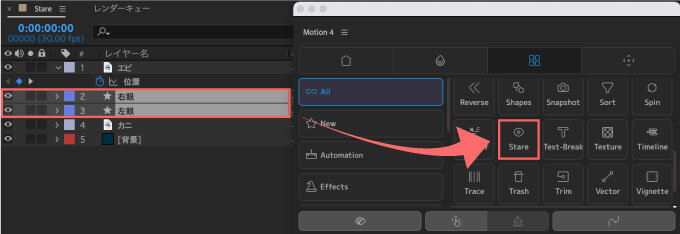
すると、それぞれのレイヤーにエフェクト『Stare』が適用されます。

右眼と左眼のレイヤーそれぞれのエフェクト『Stare』▶︎ Target ▶︎ エビのレイヤーを設定します。
これで左右の眼が『Target』で指定したエビのレイヤーを追従するようになります。

ほとんどの場合、レイヤーの方向が変な方向に向いてしまってると思うので…
まずはレイヤーが動く起点にアンカーポイントを移動します。
あとはエフェクト ▶︎ Calibration の数値を動かして両目の向きをターゲットのエビの方向へそれぞれ調整します。
これでエビの動きに合わせて両眼が自動追従します。
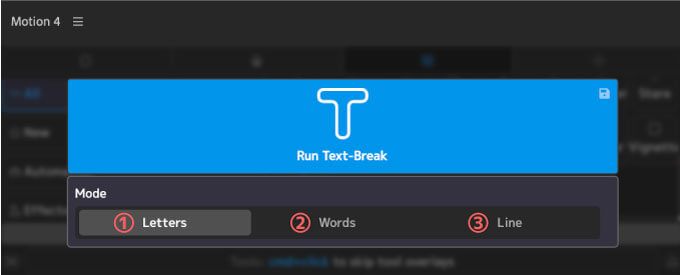
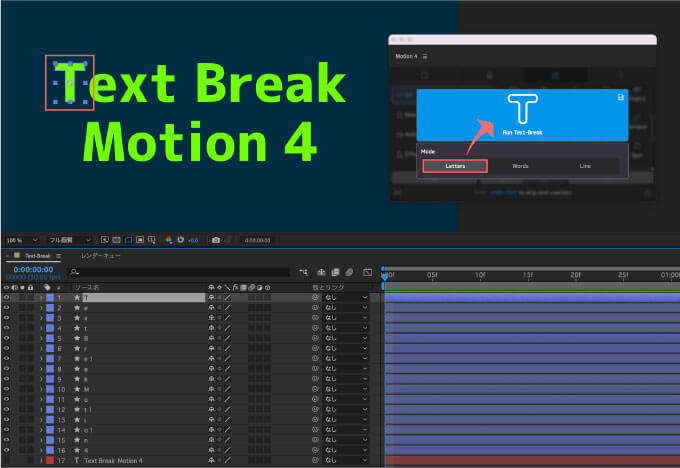
『Text Break』はテキストレイヤーを分解してシェイプ化してくれるツールになります。
『Text Break』では以下の3つの条件設定でテキストレイヤーを分解できます⬇︎⬇︎
① Letters ▶︎ 文字毎に分解
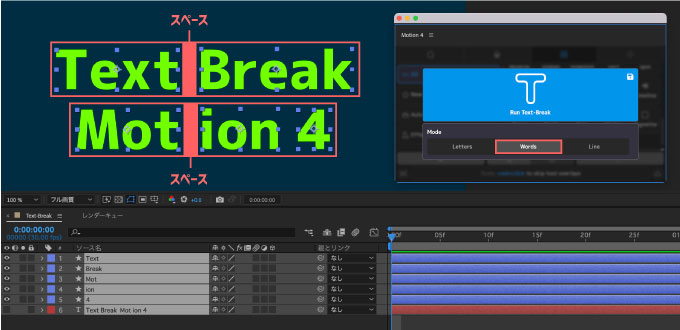
②Words ▶︎ 単語毎に分解
③Line ▶︎ 行毎に分解
① 『Letters』 設定ではテキストレイヤーを文字毎に分解してくれます。
残念ながら…
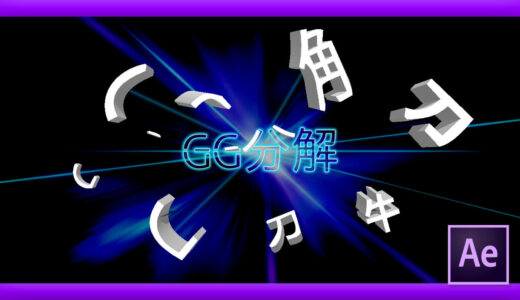
『Text-Break』ツールと同じような機能を持つ無料スクリプト『GG分解』みたいに
『 i 』を2つに分解したりなど、1つの文字を細かく分解することはできません(;´Д`)
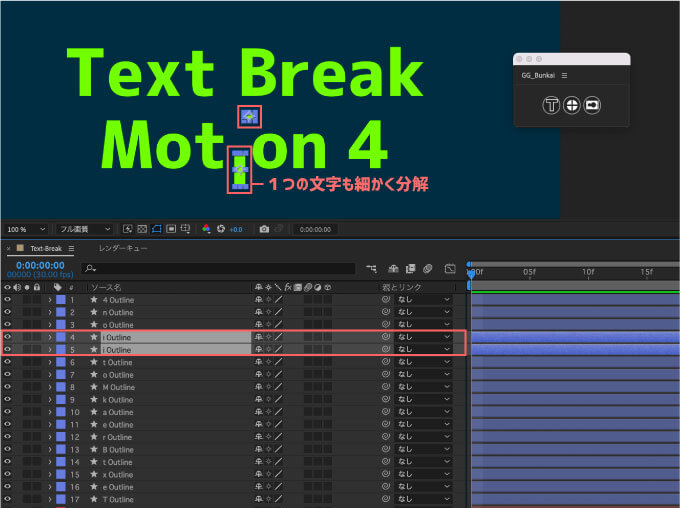
テキストレイヤーをバラバラに分解してくれる無料スクリプト『GG分解』について解説した記事はこちら⬇︎⬇︎
②『Words』設定ではテキストレイヤーを単語毎に分解してくれます。
単語毎に分解するには文字間にスペースを入れる必要があります。
③『Line』設定ではテキストレイヤーを行毎に分解してくれます。
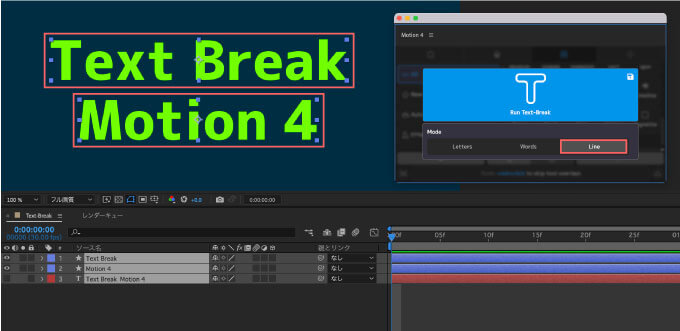
『Line』設定は1つのテキストレイヤーに2行以上テキストがある場合に機能しますd(゚∀゚)
『Texture』は合計103種類のパターンテクスチャーを『Moiton4』から直でインポートできるツールになります。
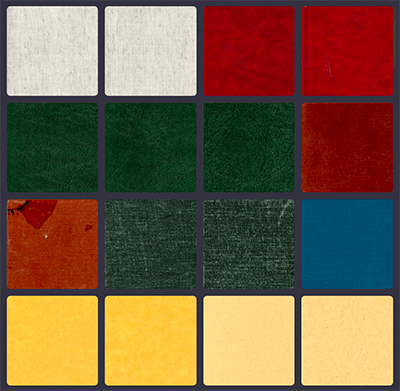
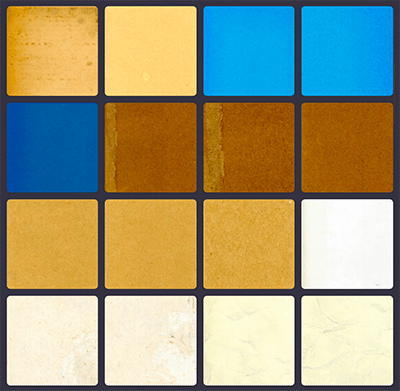

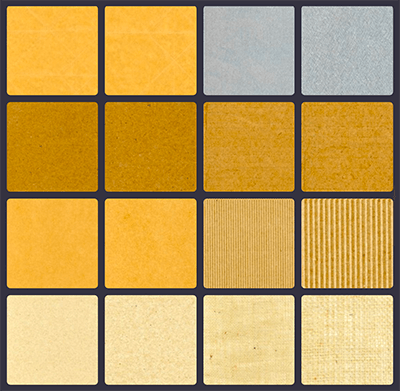
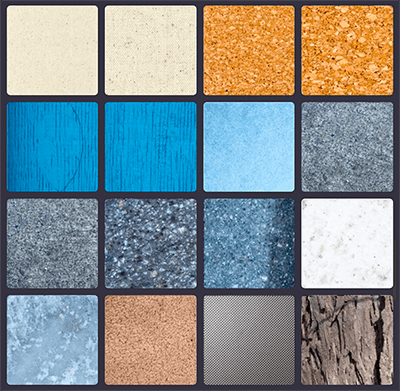
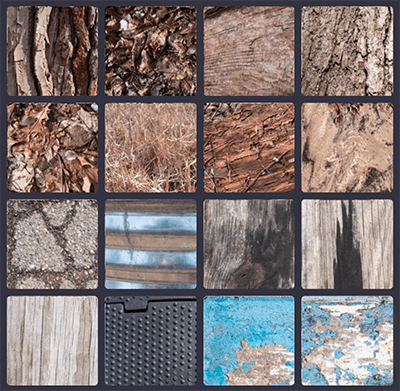

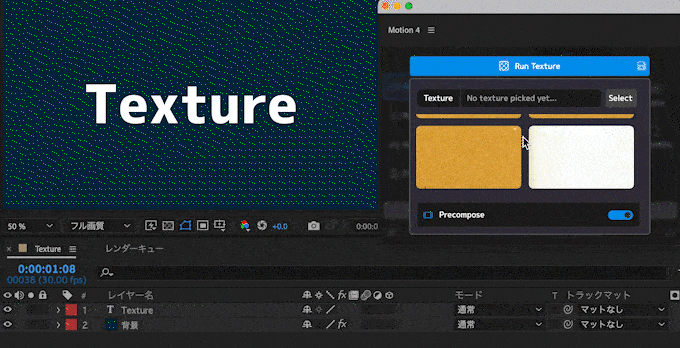
使い方は『Texture』ツールを選択すると利用できるテクスチャーが表示されるので、使いたいテクスチャーを選択して『Run Texture』で適用します。
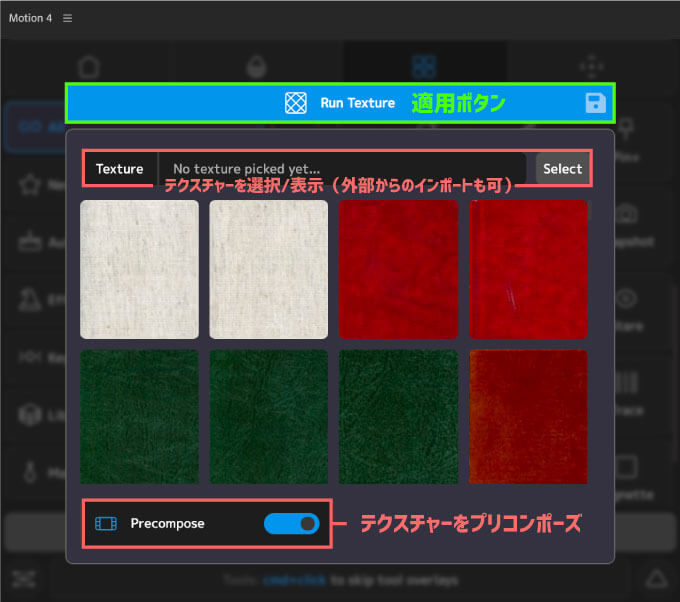
『Select』ボタンを押すとファイルを選択できるウィンドウが開くので、外部からテクスチャーをインポートすることもできます。

『Select』ボタンからインポートファイルは『After Effects』に読み込めるタイプのファイルであれば何でもインポートすることができますd(゚∀゚)
『Composition』ボタンではインポートファイルをコンポジション化することができますが
何かレイヤーを選択した状態で『Texture』を適用しないとコンポジション化されないので注意です。

レイヤー選択なし
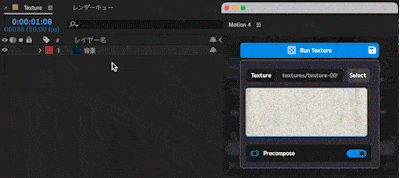
レイヤー選択あり
レイヤーを選択した状態でファイルをインポートしても
選択したレイヤーはまとめてコンポジション化されませんd(゚∀゚)
『Timeline』ツールではタイムラインをスクラブしたりワークエリアの範囲を調整したり『Motion4』のパネルスペースだけでタイムラインをコントロールすることができます。
『Timeline』ツールのパネルには3つタブが用意されていて、それぞれの数値でタイムラインをコントロールすることができます。
Seconds ▶︎ 時間
Frames ▶︎ フレームレート数
H:MM:SS:F ▶︎ タイムコード(H:MM:SS:F 形式)
『Frame Snap』機能はパネル上にあるタイムラインをスクラブしたときに、設定したフレーム数だけスナップしてシークバー(オレンジ)が移動します。
『Trace』はアニメーションの軌跡に沿ってパーティクルのような効果をつけることができるツールになります。
例えば、ロケットが飛んでくアニメーションを作ったとします。
このロケットのレイヤーに『Trace』を適用します。
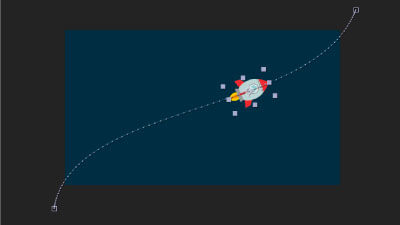

すると、エフェクト『Trace』が適用されてレイヤー(ロケット)の軌跡に沿って白い線が表示されます。

コンポジション化されロックされたレイヤーがあるので、ロックを解除してコンポジションを開きます。
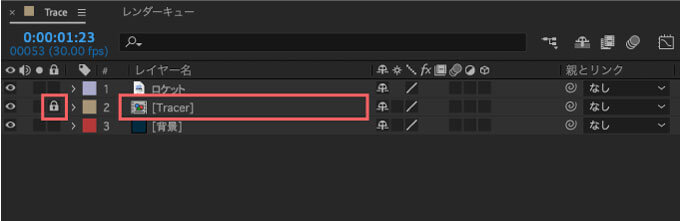
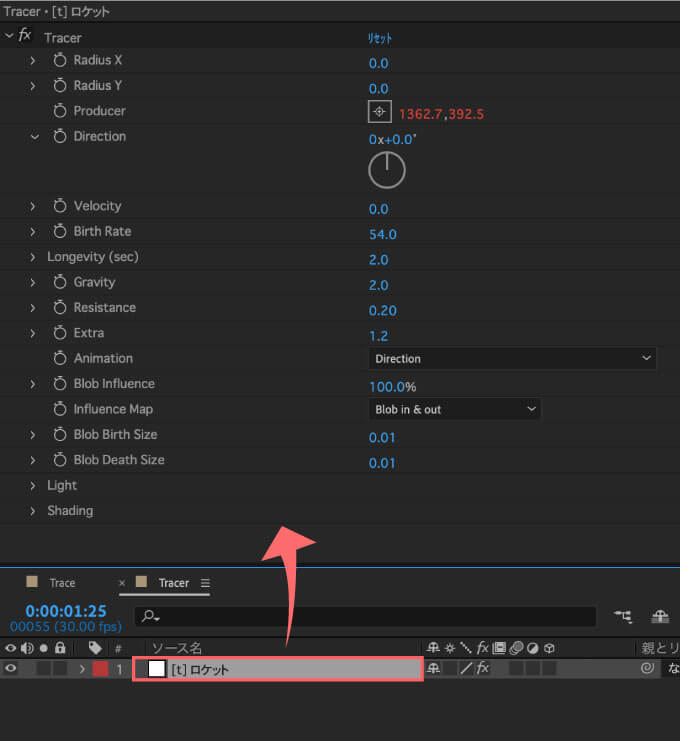
コンポジション内のレイヤーにエフェクト『Tracer』が適用されてるので、このエフェクトプロパティーを触っていくと、パーティクル系のエフェクトと同じようにいろんな表現ができます。

『Trash』は選択したレイヤーのエクスプレッションをワンボタンで削除することができるツールになります。
エクスプレッションがつけられたプロパティーを選択した状態で『Trash』ツールを適用するとエクスプレッションが削除されます。
レイヤーを選択した状態で一気に削除することもできればよかったのですが…_(┐「ε:)_
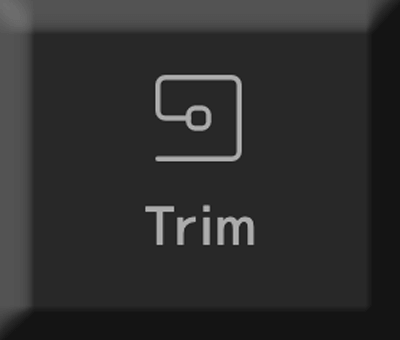
『Trim』はシェイプレイヤーの追加オプションである『パスのトリミング』をワンボタンで追加できるツールになります。
通常は『シェイプレイヤー▶︎コンテンツ▶︎追加▶︎パスのトリミングを適用するまで4工程かかる手順を

『Trim』ツールを使えば、ワンボタンで完結してくれます。
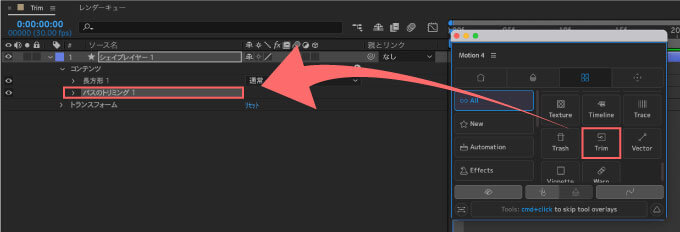
適用したらパスのトリミングを開いてくれる仕様ならもっと良かったのですが…レイヤー選択してるだけでは開いてくれません…_(┐「ε:)_

『Vector』は選択したレイヤー同士に線を引いてアニメーションさせることができます。
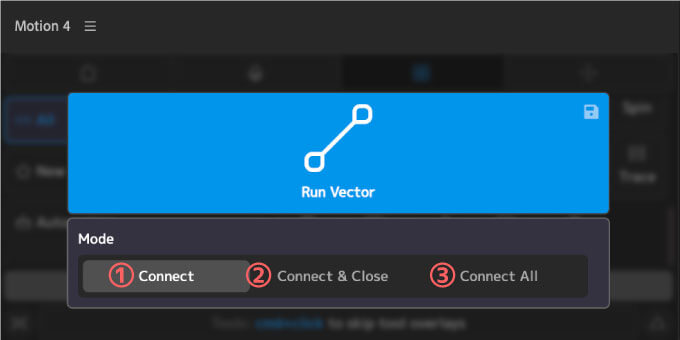
例えば、シェイプレイヤー5つを選択した状態で『Vector』ツールを選択すると
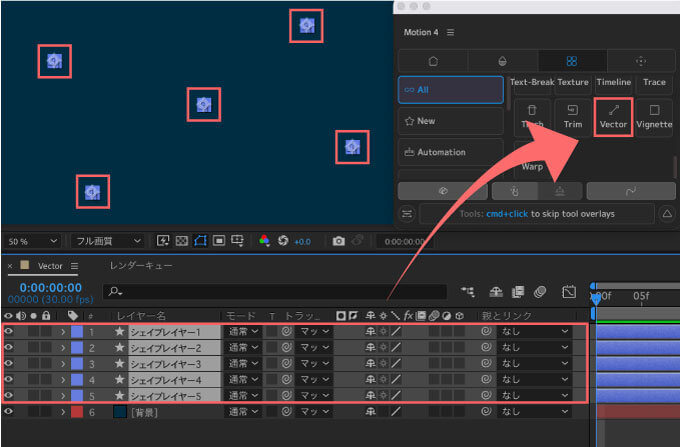
設定パネルが表示されるので『Mode』を3つの中から選択して『Run Vector』で適用します。
今回は ③『Connect All』を選択して適用します。
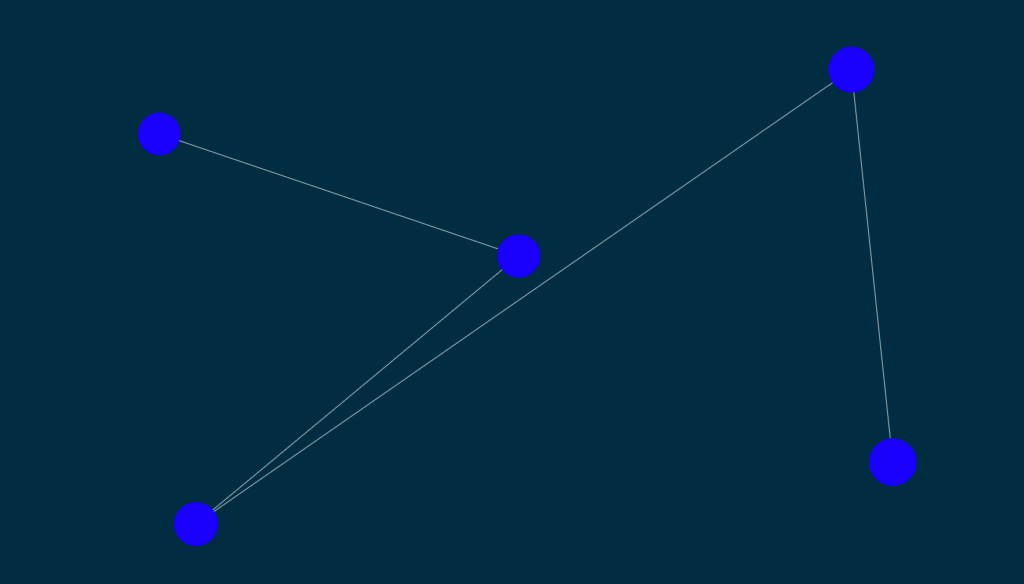
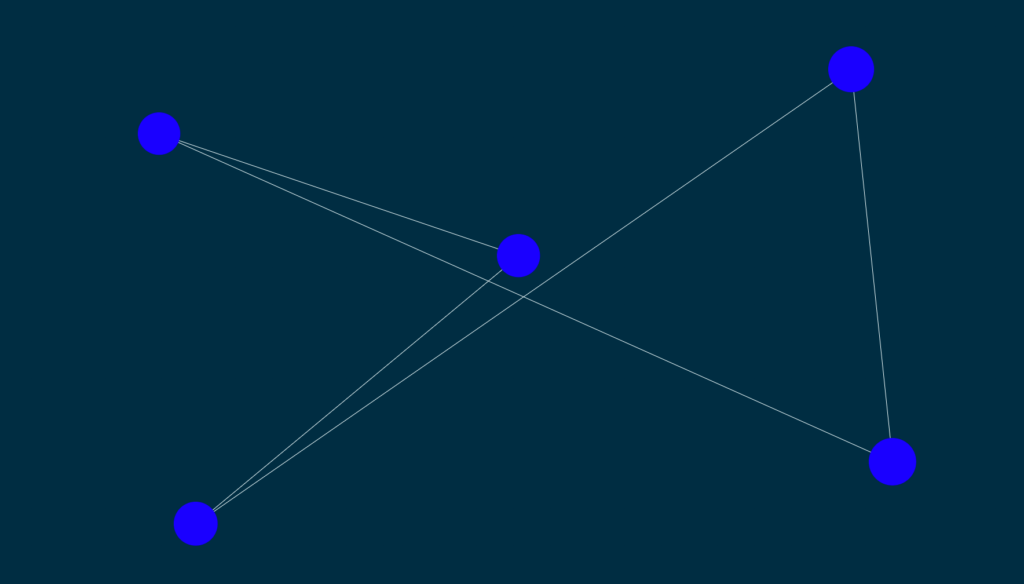
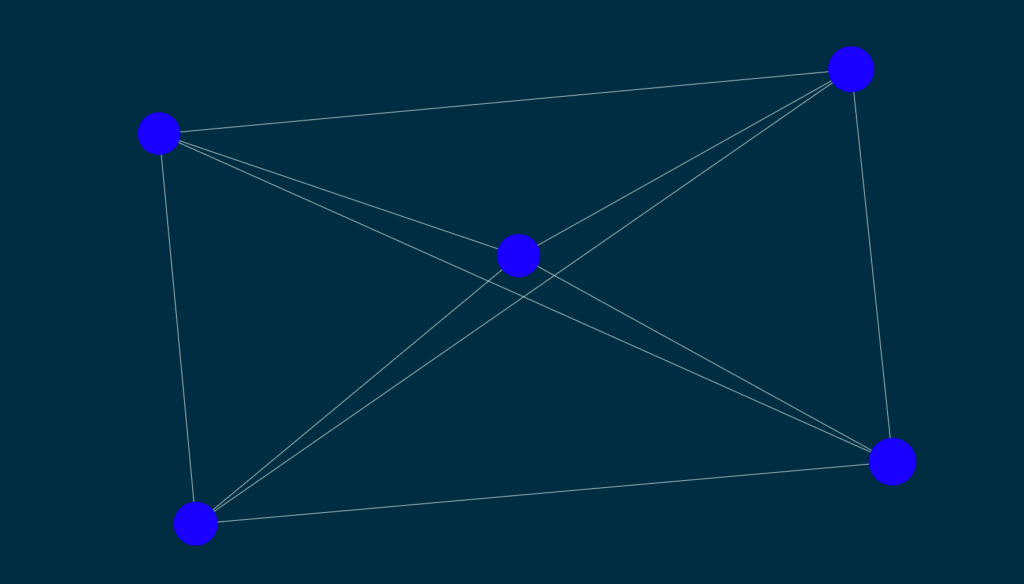
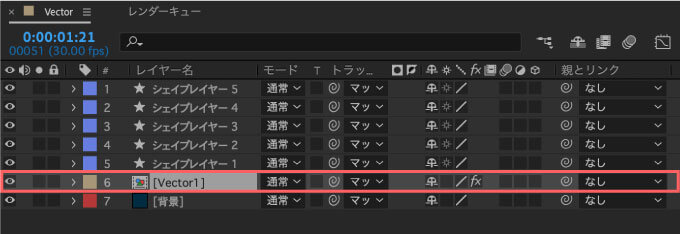
『Vector』のコンポジションが作成されます。
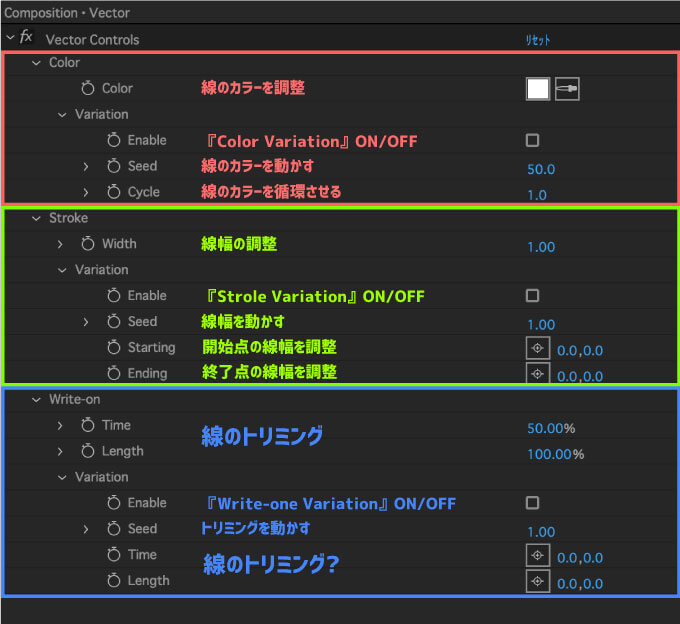
そのコンポジションのエフェクトコントロールパネル ▶︎ Vector Controls の各プロパティーを調整すれば
線のカラーや線幅、線のトリミングなど調整しながらアニメーションをつけることができます。
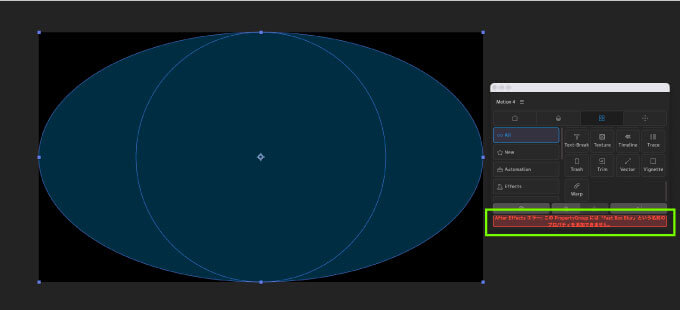
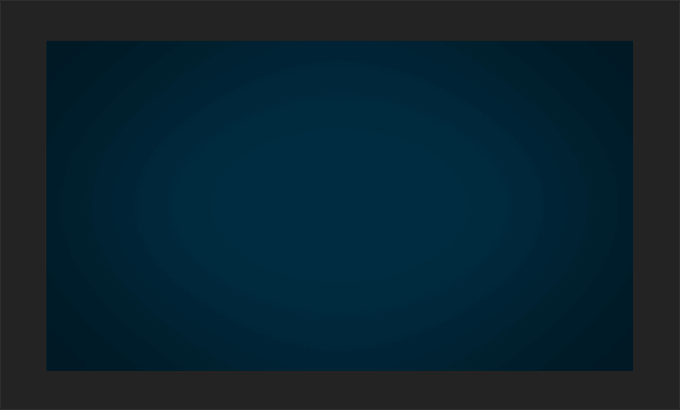
『Vignette』はワンボタンでビネットを適用できるツールになります。
残念ながら私の Mac では『Vignette』を適用すると
『Fast Box Blur』という名前のプロパティを追加できません。』
と表示され、エラーになってしまいます。
通常だと以下のように適用されてビネットを範囲や濃さを調整することができます。
英語版では普通に適用されました…_(┐「ε:)_
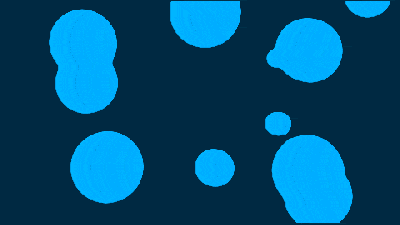
『Warp』はレイヤーにモーショントレイルをつけてモーフィングできるツールになります。
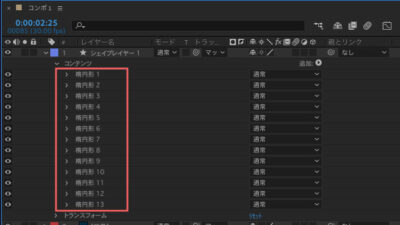
例えば、1つのレイヤーにまとめた複数の楕円形シェイプにアニメーションをつけます。
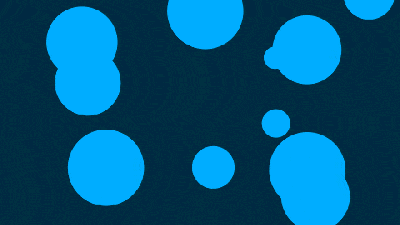
『Warp』は1つのレイヤーでのみ機能するので1つのレイヤーにまとめる、もしくはプリコンプして適用する必要があります٩( ᐛ )و
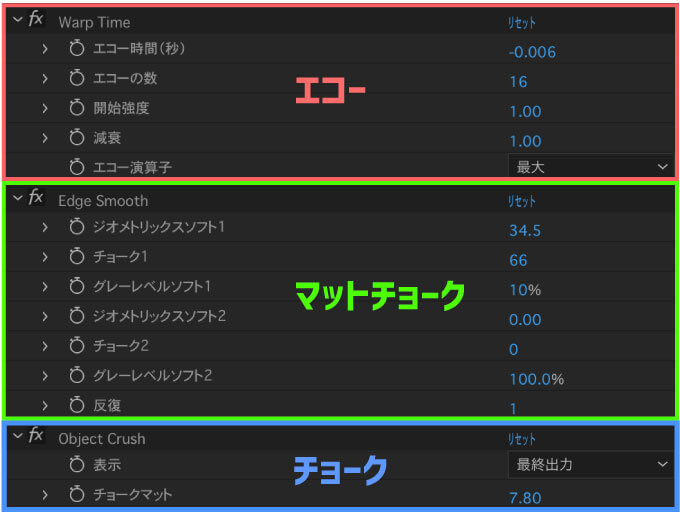
レイヤーを選択した状態で『Warp』を適用するとエフェクト『Warp Time』『Edge Smooth』『Object Crush』が適用され、シェイプ同士が融合して変形するモーフィングみたいな効果がつきます。
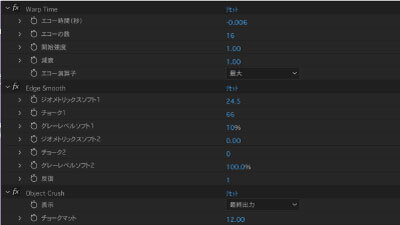
『Warp』で適用された『Warp Time』『Edge Smooth』『Object Crush』は
Warp Time ▶︎ エコー
Edge Smooth ▶︎ チョーク
Object Crush ▶︎ マットチョーク
と、デフォルトのエフェクトプロパティーと内容は全く同じです。
Settings(UI / UX)
『Settings』では『Motion4』のUI/UXの各種設定を変更することができます。
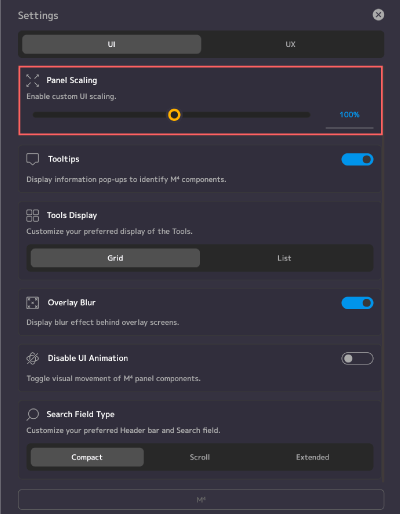
UIのボタンスペースをデフォルト100%を基準として50〜150%の間で調整できます。
Enable custom UI Scaling.
カスタム UI スケーリングを有効にします。


ボタンにカーソルを合わせたときに表示されるツールチップスの表示/非表示を切り替えることができます。
Display information pop-ups to identify M4 components.
『Motion4』コンポーネントを識別するための情報ポップアップを表示します。

『Tools』のボタン表示をグリッド表示 or リスト表示に切り替えることができます。
Customize your preferred display of the Tools.
ツールの好みの表示をカスタマイズします。
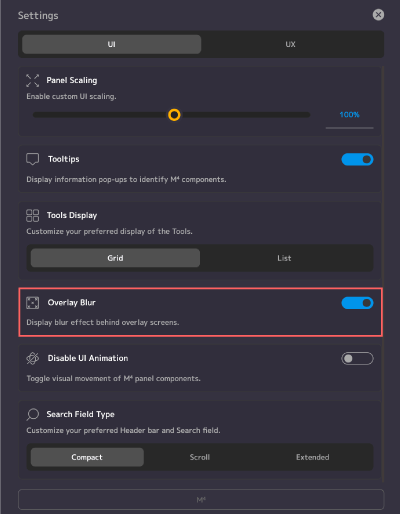
Display blur effect behind overlay screens.
オーバーレイ画面の背後にぼかし効果を表示する。

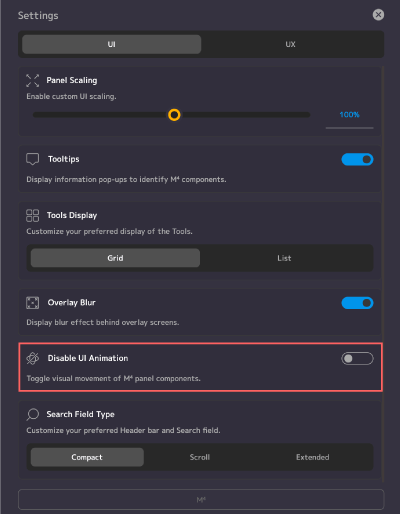
Toggle visual movement of M4 panel components.
『Motion4』パネルコンポーネントの視覚的な動きを切り替えます。
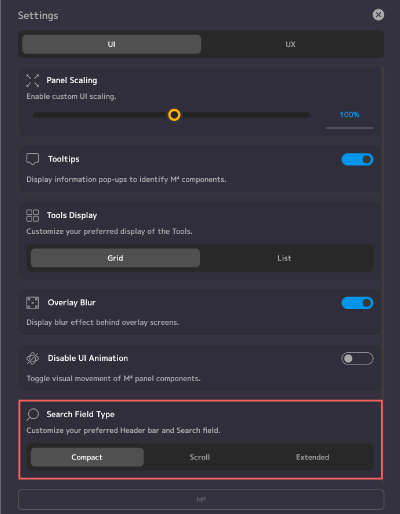
UIに配置される検索バーのタイプを3つから選択することができます。
Customize your preferred Header bar and Search field.
好みのヘッダー バーと検索フィールドをカスタマイズする。
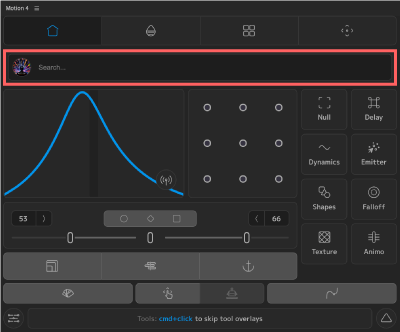
『Search Field Type』▶︎『Scroll』設定では上部4つのタブのどこでもいいので
、カーソルを合わせて上にスクロールすると検索バーと最近使用したツールが表示されます。
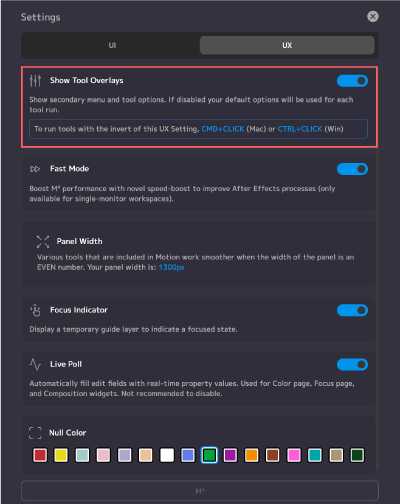
Show secondary menu and tool options. If disabled your default options will be used for each tool run.
To run tools with the invert of this UX Setting, CMD+CLICK (Mac) or CTRL+CLICK (Win).
セカンダリメニューとツールオプションを表示します。 無効にすると、ツールの実行ごとにデフォルトのオプションが使用されます。このUX設定を反転してツールを実行するには、CMD+CLICK (Mac) または CTRL+CLICK (Win)
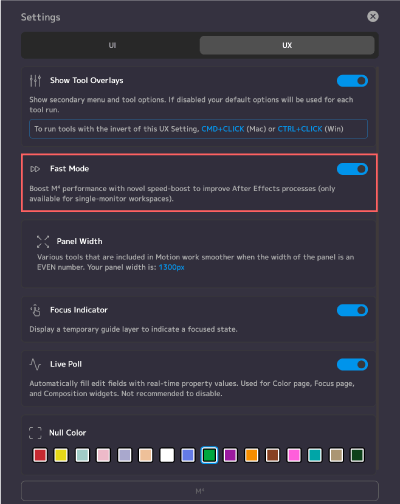
Boost M4 performance with novel speed-boost to improve After Effects processes (only available for single-monitor workspaces).
『After Effects』プロセスを改善するための斬新なスピードブーストで『Motion4』のパフォーマンスを向上させます (シングル モニターのワークスペースでのみ使用可能)。
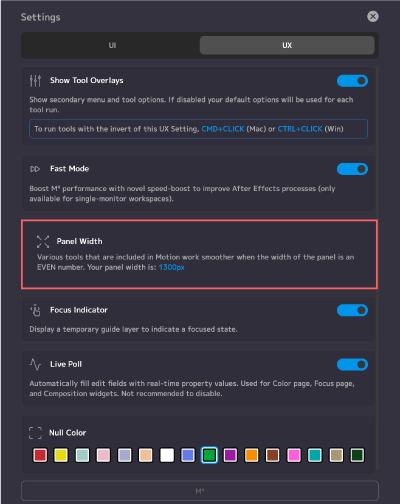
現在のパネルの幅が表示されます。パネル幅を偶数にしておくとレスポンシブがスムーズに動作します。
Various tools that are included in Motion work smoother when the width of the panel is an EVEN number. Your panel width is: 1400px.
モーションに含まれる各種ツールは、パネルの幅が偶数の場合にスムーズに動作します。 パネルの幅: 1400px。
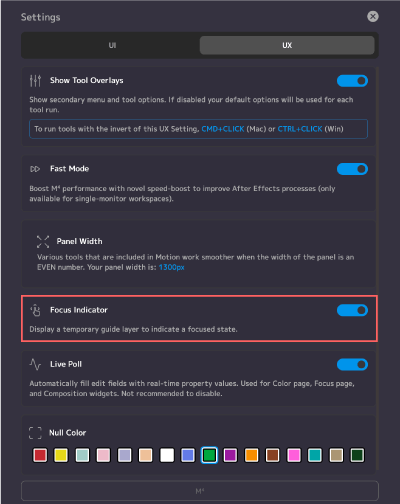
Display a temporary guide layer to indicate a focused state.
一時的なガイドレイヤーを表示して、フォーカス状態を示します。
『Focus』を適用したときに表示するガイドレイヤーの表示・非表示を切り替えることができます。
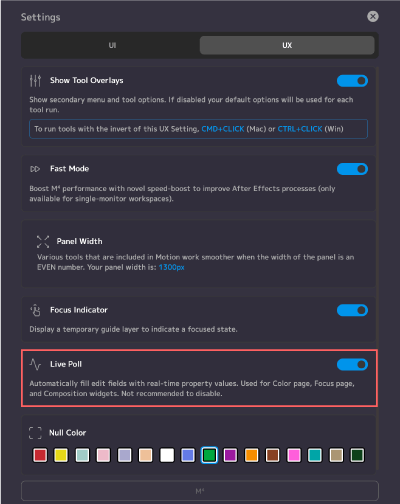
Automatically fill edit fields with real-time property values. Used for Color page, Focus page, and Composition widgets. Not recommended to disable.
編集フィールドにリアルタイムのプロパティ値を自動的に入力します。 カラー ページ、フォーカスページ、コンポジションウィジェットに使用されます。無効にすることはお勧めしません。
『Motion4』で作成するヌルオブジェクトのラベルカラーを設定できます。
最後に
『Motion4』にはかなりたくさんの機能が備わってるので、最初は戸惑うかもしれませんが
自分の編集スタイルに合ったツールパネルを『Home』タブにカスタマイズできれば自分だけの最強ユーティリティーツールとしてかなりの作業効率化に繋がる活躍してくれます。
素晴らしいツールなので、使ったことがない機能もぜひ活用してみてください。
今回紹介した『Motion4』以外にも『After Effects』で使える便利な無料・有料ツールはたくさんあります。
*『After Effects』で使えるおすすめの無料ツールをまとめた記事はこちら⬇︎⬇︎
*『After Effects』で使えるおすすめの有料プラグインやスクリプトをまとめた記事はこちら⬇︎⬇︎
以上、最後まで読んでいただきありがとうございました(=゚ω゚)ノ